Introduction
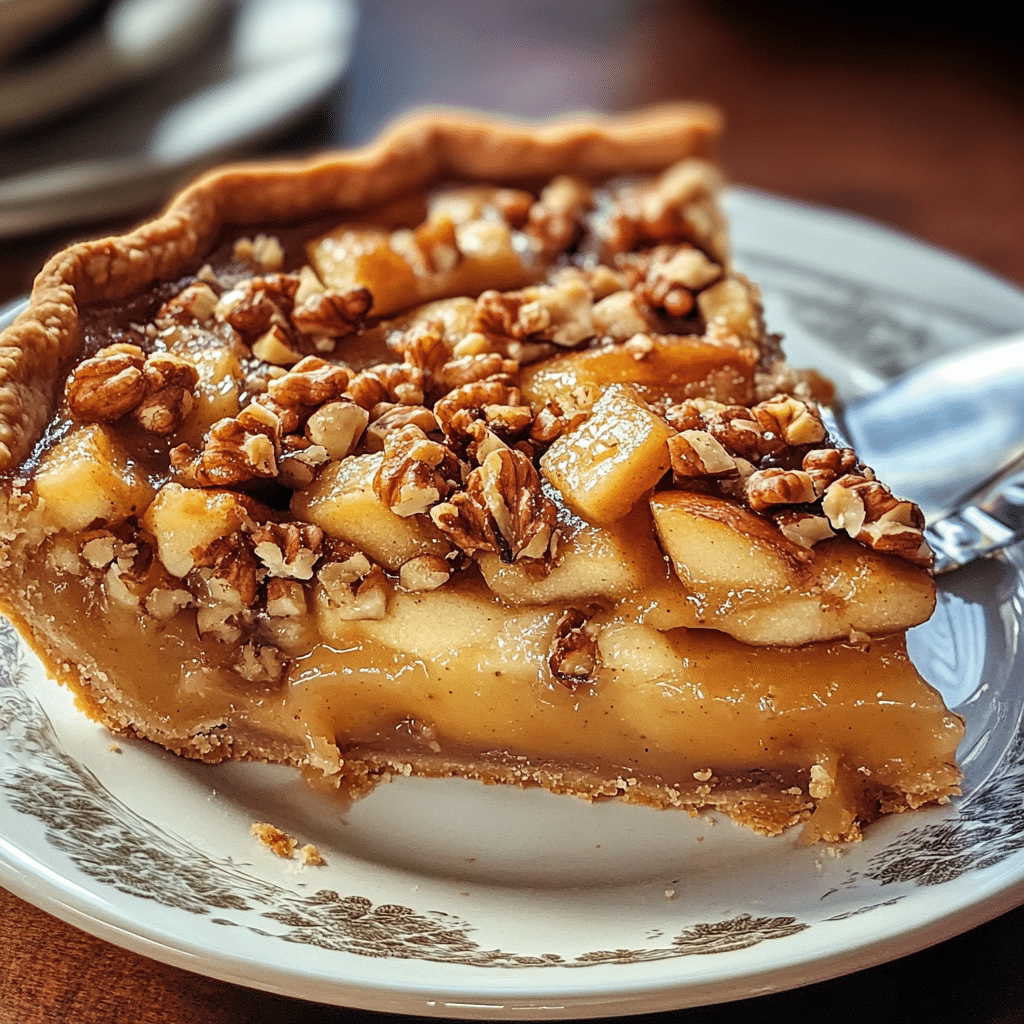
Apple-Walnut Pie is a delightful dessert that embodies the essence of fall, bringing together the sweet and tart flavors of apples with the rich, nutty crunch of walnuts. This classic pie not only evokes nostalgic memories of family gatherings and holiday celebrations, but it also fills your kitchen with an irresistible aroma that beckons everyone to the table. Imagine slicing into a golden-brown crust to reveal a luscious filling, with warm spices and buttery walnuts adding depth to each bite.
I discovered this recipe during a cozy autumn afternoon, seeking something special to celebrate the season. The combination of fresh apples and crunchy walnuts quickly became a family favorite, making its way to our holiday dessert table year after year. Whether enjoyed as a warm slice à la mode or simply on its own, this pie is a comforting treat that’s perfect for any occasion.
What I love most about this recipe is its versatility. It can be adapted based on the types of apples you have on hand, and you can easily adjust the sweetness to suit your taste. Let’s explore why this Apple-Walnut Pie will be a hit in your kitchen and how to make it perfectly every time!
Why You’ll Love This Recipe
Flavorful Filling
The combination of sweet, tart apples and crunchy walnuts creates a complex flavor profile that is both comforting and satisfying. Each bite is a delightful blend of textures and tastes, enhanced by warm spices.
Perfectly Flaky Crust
The homemade pie crust is buttery and flaky, providing the ideal base for the filling. It’s easy to make and adds an extra touch of homemade goodness to the dessert.
Seasonal Ingredients
This pie celebrates the bounty of fall with fresh apples and walnuts. It’s a wonderful way to enjoy seasonal produce and bring the flavors of autumn to your table.
Family-Friendly
Everyone loves pie, and this recipe is no exception! It’s a crowd-pleaser that appeals to both children and adults, making it a great choice for family gatherings.
Make-Ahead Option
This pie can be made in advance and stored in the refrigerator or freezer, making it a convenient dessert option for busy holiday seasons.
Preparation Time and Servings
- Total Time: Approximately 2 hours (30 minutes prep, 1 hour cooking, plus cooling time)
- Servings: This recipe serves about 8 people.
- Nutrition Facts: Calories per serving: 350, Protein: 4g, Carbs: 52g, Fat: 16g.
Ingredients
For the Pie Crust
- 2 ½ cups all-purpose flour: The base for your flaky crust.
- 1 teaspoon salt: Enhances the flavor of the crust.
- 1 teaspoon sugar: Adds a hint of sweetness to the crust.
- 1 cup unsalted butter, chilled and diced: Provides richness and flakiness.
- 6-8 tablespoons ice water: Helps bind the dough without melting the butter.
For the Apple-Walnut Filling
- 6 cups apples, peeled and sliced: Use a mix of tart and sweet apples for the best flavor.
- 1 cup walnuts, chopped: Adds crunch and a rich nutty flavor.
- ¾ cup granulated sugar: Sweetens the filling.
- 1 tablespoon lemon juice: Brightens the flavors and prevents browning.
- 2 teaspoons ground cinnamon: For warmth and spice.
- ¼ teaspoon ground nutmeg: Adds depth to the filling.
- ¼ teaspoon salt: Enhances the overall flavor.
- 2 tablespoons cornstarch: Thickens the filling and prevents it from becoming watery.
Step-by-Step Instructions
STEP 1: MAKE THE PIE CRUST
Prepare the Dough: In a large bowl, combine the flour, salt, and sugar. Add the chilled, diced butter and use a pastry cutter or your fingers to mix until the mixture resembles coarse crumbs.
Add Ice Water: Gradually add ice water, one tablespoon at a time, mixing until the dough comes together. Be careful not to overwork it; you want to keep the butter chunks intact for a flaky crust.
Chill the Dough: Divide the dough into two equal portions, shape each into a disk, wrap in plastic wrap, and refrigerate for at least 30 minutes. This resting period allows the gluten to relax and helps prevent shrinkage during baking.
STEP 2: PREHEAT THE OVEN
While the dough is chilling, preheat your oven to 425°F (220°C). This high temperature will help create a perfectly baked crust.
STEP 3: PREPARE THE FILLING
Prepare the Apples: Peel and slice the apples into thin wedges. In a large mixing bowl, toss the sliced apples with lemon juice, granulated sugar, cinnamon, nutmeg, salt, and cornstarch. Make sure the apples are well coated to ensure even flavor.
Add Walnuts: Gently fold in the chopped walnuts, allowing them to distribute evenly throughout the filling.
STEP 4: ROLL OUT THE DOUGH
Once the dough has chilled, remove one disk from the refrigerator. On a lightly floured surface, roll it out into a circle about 12 inches in diameter. Carefully transfer the rolled dough to a 9-inch pie pan, pressing it into the bottom and sides.
STEP 5: ADD THE FILLING
Pour the apple-walnut filling into the prepared pie crust, spreading it evenly. Be sure to pack the filling slightly to prevent gaps.
STEP 6: TOP WITH SECOND CRUST
Roll out the second disk of dough in the same manner as the first. You can either place it whole over the filling or cut it into strips for a lattice top. If using a whole crust, cut a few slits in the top to allow steam to escape.
STEP 7: SEAL AND CRIMP
If using a whole crust, seal the edges by crimping with your fingers or a fork. This not only looks pretty but also prevents the filling from bubbling over.
STEP 8: ADD A CRUST WASH
For a beautiful golden color, brush the top crust with an egg wash made of one beaten egg mixed with a tablespoon of milk. This step adds shine and enhances the pie’s appearance.
STEP 9: BAKE THE PIE
Place the pie on a baking sheet (to catch any drips) and bake in the preheated oven for 15 minutes. Then, reduce the temperature to 350°F (175°C) and continue baking for an additional 30-35 minutes, or until the apples are tender and the crust is golden brown.
STEP 10: COOL THE PIE
Once baked, remove the pie from the oven and allow it to cool on a wire rack for at least 2 hours. This cooling period helps the filling set, making it easier to slice.
How to Serve
Plating Ideas
- Serve Warm: Slice the pie while it’s still warm and serve it with a scoop of vanilla ice cream or a dollop of whipped cream for an extra special treat.
- Garnish: Consider garnishing with a sprinkle of cinnamon or additional chopped walnuts for added texture and flavor.
Pairing Suggestions
- Beverage Pairings: A warm cup of spiced cider or a glass of dessert wine pairs beautifully with the flavors of apple and walnut. For a non-alcoholic option, consider serving a hot cup of tea.
- Cheese Pairing: For a unique twist, serve slices of pie with a wedge of sharp cheddar cheese, which complements the sweetness of the pie wonderfully.
Additional Tips
- Use a Variety of Apples: A mix of tart and sweet apples, such as Granny Smith and Honeycrisp, creates a more complex flavor in the pie.
- Don’t Overmix the Dough: For the flakiest crust, avoid overworking the dough. Mix just until combined, and keep the butter pieces visible.
- Chill Your Ingredients: Ensure your butter and water are cold. This helps create a tender, flaky crust.
- Prevent Soggy Bottoms: To prevent a soggy bottom crust, consider pre-baking the crust for 10 minutes before adding the filling. This helps set the crust and creates a barrier against moisture.
- Adjust Sweetness: Depending on the tartness of your apples, you may want to adjust the amount of sugar in the filling to suit your taste.
Recipe Variations
Spiced Apple-Walnut Pie
Add a pinch of allspice or ginger to the filling for a spicier flavor profile that enhances the warmth of the pie.
Caramel Apple-Walnut Pie
Drizzle caramel sauce over the apple filling before adding the top crust for an extra layer of sweetness and richness.
Maple Apple-Walnut Pie
Incorporate maple syrup into the filling for a unique flavor twist that perfectly complements the apples and walnuts.
Freezing and Storage
Freezing the Pie
You can freeze the unbaked pie for up to 3 months. Wrap it tightly in plastic wrap and aluminum foil to prevent freezer burn. When ready to bake, you can bake it directly from frozen, just add an extra 10-15 minutes to the baking time.
Storing Leftovers
If you have leftovers, cover the pie and store it in the refrigerator for up to 3 days. Reheat slices in the microwave or enjoy them cold.
FAQ Section
Can I use store-bought pie crust?
Yes! If you’re short on time, feel free to use a pre-made pie crust. Just follow the instructions on the package for baking times and temperatures.
What type of apples are best for pie?
Tart apples like Granny Smith or Braeburn pair well with sweeter varieties like Honeycrisp or Fuji. A mix ensures a balanced flavor.
Can
I make this pie gluten-free?
Yes! Substitute all-purpose flour with a gluten-free flour blend. Be sure to check that your other ingredients, like baking powder, are gluten-free as well.
How can I make the pie ahead of time?
You can prepare the pie a day in advance and store it in the refrigerator. Just reheat before serving, or enjoy it cold.
Can I make mini pies instead?
Absolutely! Follow the same instructions but use a muffin tin for mini pies. Adjust the baking time as needed, usually around 20-25 minutes.
Conclusion
I hope you’re excited to try this Apple-Walnut Pie! It’s a dessert that not only showcases the wonderful flavors of the season but also brings warmth and joy to any gathering. The combination of tender apples, crunchy walnuts, and a flaky crust makes it a comforting treat that everyone will love.
Gather your ingredients, unleash your creativity, and enjoy the delightful flavors of this classic pie. Whether for a holiday celebration or a simple family dinner, it’s bound to be a showstopper. Don’t forget to share your results! I can’t wait to see how your Apple-Walnut Pie turns out—be sure to leave a comment or tag me on social media with your delicious creations. Happy baking!
Print
Apple-Walnut Pie: A Timeless Dessert
- Total Time: 2 hours
Description
Indulge in the comforting warmth of Apple-Walnut Pie, a classic dessert that beautifully marries sweet and tart apples with the rich crunch of walnuts. The pie features a buttery, flaky crust that cradles a luscious filling, infused with aromatic spices like cinnamon and nutmeg. Each bite offers a delightful contrast between the tender apples and the nutty texture of walnuts, creating a symphony of flavors that evoke the essence of fall. Perfect for family gatherings or holiday celebrations, this pie is best enjoyed warm, perhaps with a scoop of vanilla ice cream or a dollop of whipped cream, making it a beloved treat that brings everyone together.
Ingredients
For the Pie Crust
- 2 ½ cups all-purpose flour: The base for your flaky crust.
- 1 teaspoon salt: Enhances the flavor of the crust.
- 1 teaspoon sugar: Adds a hint of sweetness to the crust.
- 1 cup unsalted butter, chilled and diced: Provides richness and flakiness.
- 6–8 tablespoons ice water: Helps bind the dough without melting the butter.
For the Apple-Walnut Filling
- 6 cups apples, peeled and sliced: Use a mix of tart and sweet apples for the best flavor.
- 1 cup walnuts, chopped: Adds crunch and a rich nutty flavor.
- ¾ cup granulated sugar: Sweetens the filling.
- 1 tablespoon lemon juice: Brightens the flavors and prevents browning.
- 2 teaspoons ground cinnamon: For warmth and spice.
- ¼ teaspoon ground nutmeg: Adds depth to the filling.
- ¼ teaspoon salt: Enhances the overall flavor.
- 2 tablespoons cornstarch: Thickens the filling and prevents it from becoming watery.
Instructions
STEP 1: MAKE THE PIE CRUST
Prepare the Dough: In a large bowl, combine the flour, salt, and sugar. Add the chilled, diced butter and use a pastry cutter or your fingers to mix until the mixture resembles coarse crumbs.
Add Ice Water: Gradually add ice water, one tablespoon at a time, mixing until the dough comes together. Be careful not to overwork it; you want to keep the butter chunks intact for a flaky crust.
Chill the Dough: Divide the dough into two equal portions, shape each into a disk, wrap in plastic wrap, and refrigerate for at least 30 minutes. This resting period allows the gluten to relax and helps prevent shrinkage during baking.
STEP 2: PREHEAT THE OVEN
While the dough is chilling, preheat your oven to 425°F (220°C). This high temperature will help create a perfectly baked crust.
STEP 3: PREPARE THE FILLING
Prepare the Apples: Peel and slice the apples into thin wedges. In a large mixing bowl, toss the sliced apples with lemon juice, granulated sugar, cinnamon, nutmeg, salt, and cornstarch. Make sure the apples are well coated to ensure even flavor.
Add Walnuts: Gently fold in the chopped walnuts, allowing them to distribute evenly throughout the filling.
STEP 4: ROLL OUT THE DOUGH
Once the dough has chilled, remove one disk from the refrigerator. On a lightly floured surface, roll it out into a circle about 12 inches in diameter. Carefully transfer the rolled dough to a 9-inch pie pan, pressing it into the bottom and sides.
STEP 5: ADD THE FILLING
Pour the apple-walnut filling into the prepared pie crust, spreading it evenly. Be sure to pack the filling slightly to prevent gaps.
STEP 6: TOP WITH SECOND CRUST
Roll out the second disk of dough in the same manner as the first. You can either place it whole over the filling or cut it into strips for a lattice top. If using a whole crust, cut a few slits in the top to allow steam to escape.
STEP 7: SEAL AND CRIMP
If using a whole crust, seal the edges by crimping with your fingers or a fork. This not only looks pretty but also prevents the filling from bubbling over.
STEP 8: ADD A CRUST WASH
For a beautiful golden color, brush the top crust with an egg wash made of one beaten egg mixed with a tablespoon of milk. This step adds shine and enhances the pie’s appearance.
STEP 9: BAKE THE PIE
Place the pie on a baking sheet (to catch any drips) and bake in the preheated oven for 15 minutes. Then, reduce the temperature to 350°F (175°C) and continue baking for an additional 30-35 minutes, or until the apples are tender and the crust is golden brown.
STEP 10: COOL THE PIE
Once baked, remove the pie from the oven and allow it to cool on a wire rack for at least 2 hours. This cooling period helps the filling set, making it easier to slice.
- Prep Time: 30 minutes
- Cook Time: 1 hour plus cooling time
Nutrition
- Calories: 350 kcal
- Fat: 16g
- Carbohydrates: 52g
- Protein: 4g

