Introduction
As the holiday season approaches, the aroma of a perfectly cooked turkey fills the air, bringing warmth and joy to gatherings with family and friends. Applewood Smoked Turkey stands out as a delicious and festive centerpiece that elevates any holiday feast. The combination of tender, juicy meat infused with the subtle sweetness of applewood smoke creates a flavor experience that is both comforting and unforgettable.
I discovered this method of preparing turkey during a family gathering, and it quickly became a cherished tradition. The smoky flavor paired with herbs and spices not only enhances the natural taste of the turkey but also adds an impressive touch to the dinner table. Whether you’re hosting a Thanksgiving feast or a holiday get-together, this smoked turkey will leave your guests raving and asking for seconds. Let’s dive into why this recipe is a must-try and how to achieve turkey perfection!
Why You’ll Love This Recipe
- Unique Flavor: The applewood smoke imparts a subtle sweetness that complements the savory notes of the turkey, creating a depth of flavor that will impress your guests.
- Juicy and Tender: Smoking the turkey ensures it stays moist and flavorful, preventing the dryness often associated with traditional roasting methods.
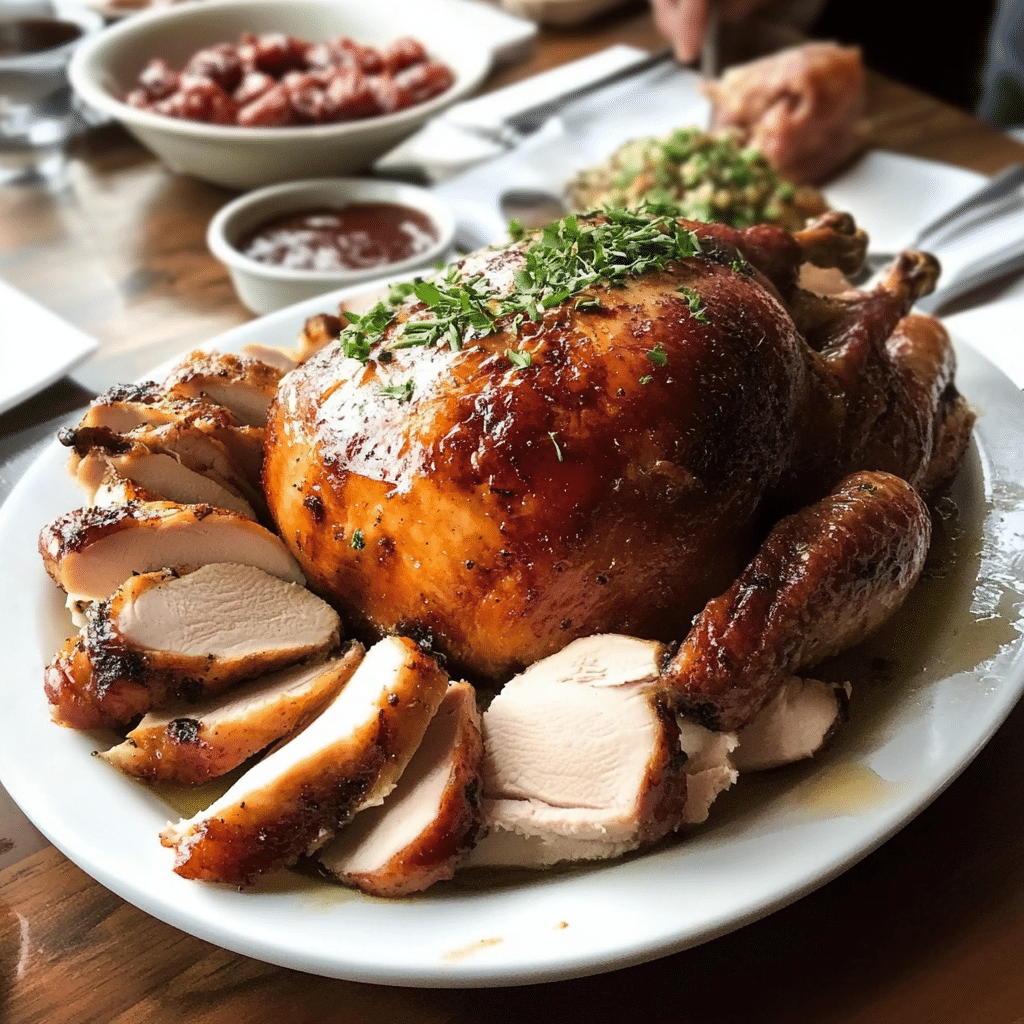
- Impressive Presentation: A beautifully smoked turkey makes for a stunning centerpiece, sure to captivate your audience and serve as a focal point on your holiday table.
- Versatile Cooking Method: This recipe can be adapted for various occasions, from festive holidays to summer barbecues, making it a versatile choice for any gathering.
- Leftover Magic: Smoked turkey leftovers can be transformed into delicious sandwiches, soups, and salads, ensuring that not a morsel goes to waste.
- Healthy Alternative: Compared to many other holiday dishes, smoked turkey is a lean source of protein, making it a healthier option for those watching their diets during the festive season.
Preparation Time and Servings
- Total Time: 8-10 hours (including brining and smoking time)
- Servings: This recipe serves approximately 8-10 people, making it ideal for gatherings of friends and family.
- Nutrition Facts: Calories per serving: 400, Protein: 60g, Carbs: 0g, Fat: 20g. This information can help you plan your meals, especially if you’re counting calories or macronutrients.
Ingredients
For the Brine:
- 1 cup kosher salt: Essential for flavor and moisture retention.
- ½ cup brown sugar: Adds sweetness to balance the salt and enhances the overall taste.
- 1 gallon water: The base for the brine solution.
- 4 cloves garlic, minced: For aromatic flavor that infuses the turkey.
- 1 tablespoon black peppercorns: Adds a hint of spice and depth.
- 2-3 sprigs fresh rosemary: Infuses herbal notes and a lovely aroma.
- 2-3 sprigs fresh thyme: Enhances flavor complexity and freshness.
For the Turkey:
- 1 whole turkey (12-14 pounds): The star of the meal, choose a fresh, high-quality turkey for the best results.
- 2 tablespoons olive oil: Helps the skin crisp up during smoking and adds flavor.
- Salt and pepper: For seasoning; use generously to ensure flavor.
- 2-3 apples, quartered: To enhance the applewood flavor and add moisture during cooking.
- 1 onion, quartered: Adds sweetness and flavor as it cooks and infuses the meat.
- Optional: Fresh herbs for garnish: Such as parsley or thyme, to add a pop of color and freshness to your presentation.
For the Applewood Chips:
- Applewood smoking chips: For that signature flavor; soak in water for at least 30 minutes before using to ensure they smoke rather than burn.
Step-by-Step Instructions
STEP 1: PREPARE THE BRINE
In a large pot, combine the kosher salt, brown sugar, and water. Heat over medium until the salt and sugar dissolve completely. This step is crucial as it allows the brine to fully penetrate the turkey, enhancing its flavor and moisture content. Once dissolved, remove from heat and stir in the minced garlic, black peppercorns, rosemary, and thyme. Allow the brine to cool to room temperature, which is important to avoid cooking the turkey prematurely.
STEP 2: BRINE THE TURKEY
Once the brine is cool, submerge the turkey in a large container or a brining bag. Pour the brine over the turkey, ensuring it’s fully covered. If using a bag, you can remove as much air as possible to help the brine coat the turkey evenly. Refrigerate for at least 8 hours or overnight for optimal flavor and moisture. This long brining time allows the turkey to absorb the flavors, making it incredibly juicy.
STEP 3: PREPARE FOR SMOKING
Remove the turkey from the brine and rinse it under cold water to remove excess salt. This step helps prevent the turkey from becoming overly salty. Pat it dry with paper towels, inside and out. Drying the turkey will help achieve a crispy skin during the smoking process, which is a delightful contrast to the moist meat inside.
STEP 4: SEASON THE TURKEY
Rub the turkey all over with olive oil, ensuring you coat it well for maximum flavor and browning. Then, season generously with salt and pepper. This simple seasoning will enhance the overall taste of the turkey. Stuff the cavity with quartered apples and onion, which will release moisture and flavor during the smoking process, making the meat even more succulent.
STEP 5: PREHEAT THE SMOKER
Prepare your smoker according to the manufacturer’s instructions. Preheat it to 225°F (107°C) and add the soaked applewood chips to the smoker box or directly onto the coals. This low and slow method allows the turkey to absorb the smoke flavor while cooking evenly.
STEP 6: SMOKE THE TURKEY
Place the turkey on the smoker rack, breast side up. Close the lid and smoke for about 30-40 minutes per pound, or until the internal temperature reaches 165°F (74°C) in the thickest part of the breast and thigh. Make sure to monitor the temperature closely and add more wood chips as needed to maintain consistent smoke.
STEP 7: BASTE (OPTIONAL)
If desired, you can baste the turkey every hour with a mixture of melted butter and herbs to enhance flavor and moisture. This step adds a nice golden color to the skin and ensures the turkey remains juicy. Use a basting brush or a ladle to apply the butter evenly.
STEP 8: REST THE TURKEY
Once the turkey reaches the desired temperature, carefully remove it from the smoker and let it rest for at least 20-30 minutes before carving. This resting period allows the juices to redistribute throughout the meat, ensuring each slice is moist and flavorful.
STEP 9: CARVE AND SERVE
Carve the turkey, starting with the breast meat, followed by the thighs and drumsticks. Arrange the carved turkey on a platter and garnish with fresh herbs for a beautiful presentation. Serve with your favorite sides, such as stuffing, cranberry sauce, and mashed potatoes, and enjoy the compliments from your guests!
How to Serve
- Pair with Sides: Serve with classic sides like mashed potatoes, green bean casserole, and cranberry sauce for a traditional holiday feast. Consider adding roasted vegetables for a colorful and nutritious addition.
- Sauce Options: Consider serving with gravy made from turkey drippings or a tangy apple cider reduction. A simple homemade gravy can elevate the dish further, allowing guests to customize their servings.
- Wine Pairing: A crisp white wine, such as Sauvignon Blanc, or a light-bodied red, like Pinot Noir, complements the flavors beautifully. The acidity in these wines cuts through the richness of the turkey, creating a well-rounded dining experience.
Additional Tips
- Choose the Right Turkey: Opt for a fresh, high-quality turkey for the best flavor and texture. Organic or free-range turkeys often offer richer taste and better texture.
- Don’t Skip the Brine: Brining is essential for keeping the turkey moist during the smoking process. Even if you’re short on time, a few hours of brining can make a significant difference.
- Monitor Temperature: Use a meat thermometer to ensure your turkey is cooked perfectly without overcooking. Insert it into the thickest part of the breast and thigh for the most accurate reading.
- Experiment with Flavors: Feel free to add spices or herbs to the brine for additional flavor. For example, adding citrus peels or other spices can create a unique flavor profile.
- Leftover Storage: Store leftover smoked turkey in an airtight container in the refrigerator for up to 4 days. Ensure it’s cooled down before refrigerating to maintain freshness.
Recipe Variations
- Herb-Infused Brine: Add other herbs like sage or dill to the brine for additional flavor complexity. You can even include a splash of apple cider for a hint of sweetness.
- Spicy Kick: Incorporate red pepper flakes or hot sauce into the brine for a spicy twist that adds an exciting layer of flavor to your turkey.
- Citrus Addition: Add lemon or orange slices to the brine for a bright, zesty flavor that pairs beautifully with the applewood smoke.
- Sweet Glaze: Brush the turkey with a maple syrup or honey glaze during the last hour of smoking for a sweet finish that caramelizes nicely on the skin.
Serving Suggestions
- **Side D
ishes**: Complement the smoked turkey with roasted Brussels sprouts, sweet potato casserole, or a seasonal salad. A fresh cranberry relish can add a vibrant contrast to the rich flavors of the turkey.
- Beverage Pairing: Serve with apple cider, sparkling water, or a festive holiday cocktail. A spiced cider could also enhance the meal’s autumnal feel.
- Kid-Friendly Option: Offer turkey sliders with cranberry sauce for a fun twist that kids will love. Use dinner rolls or slider buns to make mini sandwiches that are easy to handle.
Freezing and Storage
Storage
- Leftover applewood smoked turkey can be stored in an airtight container in the refrigerator for up to 4 days. If you plan on using the leftovers, ensure you keep them separate from other dishes to avoid contamination.
Freezing
- If you have more leftovers than you can eat, consider freezing them. Wrap portions tightly in plastic wrap and aluminum foil, or place them in freezer bags for up to 3 months. Label the bags with the date for easy tracking.
Reheating
- To reheat, place the turkey in the oven at 325°F (165°C) until warmed through, covering it with foil to prevent drying out. Alternatively, you can slice the turkey and reheat it in a skillet over low heat with a splash of broth to keep it moist.
Special Equipment
- Smoker: Essential for achieving that delicious smoky flavor. Whether it’s an electric, charcoal, or gas smoker, each has its own unique method for creating flavorful dishes.
- Brining Bag or Container: To hold the turkey while brining. If you don’t have a large enough container, a cooler can work well too.
- Meat Thermometer: A must-have for checking doneness and ensuring your turkey is cooked safely. Consider investing in a digital instant-read thermometer for quick and accurate readings.
- Basting Brush: For applying any glazes or butter during the smoking process. A silicone brush is ideal as it withstands high temperatures.
FAQ Section
Can I use a different type of wood for smoking?
Yes! While applewood adds a sweet flavor, you can experiment with other woods like hickory, cherry, or maple for different flavor profiles. Each type of wood imparts a unique taste, allowing for customization.
How do I know when my turkey is done?
Use a meat thermometer to check that the internal temperature reaches 165°F (74°C) in the thickest part of the breast and thigh. This ensures the turkey is safe to eat while remaining juicy.
Can I smoke a frozen turkey?
It’s best to fully thaw the turkey before brining and smoking for even cooking. A frozen turkey can lead to uneven cooking and result in dry meat.
How long should I let the turkey rest?
Allow the turkey to rest for at least 20-30 minutes before carving to retain its juices. This resting period is crucial for ensuring each slice is moist and flavorful.
Can I make this turkey ahead of time?
While smoking is best done on the day of serving, you can prepare and brine the turkey a day in advance. Smoking a day early can also allow the flavors to deepen and develop.
Conclusion
I hope you’re excited to try this Applewood Smoked Turkey! It’s a flavorful and impressive dish that will undoubtedly become a centerpiece at your holiday gatherings. The smoky aroma, juicy meat, and beautiful presentation make it a showstopper that your guests will rave about.
Don’t forget to share your results! I can’t wait to see how your smoked turkey turns out—be sure to leave a comment or tag me on social media with your delicious creations. Enjoy the cooking process and the delightful rewards that follow! Embrace the flavors of the season and create lasting memories with this delicious turkey recipe, making your holiday celebrations truly special.
Print
Applewood Smoked Turkey: A Flavorful Holiday Tradition
- Total Time: 8-10 hours
Description
Applewood Smoked Turkey is a flavorful centerpiece that elevates any holiday feast or gathering. This dish features a whole turkey marinated and smoked using aromatic applewood, which imparts a subtly sweet and fruity flavor profile. The result is a beautifully golden-brown bird, with tender, juicy meat that is infused with a smoky depth. Perfectly seasoned and expertly cooked, this turkey will not only satisfy your guests but also leave them raving about the meal long after it’s over. Whether served with traditional sides or modern accompaniments, Applewood Smoked Turkey adds a delicious twist to your festive table.
Ingredients
For the Brine:
- 1 cup kosher salt: Essential for flavor and moisture retention.
- ½ cup brown sugar: Adds sweetness to balance the salt and enhances the overall taste.
- 1 gallon water: The base for the brine solution.
- 4 cloves garlic, minced: For aromatic flavor that infuses the turkey.
- 1 tablespoon black peppercorns: Adds a hint of spice and depth.
- 2–3 sprigs fresh rosemary: Infuses herbal notes and a lovely aroma.
- 2–3 sprigs fresh thyme: Enhances flavor complexity and freshness.
For the Turkey:
- 1 whole turkey (12–14 pounds): The star of the meal, choose a fresh, high-quality turkey for the best results.
- 2 tablespoons olive oil: Helps the skin crisp up during smoking and adds flavor.
- Salt and pepper: For seasoning; use generously to ensure flavor.
- 2–3 apples, quartered: To enhance the applewood flavor and add moisture during cooking.
- 1 onion, quartered: Adds sweetness and flavor as it cooks and infuses the meat.
- Optional: Fresh herbs for garnish: Such as parsley or thyme, to add a pop of color and freshness to your presentation.
For the Applewood Chips:
- Applewood smoking chips: For that signature flavor; soak in water for at least 30 minutes before using to ensure they smoke rather than burn.
Instructions
STEP 1: PREPARE THE BRINE
In a large pot, combine the kosher salt, brown sugar, and water. Heat over medium until the salt and sugar dissolve completely. This step is crucial as it allows the brine to fully penetrate the turkey, enhancing its flavor and moisture content. Once dissolved, remove from heat and stir in the minced garlic, black peppercorns, rosemary, and thyme. Allow the brine to cool to room temperature, which is important to avoid cooking the turkey prematurely.
STEP 2: BRINE THE TURKEY
Once the brine is cool, submerge the turkey in a large container or a brining bag. Pour the brine over the turkey, ensuring it’s fully covered. If using a bag, you can remove as much air as possible to help the brine coat the turkey evenly. Refrigerate for at least 8 hours or overnight for optimal flavor and moisture. This long brining time allows the turkey to absorb the flavors, making it incredibly juicy.
STEP 3: PREPARE FOR SMOKING
Remove the turkey from the brine and rinse it under cold water to remove excess salt. This step helps prevent the turkey from becoming overly salty. Pat it dry with paper towels, inside and out. Drying the turkey will help achieve a crispy skin during the smoking process, which is a delightful contrast to the moist meat inside.
STEP 4: SEASON THE TURKEY
Rub the turkey all over with olive oil, ensuring you coat it well for maximum flavor and browning. Then, season generously with salt and pepper. This simple seasoning will enhance the overall taste of the turkey. Stuff the cavity with quartered apples and onion, which will release moisture and flavor during the smoking process, making the meat even more succulent.
STEP 5: PREHEAT THE SMOKER
Prepare your smoker according to the manufacturer’s instructions. Preheat it to 225°F (107°C) and add the soaked applewood chips to the smoker box or directly onto the coals. This low and slow method allows the turkey to absorb the smoke flavor while cooking evenly.
STEP 6: SMOKE THE TURKEY
Place the turkey on the smoker rack, breast side up. Close the lid and smoke for about 30-40 minutes per pound, or until the internal temperature reaches 165°F (74°C) in the thickest part of the breast and thigh. Make sure to monitor the temperature closely and add more wood chips as needed to maintain consistent smoke.
STEP 7: BASTE (OPTIONAL)
If desired, you can baste the turkey every hour with a mixture of melted butter and herbs to enhance flavor and moisture. This step adds a nice golden color to the skin and ensures the turkey remains juicy. Use a basting brush or a ladle to apply the butter evenly.
STEP 8: REST THE TURKEY
Once the turkey reaches the desired temperature, carefully remove it from the smoker and let it rest for at least 20-30 minutes before carving. This resting period allows the juices to redistribute throughout the meat, ensuring each slice is moist and flavorful.
STEP 9: CARVE AND SERVE
Carve the turkey, starting with the breast meat, followed by the thighs and drumsticks. Arrange the carved turkey on a platter and garnish with fresh herbs for a beautiful presentation. Serve with your favorite sides, such as stuffing, cranberry sauce, and mashed potatoes, and enjoy the compliments from your guests!
Nutrition
- Calories: 400 kcal
- Fat: 20g
- Carbohydrates: 0g
- Protein: 60g

