Introduction
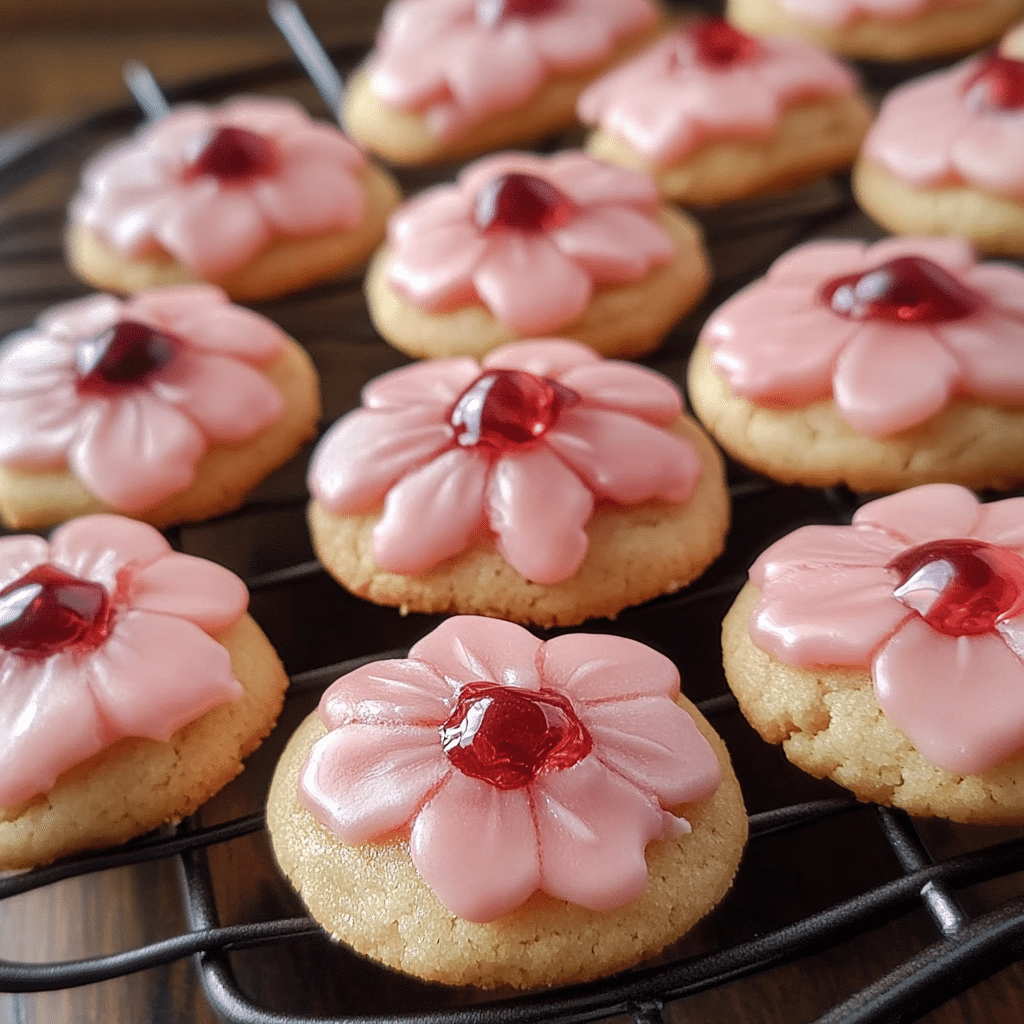
As the days grow longer and flowers start to bloom, nothing celebrates the spirit of spring better than Cherry Blossom Cookies. These sweet, vibrant cookies combine the delicate flavors of cherries with a soft, buttery texture that melts in your mouth. Perfect for springtime gatherings, these cookies are as beautiful as they are delicious, making them an ideal treat for everything from Easter celebrations to Mother’s Day picnics or even just a cheerful afternoon snack.
The beauty of Cherry Blossom Cookies lies in their simplicity and the natural sweetness of cherries. The addition of maraschino cherries or dried cherries enhances their flavor, while the soft, buttery dough ensures they are irresistibly tender. Decorated with colorful sprinkles or a glaze, these cookies bring a touch of whimsy to any occasion.
In this article, we’ll dive into the step-by-step process of making these cookies, share some helpful tips and tricks, and suggest variations to help you make them your own. Whether you’re an experienced baker or a novice in the kitchen, Cherry Blossom Cookies are a delightful treat you can easily whip up.
Why You’ll Love This Recipe
Vibrant and Festive: With the beautiful pink hue from the cherries and the potential for colorful decorations, these cookies are perfect for spring holidays, like Easter or a garden party.
Simple to Make: The ingredients and steps are straightforward, making these cookies ideal for bakers of any skill level.
Deliciously Sweet: The combination of cherries and a soft, buttery dough gives these cookies a perfect balance of flavor and texture.
Customizable: Add your own twist to the recipe by experimenting with different types of cherries, glazes, or decorative toppings.
Perfect for Gifting: Packaged in a cute box or a decorative tin, Cherry Blossom Cookies make a thoughtful and delicious gift for friends and family.
Preparation Time and Servings
- Total Time: 1 hour 30 minutes (20 minutes prep, 10-12 minutes baking, plus cooling time)
- Servings: This recipe yields about 24 cookies, depending on the size of your dough balls.
- Nutrition Facts (per serving):
- Calories: 150
- Protein: 1g
- Carbs: 22g
- Fat: 7g
- Fiber: 1g
Ingredients
For the Cookies:
- 2 1/4 cups all-purpose flour: The base of the dough. Be sure to measure the flour correctly for the best results.
- 1/2 teaspoon baking powder: Helps the cookies rise and stay soft and chewy.
- 1/4 teaspoon salt: Balances the sweetness and enhances the flavors of the cookies.
- 1 cup unsalted butter, softened: Butter creates the rich, soft texture of the cookies.
- 1 cup granulated sugar: Sweetens the dough and helps the cookies spread.
- 1 large egg: Binds the dough together and gives the cookies structure.
- 1 teaspoon vanilla extract: Adds flavor and depth to the dough.
- 1/2 cup maraschino cherries, chopped (or dried cherries): These cherries give the cookies their distinctive flavor and color.
- 1/4 cup cherry juice (from the maraschino cherries or fresh cherry juice): Adds moisture and a hint of cherry flavor to the dough.
For the Cherry Glaze (optional):
- 1 cup powdered sugar: Sweetens the glaze.
- 2 tablespoons cherry juice: Used to flavor the glaze and enhance the cherry flavor.
- 1/4 teaspoon almond extract: Adds a subtle nutty note that pairs well with the cherries.
Decoration (optional):
- Sprinkles: Colorful sprinkles for an extra festive touch.
- Extra chopped cherries: For garnishing the cookies.
Step-by-Step Instructions
STEP 1: PREHEAT THE OVEN AND PREPARE BAKING SHEETS
Preheat your oven to 350°F (175°C). Line two baking sheets with parchment paper or silicone baking mats to prevent the cookies from sticking. This will help ensure an even bake and make cleanup easier.
STEP 2: COMBINE DRY INGREDIENTS
In a medium-sized bowl, whisk together the all-purpose flour, baking powder, and salt. These dry ingredients help provide structure to the dough and ensure your cookies bake evenly. Set the bowl aside.
STEP 3: CREAM BUTTER AND SUGAR
In a large mixing bowl, beat the softened butter and granulated sugar together using an electric mixer or stand mixer. Start on low speed and gradually increase to medium-high. Cream the mixture for about 2-3 minutes until it becomes light and fluffy. This step is important for creating a smooth and airy dough.
STEP 4: ADD EGG AND VANILLA
Add the egg and vanilla extract to the creamed butter and sugar, mixing until fully incorporated. The mixture should be smooth and well combined.
STEP 5: INCORPORATE DRY INGREDIENTS
Gradually add the dry ingredients to the wet mixture, mixing on low speed until everything is just combined. Be careful not to overmix, as this can make the cookies dense. The dough should be soft, slightly sticky, and smooth.
STEP 6: ADD CHERRIES AND CHERRY JUICE
Once the dough is ready, gently fold in the chopped maraschino cherries (or dried cherries) and cherry juice. The dough will take on a pinkish hue from the cherries, which is one of the signature features of these cookies. Mix until the cherries are evenly distributed throughout the dough.
STEP 7: SCOOP AND FORM DOUGH BALLS
Using a cookie scoop or a tablespoon, scoop out dough and roll it into 1-inch balls. Place the dough balls about 2 inches apart on the prepared baking sheets. This will allow the cookies to spread slightly as they bake without touching each other.
STEP 8: BAKE THE COOKIES
Bake the cookies in the preheated oven for 10-12 minutes, or until the edges are set and the centers are slightly soft. The cookies will continue to firm up as they cool, so don’t worry if they appear a little underdone in the center. Keep a close eye on them during the last couple of minutes to ensure they don’t overbake.
STEP 9: COOL AND DECORATE
Once baked, remove the cookies from the oven and let them cool on the baking sheets for 5 minutes. Then, transfer them to a wire rack to cool completely. If desired, decorate the cooled cookies with a cherry glaze, sprinkles, or extra chopped cherries.
How to Serve
Perfect for Spring Celebrations: Cherry Blossom Cookies are ideal for serving at springtime gatherings such as Easter brunch, Mother’s Day celebrations, or a garden tea party. Their bright, cheerful color and sweet flavor make them a perfect addition to your festive table.
Gift-Giving: These cookies also make great gifts. Package them in a cute box or jar with a ribbon for a thoughtful and delicious present that’s sure to brighten someone’s day.
With a Beverage: Enjoy these cookies with a cup of tea, a glass of milk, or even a chilled glass of rosé. The light cherry flavor pairs wonderfully with many beverages.
Additional Tips
- Use Room Temperature Ingredients: Be sure to use softened butter and room-temperature eggs to ensure smooth dough. Cold butter will not cream properly with the sugar and could result in dense cookies.
- Don’t Overmix the Dough: Overmixing the dough can lead to tough cookies, so mix just until the ingredients are incorporated.
- Chill the Dough (Optional): If you prefer thicker cookies or want to prevent excessive spreading, you can chill the dough in the fridge for 30 minutes before scooping and baking.
- Choose Your Cherries Wisely: Maraschino cherries give these cookies a bright, sweet flavor, while dried cherries provide a chewier, more concentrated taste. You can also mix both types for added texture.
Recipe Variations
- Cherry Almond: Add 1/2 teaspoon of almond extract to the dough for a nutty flavor that pairs beautifully with the cherries.
- Chocolate Cherry: Add 1/2 cup of mini chocolate chips to the dough for a delicious chocolate-cherry combination.
- Lemon Cherry: Add 1 tablespoon of lemon zest to the dough for a citrusy twist that complements the sweetness of the cherries.
- Coconut Cherry: Add 1/4 cup of shredded coconut to the dough for a tropical touch.
Freezing and Storage
- Storage: Store the cookies in an airtight container at room temperature for up to 1 week. Place a sheet of parchment paper between layers of cookies to prevent them from sticking together.
- Freezing: These cookies freeze well. Place them in a single layer on a baking sheet and freeze for 1-2 hours. Once frozen, transfer the cookies to a freezer bag or airtight container and store for up to 3 months. To thaw, simply let them sit at room temperature for 10-15 minutes.
FAQ Section
Can I use fresh cherries instead of maraschino cherries?
Yes, fresh cherries can be used, but you will need to chop them finely and remove the pits. Keep in mind that fresh cherries have more moisture, so the dough may be slightly wetter. You might need to add a bit more flour to compensate.
Can I make these cookies ahead of time?
Yes, you can prepare the dough in advance and refrigerate it for up to 2 days before baking. You can also freeze the dough for up to 3 months. Just scoop out
the dough and bake directly from frozen, adding an extra minute or two to the baking time.
Can I skip the glaze?
Yes, the glaze is optional, but it adds a nice shine and extra cherry flavor. You can also sprinkle the cookies with powdered sugar or serve them plain for a more understated look.
Conclusion
Cherry Blossom Cookies are a delightful way to celebrate the season with their sweet cherry flavor and delicate texture. Whether for a holiday, a special occasion, or just because, these cookies are sure to be a hit with anyone who tries them. With their colorful and cheerful appearance, they bring a taste of spring to your kitchen.
So, gather your ingredients and start baking these sweet treats today! And don’t forget to share them with family and friends—they’re sure to become a beloved recipe in your holiday baking tradition. Happy baking, and enjoy the spring sweetness!
Print
Cherry Blossom Cookies: A Delightful Spring Treat
- Total Time: 1 hour 30 minutes
Description
Cherry Blossom Cookies are delicate, soft, and subtly sweet, inspired by the beauty and flavors of spring. These cookies typically feature a buttery dough infused with almond extract, giving them a slightly nutty flavor that complements the sweet, chewy dried cherries placed in the center. The cherries add a tart contrast to the buttery sweetness of the cookie base, while the light almond notes elevate the overall flavor profile. The cookies may be lightly dusted with powdered sugar for an elegant finish, making them a lovely treat for springtime or festive occasions. Their gentle sweetness and delightful texture make them a refreshing and charming option for any dessert table.
Ingredients
For the Cookies:
- 2 1/4 cups all-purpose flour: The base of the dough. Be sure to measure the flour correctly for the best results.
- 1/2 teaspoon baking powder: Helps the cookies rise and stay soft and chewy.
- 1/4 teaspoon salt: Balances the sweetness and enhances the flavors of the cookies.
- 1 cup unsalted butter, softened: Butter creates the rich, soft texture of the cookies.
- 1 cup granulated sugar: Sweetens the dough and helps the cookies spread.
- 1 large egg: Binds the dough together and gives the cookies structure.
- 1 teaspoon vanilla extract: Adds flavor and depth to the dough.
- 1/2 cup maraschino cherries, chopped (or dried cherries): These cherries give the cookies their distinctive flavor and color.
- 1/4 cup cherry juice (from the maraschino cherries or fresh cherry juice): Adds moisture and a hint of cherry flavor to the dough.
For the Cherry Glaze (optional):
- 1 cup powdered sugar: Sweetens the glaze.
- 2 tablespoons cherry juice: Used to flavor the glaze and enhance the cherry flavor.
- 1/4 teaspoon almond extract: Adds a subtle nutty note that pairs well with the cherries.
For Decoration (optional):
- Sprinkles: Colorful sprinkles for an extra festive touch.
- Extra chopped cherries: For garnishing the cookies.
Instructions
STEP 1: PREHEAT THE OVEN AND PREPARE BAKING SHEETS
Preheat your oven to 350°F (175°C). Line two baking sheets with parchment paper or silicone baking mats to prevent the cookies from sticking. This will help ensure an even bake and make cleanup easier.
STEP 2: COMBINE DRY INGREDIENTS
In a medium-sized bowl, whisk together the all-purpose flour, baking powder, and salt. These dry ingredients help provide structure to the dough and ensure your cookies bake evenly. Set the bowl aside.
STEP 3: CREAM BUTTER AND SUGAR
In a large mixing bowl, beat the softened butter and granulated sugar together using an electric mixer or stand mixer. Start on low speed and gradually increase to medium-high. Cream the mixture for about 2-3 minutes until it becomes light and fluffy. This step is important for creating a smooth and airy dough.
STEP 4: ADD EGG AND VANILLA
Add the egg and vanilla extract to the creamed butter and sugar, mixing until fully incorporated. The mixture should be smooth and well combined.
STEP 5: INCORPORATE DRY INGREDIENTS
Gradually add the dry ingredients to the wet mixture, mixing on low speed until everything is just combined. Be careful not to overmix, as this can make the cookies dense. The dough should be soft, slightly sticky, and smooth.
STEP 6: ADD CHERRIES AND CHERRY JUICE
Once the dough is ready, gently fold in the chopped maraschino cherries (or dried cherries) and cherry juice. The dough will take on a pinkish hue from the cherries, which is one of the signature features of these cookies. Mix until the cherries are evenly distributed throughout the dough.
STEP 7: SCOOP AND FORM DOUGH BALLS
Using a cookie scoop or a tablespoon, scoop out dough and roll it into 1-inch balls. Place the dough balls about 2 inches apart on the prepared baking sheets. This will allow the cookies to spread slightly as they bake without touching each other.
STEP 8: BAKE THE COOKIES
Bake the cookies in the preheated oven for 10-12 minutes, or until the edges are set and the centers are slightly soft. The cookies will continue to firm up as they cool, so don’t worry if they appear a little underdone in the center. Keep a close eye on them during the last couple of minutes to ensure they don’t overbake.
STEP 9: COOL AND DECORATE
Once baked, remove the cookies from the oven and let them cool on the baking sheets for 5 minutes. Then, transfer them to a wire rack to cool completely. If desired, decorate the cooled cookies with a cherry glaze, sprinkles, or extra chopped cherries.
- Prep Time: 20 minutes
- Cook Time: 10-12 minutes baking
Nutrition
- Calories: 160 kcal
- Fat: 7g
- Carbohydrates: 22g
- Protein: 1g

