Introduction
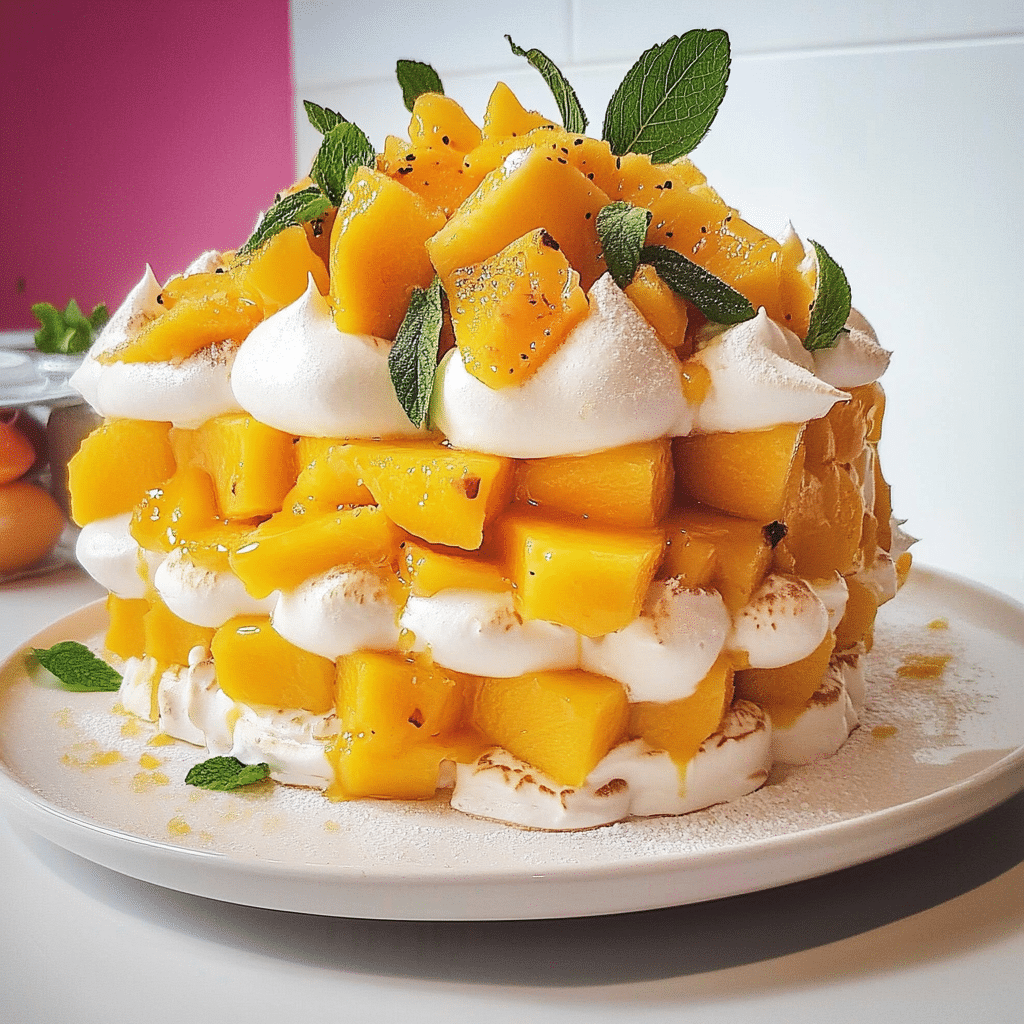
If you’re searching for a dessert that’s as visually stunning as it is delicious, look no further than the Chewy Meringue and Mango Sorbet Cake. This layered masterpiece brings together the perfect balance of textures and flavors—crunchy, chewy meringue layers, silky mango sorbet, and a touch of whipped cream to create a refreshing and indulgent treat. It’s an elegant dessert that’s sure to wow your guests, whether you’re serving it at a summer gathering, a holiday feast, or as a show-stopping finale to a family dinner.
The beauty of this dessert lies not only in its striking appearance but also in its simplicity. With just a few key ingredients, you can create a vibrant and flavorful cake that’s light, refreshing, and not overwhelmingly sweet. The chewy meringue layers contrast perfectly with the smooth, citrusy mango sorbet, and the whipped cream adds a luxurious finish. Together, they create a harmony of flavors that’s truly irresistible.
In this article, we’ll dive into why the Chewy Meringue and Mango Sorbet Cake is a must-try, walk you through the step-by-step process to make it at home, and provide tips on how to serve and store it. Let’s get started!
Why You’ll Love This Recipe
- Visually Stunning: The combination of bright mango sorbet, delicate meringue layers, and whipped cream creates a show-stopping dessert that’s perfect for special occasions.
- Refreshing and Light: While rich and satisfying, this dessert has a light, fruity quality thanks to the mango sorbet, making it an ideal option for warmer months or after a heavy meal.
- Easy to Customize: Feel free to adjust the flavor by using other fruit sorbets, or even adding fresh fruit or citrus zest to the meringue layers for an added touch of flavor.
- Perfect for Summer and Holidays: This dessert is a great choice for summer gatherings, picnics, or as a refreshing holiday treat. The mango sorbet gives it a tropical flair that works beautifully with a variety of occasions.
- No-Bake Convenience: The meringue layers require baking, but the dessert itself is easy to assemble, and it doesn’t require any cooking over the stove or lengthy preparation. Simply build the layers, freeze, and serve!
- Impressive Yet Simple: While this cake looks complex and sophisticated, it’s relatively simple to make, making it an ideal dessert for both beginner and experienced bakers.
Preparation Time and Servings
- Total Time: 3 hours 30 minutes (including baking, cooling, and freezing)
- Servings: Serves 8-10 people
- Nutrition Facts (per serving):
Calories: 280
Protein: 3g
Carbs: 41g
Fat: 14g
Fiber: 1g
Ingredients
For the Meringue Layers:
- 4 large egg whites (room temperature)
- 1 cup granulated sugar
- 1/2 teaspoon vanilla extract
- 1/4 teaspoon cream of tartar
- Pinch of salt
Mango Sorbet:
- 2 1/2 cups fresh mango puree (about 2-3 ripe mangoes)
- 3/4 cup simple syrup (or adjust to taste)
- 1 tablespoon lime juice (optional, for added tang)
For the Whipped Cream:
- 1 cup heavy cream
- 2 tablespoons powdered sugar
- 1/2 teaspoon vanilla extract
Step-by-Step Instructions
Step 1: Preheat the Oven and Prepare the Meringue
Start by preheating your oven to 225°F (110°C). This low temperature is perfect for slowly drying out the meringue to get that chewy, crisp texture without browning it.
Next, line two baking sheets with parchment paper. You’ll need two sheets because the meringue will be baked in two separate layers. Using a pencil, trace a 9-inch circle on each sheet of parchment to guide the size of your meringue layers. Flip the parchment over so the pencil marks are on the underside, and the meringue won’t come in contact with them.
In a large, clean mixing bowl, beat the egg whites with a hand mixer or stand mixer on low speed until they begin to foam. Add a pinch of salt and cream of tartar, and gradually increase the speed to medium. Continue to beat until the egg whites form soft peaks. This means the egg whites will hold a gentle shape when you lift the beaters, but the tips will curl over slightly.
Once you’ve reached soft peaks, begin adding the granulated sugar, one tablespoon at a time, beating on high speed. Continue to beat for about 5-7 minutes, until the meringue forms stiff peaks. The meringue should be glossy and smooth, and when you lift the beaters, the peaks should stand straight up without falling over.
Finally, add vanilla extract and beat for another 30 seconds to incorporate.
Step 2: Bake the Meringue Layers
Spoon the meringue into two even portions, one for each baking sheet. Use a spatula to spread the meringue into the traced circles, smoothing the tops. Try to make the layers as even as possible so they bake evenly.
Place the baking sheets in the preheated oven and bake for about 1 1/2 hours, or until the meringues are dry to the touch and lift easily off the parchment paper. Avoid opening the oven door too much while baking, as this can cause the meringue to collapse.
Once baked, turn off the oven and let the meringue layers cool completely inside the oven with the door slightly ajar. This slow cooling helps prevent cracking.
Step 3: Prepare the Mango Sorbet
While the meringue layers are cooling, it’s time to make the mango sorbet. Begin by peeling and cubing your mangoes. If you prefer a smoother consistency, you can use frozen mango chunks or store-bought mango puree. Place the fresh mango pieces in a blender or food processor, and blend until smooth.
In a medium bowl, combine the mango puree with simple syrup and lime juice. Taste the mixture to check the sweetness; if it’s too tart, you can add a bit more simple syrup. Once you’re satisfied with the flavor, pour the mango mixture into a shallow dish or ice cream maker, and freeze.
If you’re using an ice cream maker, churn the mixture according to the manufacturer’s instructions until it reaches a sorbet-like consistency. If you’re freezing it in a dish, place it in the freezer and stir every 30 minutes until it firms up, about 3 hours. You want it to be scoopable but still slightly soft to spread over the meringue layers.
Step 4: Whip the Cream
While the sorbet is freezing, prepare the whipped cream. In a chilled mixing bowl, beat the heavy cream with powdered sugar and vanilla extract until soft peaks form. Be careful not to overwhip—stop as soon as the cream holds its shape but isn’t too stiff.
Step 5: Assemble the Cake
Once the meringue layers have cooled completely and the mango sorbet is firm but spreadable, it’s time to assemble the cake.
Place one meringue layer on a large serving platter. Spread a generous layer of the mango sorbet over the meringue, smoothing it out to the edges. Then, top the sorbet layer with a light spread of whipped cream.
Carefully place the second meringue layer on top of the first, and repeat with another layer of mango sorbet and whipped cream. You may want to leave a bit of whipped cream for garnish at the end. Once assembled, place the cake in the freezer for about 30 minutes to firm up and set.
Step 6: Garnish and Serve
Before serving, garnish the cake with a dollop of whipped cream on top and fresh fruit like sliced mango or berries. You can also sprinkle a little lime zest or even a few edible flowers for an elegant touch. Slice the cake using a serrated knife for clean, even slices, and serve immediately.
How to Serve
- As a Summer Dessert: This cake is the perfect finale to a hot summer day. Serve it at your next barbecue, picnic, or outdoor dinner party for a refreshing treat.
- For Special Occasions: Whether it’s a birthday, anniversary, or holiday gathering, this dessert will impress your guests with its vibrant colors and delightful flavors. It pairs beautifully with a glass of bubbly or a light white wine like Prosecco.
- With a Tropical Twist: Add tropical fruits such as kiwi, pineapple, or passionfruit to the top of the cake for an extra burst of flavor and color.
Additional Tips and Variations
- Frozen Mango Sorbet: If you’re in a pinch and don’t have time to make sorbet from scratch, feel free to use store-bought mango sorbet. Just make sure it’s high-quality and not overly sweet.
- Add Coconut: To give the dessert a more tropical feel, consider adding shredded coconut to the whipped cream or sprinkling it over the top of the cake before serving.
- Layer with Fruit: For added texture and flavor, layer fresh fruit such as sliced strawberries, raspberries, or blueberries between the meringue layers along with the sorbet.
- Experiment with Other Sorbets: If you’re not a fan of mango, feel free to swap it out for another fruit sorbet, such as strawberry, raspberry, or lime.
Storage and Reheating
- Refrigeration: This cake should be kept in the freezer until ready to serve, as it will soften at room temperature. It can be stored in the freezer for up to 1 week.
- Leftovers: If you have leftovers, simply wrap the cake in plastic wrap or place it in an airtight container to keep it fresh in the freezer.
Conclusion
The Chewy Meringue and Mango Sorbet Cake is a dessert that’s as stunning as it is delicious. With its layers of crisp, chewy meringue, creamy whipped cream, and refreshing mango sorbet, it’s the perfect treat for any occasion. Whether you’re hosting a summer party or looking for a dessert that will impress your holiday guests, this cake will surely become a favorite.
So, grab your meringue, whip up that mango sorbet, and get ready to create a dessert that’s as beautiful to look at as it is to eat. Enjoy!
Print
Chewy Meringue and Mango Sorbet Cake: A Refreshing, Show-Stopping Dessert
- Total Time: 3 hours and 30 minutes
Description
The Chewy Meringue and Mango Sorbet Cake is a stunning, refreshing dessert that combines the best of tropical flavors and delicate textures. The chewy meringue layers create a crisp contrast against the smooth, citrusy mango sorbet, while the fluffy whipped cream adds richness and balance. This dessert is perfect for warm-weather gatherings or as a show-stopping finale to any special occasion. The vibrant colors of the mango sorbet and the light, airy meringue make it a feast for the eyes as well as the taste buds. Each bite delivers a delightful balance of sweetness, tang, and creaminess, making it an unforgettable treat. Whether you’re serving it at a summer picnic or a holiday dinner, the Chewy Meringue and Mango Sorbet Cake is guaranteed to impress your guests with its elegance and flavor.
Ingredients
For the Meringue Layers:
- 4 large egg whites (room temperature)
- 1 cup granulated sugar
- 1/2 teaspoon vanilla extract
- 1/4 teaspoon cream of tartar
- Pinch of salt
For the Mango Sorbet:
- 2 1/2 cups fresh mango puree (about 2–3 ripe mangoes)
- 3/4 cup simple syrup (or adjust to taste)
- 1 tablespoon lime juice (optional, for added tang)
For the Whipped Cream:
- 1 cup heavy cream
- 2 tablespoons powdered sugar
- 1/2 teaspoon vanilla extract
Instructions
Step 1: Preheat the Oven and Prepare the Meringue
Start by preheating your oven to 225°F (110°C). This low temperature is perfect for slowly drying out the meringue to get that chewy, crisp texture without browning it.
Next, line two baking sheets with parchment paper. You’ll need two sheets because the meringue will be baked in two separate layers. Using a pencil, trace a 9-inch circle on each sheet of parchment to guide the size of your meringue layers. Flip the parchment over so the pencil marks are on the underside, and the meringue won’t come in contact with them.
In a large, clean mixing bowl, beat the egg whites with a hand mixer or stand mixer on low speed until they begin to foam. Add a pinch of salt and cream of tartar, and gradually increase the speed to medium. Continue to beat until the egg whites form soft peaks. This means the egg whites will hold a gentle shape when you lift the beaters, but the tips will curl over slightly.
Once you’ve reached soft peaks, begin adding the granulated sugar, one tablespoon at a time, beating on high speed. Continue to beat for about 5-7 minutes, until the meringue forms stiff peaks. The meringue should be glossy and smooth, and when you lift the beaters, the peaks should stand straight up without falling over.
Finally, add vanilla extract and beat for another 30 seconds to incorporate.
Step 2: Bake the Meringue Layers
Spoon the meringue into two even portions, one for each baking sheet. Use a spatula to spread the meringue into the traced circles, smoothing the tops. Try to make the layers as even as possible so they bake evenly.
Place the baking sheets in the preheated oven and bake for about 1 1/2 hours, or until the meringues are dry to the touch and lift easily off the parchment paper. Avoid opening the oven door too much while baking, as this can cause the meringue to collapse.
Once baked, turn off the oven and let the meringue layers cool completely inside the oven with the door slightly ajar. This slow cooling helps prevent cracking.
Step 3: Prepare the Mango Sorbet
While the meringue layers are cooling, it’s time to make the mango sorbet. Begin by peeling and cubing your mangoes. If you prefer a smoother consistency, you can use frozen mango chunks or store-bought mango puree. Place the fresh mango pieces in a blender or food processor, and blend until smooth.
In a medium bowl, combine the mango puree with simple syrup and lime juice. Taste the mixture to check the sweetness; if it’s too tart, you can add a bit more simple syrup. Once you’re satisfied with the flavor, pour the mango mixture into a shallow dish or ice cream maker, and freeze.
If you’re using an ice cream maker, churn the mixture according to the manufacturer’s instructions until it reaches a sorbet-like consistency. If you’re freezing it in a dish, place it in the freezer and stir every 30 minutes until it firms up, about 3 hours. You want it to be scoopable but still slightly soft to spread over the meringue layers.
Step 4: Whip the Cream
While the sorbet is freezing, prepare the whipped cream. In a chilled mixing bowl, beat the heavy cream with powdered sugar and vanilla extract until soft peaks form. Be careful not to overwhip—stop as soon as the cream holds its shape but isn’t too stiff.
Step 5: Assemble the Cake
Once the meringue layers have cooled completely and the mango sorbet is firm but spreadable, it’s time to assemble the cake.
Place one meringue layer on a large serving platter. Spread a generous layer of the mango sorbet over the meringue, smoothing it out to the edges. Then, top the sorbet layer with a light spread of whipped cream.
Carefully place the second meringue layer on top of the first, and repeat with another layer of mango sorbet and whipped cream. You may want to leave a bit of whipped cream for garnish at the end. Once assembled, place the cake in the freezer for about 30 minutes to firm up and set.
Step 6: Garnish and Serve
Before serving, garnish the cake with a dollop of whipped cream on top and fresh fruit like sliced mango or berries. You can also sprinkle a little lime zest or even a few edible flowers for an elegant touch. Slice the cake using a serrated knife for clean, even slices, and serve immediately.
Nutrition
- Calories: 280 kcal
- Fat: 14g
- Carbohydrates: 41g
- Protein: 3g

