Introduction
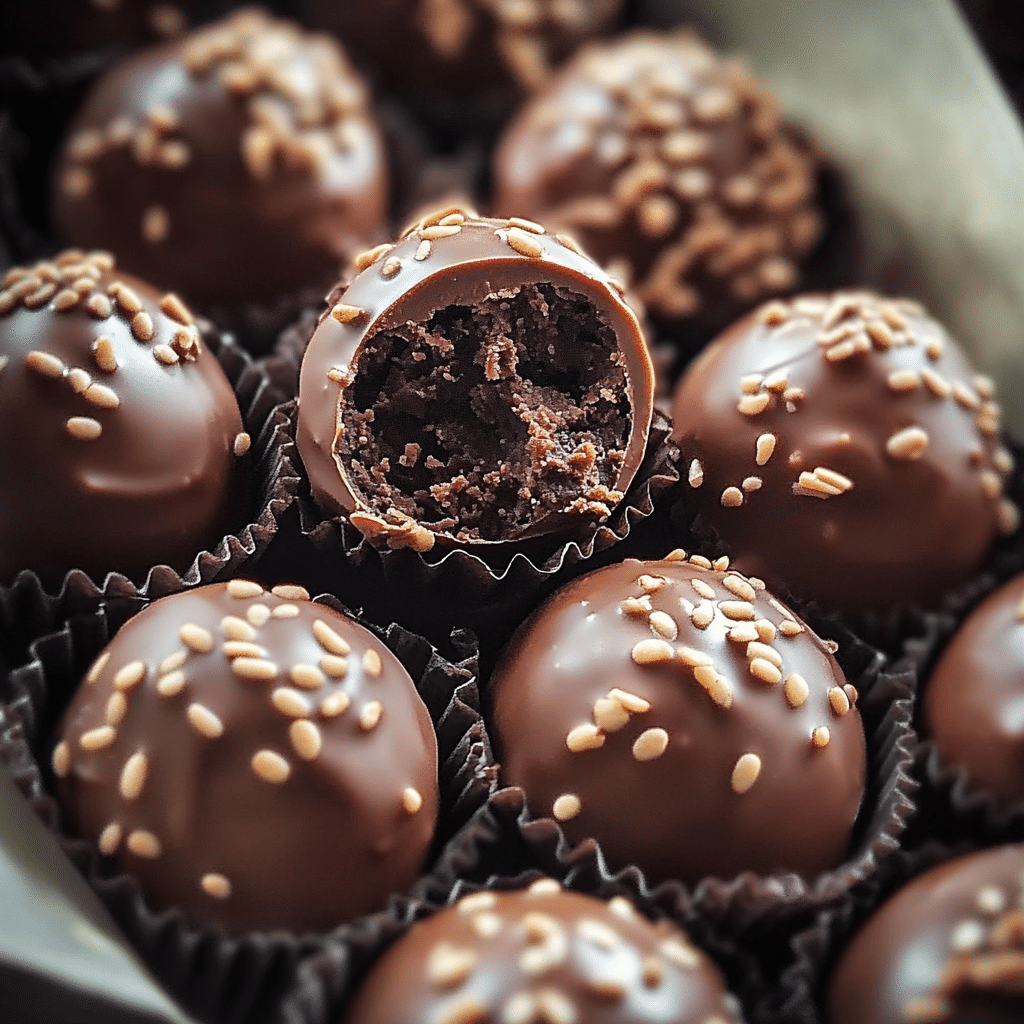
Chocolate truffles are the epitome of indulgence—smooth, creamy, and decadent. With their rich chocolate centers and velvety coatings, these bite-sized treats are perfect for any occasion, whether you’re treating yourself or gifting them to someone special. The beauty of chocolate truffles lies in their simplicity—just a few ingredients can be transformed into a luxurious and elegant treat.
Making chocolate truffles at home is easier than it may seem. With a bit of patience and a few key techniques, you can create professional-quality truffles in the comfort of your own kitchen. This recipe offers step-by-step instructions to ensure your truffles turn out perfectly every time, along with variations and tips to personalize the flavor and presentation.
In this article, I’ll walk you through the process of making homemade chocolate truffles from scratch, providing helpful tips, decorating ideas, and suggestions for storing and serving these irresistible candies.
Why You’ll Love This Recipe
- Decadent Flavor: Chocolate truffles offer an intense chocolate flavor with a smooth, melt-in-your-mouth texture.
- Versatile: You can customize your truffles with different fillings, coatings, and flavors, making them perfect for any occasion.
- Easy to Make: While they may seem fancy, truffles are surprisingly simple to prepare with just a few ingredients.
- Perfect for Gifting: Homemade chocolate truffles make thoughtful, personalized gifts, ideal for holidays, birthdays, or special events.
- No-Bake: These truffles require no baking, making them a quick treat to prepare with minimal mess.
Preparation Time and Servings
- Prep Time: 20 minutes
- Chill Time: 2 hours (for ganache to firm up)
- Total Time: 2 hours 20 minutes
- Servings: This recipe makes approximately 20-25 truffles, depending on the size.
Ingredients
- 8 ounces (225g) dark chocolate (70% cocoa): The base of your truffle ganache. Use high-quality chocolate for the best flavor.
- ½ cup heavy cream: Adds richness and creates the smooth, creamy texture of the ganache.
- 1 tablespoon unsalted butter: Enhances the smoothness and flavor of the truffle filling.
- 1 teaspoon vanilla extract: Adds depth to the flavor profile.
- Pinch of salt: Balances the sweetness and enhances the chocolate flavor.
- Coating options (choose one or more):
- Cocoa powder (for a classic finish)
- Chopped nuts (such as hazelnuts, almonds, or pistachios)
- Shredded coconut
- Melted chocolate (for a glossy coating)
- Sprinkles or edible glitter (for a festive touch)
- Sea salt (for a sweet-and-salty contrast)
Step-by-Step Instructions
Step 1: Chop the Chocolate
Begin by chopping the dark chocolate into small, even pieces. This will help it melt more evenly when combined with the cream. You can use a serrated knife for a cleaner cut, or simply break it into pieces by hand if you prefer. Place the chopped chocolate into a heatproof bowl and set it aside.
Step 2: Heat the Cream and Butter
In a small saucepan over medium heat, bring the heavy cream and butter to a simmer. Stir occasionally, ensuring the butter is completely melted. You’ll want to heat the cream just until it begins to bubble at the edges—not to a full boil.
Step 3: Combine the Cream and Chocolate
Once the cream and butter are simmering, pour the mixture over the chopped chocolate. Let it sit for about 2-3 minutes to allow the heat from the cream to soften the chocolate. Afterward, gently stir the mixture with a spatula or wooden spoon until smooth and glossy. The result should be a thick, silky ganache. Add the vanilla extract and a pinch of salt, stirring to combine.
Step 4: Chill the Ganache
At this point, you will need to allow the ganache to cool and firm up before shaping it into truffles. Cover the bowl with plastic wrap and refrigerate the ganache for 1-2 hours, or until it has solidified enough to scoop and roll into balls.
Step 5: Shape the Truffles
Once the ganache has cooled and thickened, use a melon baller, small cookie scoop, or your hands to portion out the ganache into small rounds. Aim for about 1-inch-sized truffles, though you can make them larger or smaller depending on your preference. Roll each portion between your palms to form smooth, even balls.
Step 6: Coat the Truffles
Now comes the fun part—coating your truffles! You can roll them in cocoa powder for a classic truffle finish, or get creative with different coatings like chopped nuts, shredded coconut, or melted chocolate.
- For Cocoa Powder Coating: Place a few tablespoons of cocoa powder in a shallow dish. Gently roll each truffle in the cocoa powder, ensuring it is evenly coated.
- For Chopped Nuts: Place finely chopped nuts in a shallow bowl. Roll the truffles in the nuts, pressing lightly to make sure they stick.
- For Shredded Coconut: Roll the truffles in shredded coconut, ensuring they’re fully coated.
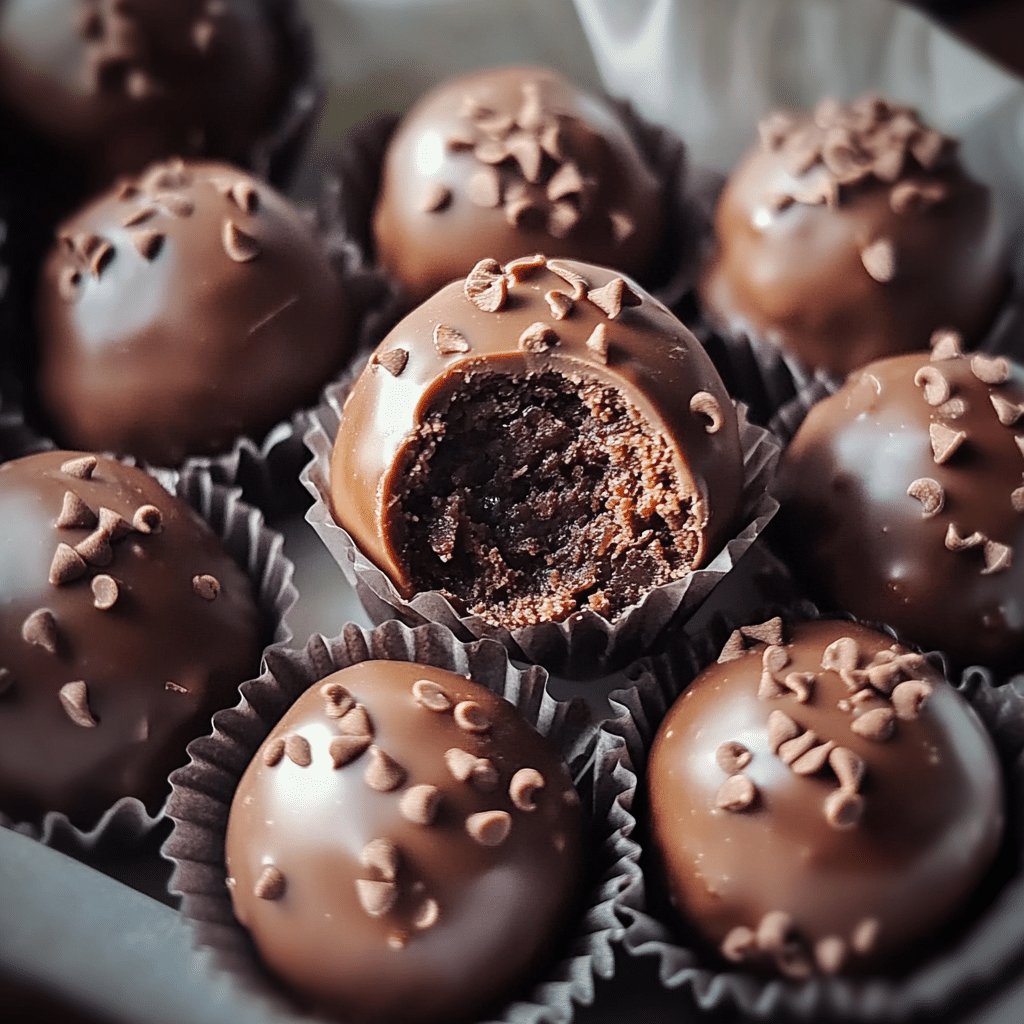
- For Melted Chocolate Coating: If you prefer a glossy chocolate finish, melt more chocolate (dark, milk, or white) in the microwave or double boiler. Dip each truffle into the melted chocolate using a fork or toothpick, then place it on parchment paper to set.
- For a Festive Touch: You can also roll the truffles in colorful sprinkles or edible glitter for an extra flair.
Step 7: Chill and Set
After coating the truffles, return them to the refrigerator for about 30 minutes to allow the coatings to set. If you’ve used melted chocolate for coating, this will also give it time to harden and create a glossy finish.
Step 8: Serve and Enjoy
Once the truffles have set and the coatings have hardened, your chocolate truffles are ready to serve! Arrange them on a platter, and if desired, garnish with a light dusting of cocoa powder or extra crushed nuts for added decoration. These truffles can be enjoyed immediately or stored for later.
How to Serve
Chocolate truffles are perfect for a variety of occasions. Here are a few serving suggestions:
- As a Gift: Package truffles in a decorative gift box or clear bag for a thoughtful and delicious homemade gift. Tie with a ribbon for a personal touch.
- After Dinner: Serve them as a decadent dessert after a meal. Pair them with a glass of dessert wine, like a rich port or a sweet Riesling, to complement their chocolate flavor.
- For Special Occasions: Chocolate truffles are a perfect treat for holidays, birthdays, or other celebrations. Customize the coatings to match the occasion—red and green sprinkles for Christmas, or gold glitter for New Year’s Eve.
Recipe Variations
- Flavored Truffles: Infuse the ganache with flavors like orange zest, raspberry puree, espresso, or mint extract. Just add the flavoring while stirring in the vanilla extract.
- Nutty Truffles: Add finely chopped nuts, such as hazelnuts, almonds, or walnuts, directly into the ganache for a delightful texture and flavor.
- Fruit-Filled Truffles: For a fruity twist, add a small dollop of fruit preserves (like raspberry or apricot) in the center of each truffle before rolling it.
- Vegan Truffles: Use dairy-free chocolate and substitute coconut cream or almond milk for the heavy cream to create a vegan version of these truffles.
Additional Tips
- Use High-Quality Chocolate: Since chocolate is the primary ingredient, using a good-quality chocolate will make a significant difference in the flavor and texture of your truffles.
- Room Temperature Ganache: Make sure the ganache is cooled to room temperature before rolling it into balls. If it’s too soft, it will be difficult to shape, and if it’s too hard, it may crack during rolling.
- Make Ahead: Chocolate truffles can be made up to a week in advance. Store them in an airtight container in the refrigerator until ready to serve.
- Custom Coatings: For extra flair, you can dip the truffles in colored sugar or drizzle melted white or dark chocolate over the top for a decorative finish.
Freezing and Storage
- Storing: Chocolate truffles should be stored in an airtight container in a cool place (or the refrigerator) for up to 1-2 weeks.
- Freezing: Truffles freeze well for up to 3 months. To freeze, place them on a baking sheet and freeze until solid. Then, transfer them to an airtight container or freezer bag. To thaw, place the truffles in the refrigerator overnight.
FAQ Section
Can I make chocolate truffles ahead of time?
Yes! Chocolate truffles can be made in advance and stored in the refrigerator for up to a week. They can also be frozen for up to 3 months, making them great for prepping ahead of time.
How do I make my truffles glossy?
If you’re coating your truffles in chocolate, ensure that the chocolate is tempered or has a smooth consistency. Additionally, let the truffles set in a cool place to maintain their shiny finish.
Can I make truffles without cream?
Yes, you can make truffles without cream by substituting it with coconut milk, almond milk, or any other milk alternative, though the texture and flavor may differ slightly.
Can I use milk chocolate instead of dark chocolate?
Absolutely! You can use milk chocolate for a sweeter truffle. Just be mindful that it will create a softer ganache, so chilling the mixture a bit longer might be necessary to ensure it firms up enough for rolling.
Print
Chocolate Truffles: A Decadent, Indulgent Delight
- Total Time: 2 hours 20 minutes
Description
Chocolate truffles are rich, indulgent confections that are a true delight for chocolate lovers. They are made with a smooth, velvety ganache—a blend of heavy cream and finely chopped chocolate—resulting in a creamy filling. This ganache is often flavored with liqueurs like brandy, rum, or cognac, or enhanced with spices, extracts, or citrus zest for added depth. Once the ganache is cooled and firmed up, it is shaped into small balls, often rolled by hand. The truffles can be coated in a variety of ways, including rolling them in cocoa powder, chopped nuts, shredded coconut, or finely crushed cookies. Some truffles may even be enrobed in a thin layer of tempered chocolate, creating a crisp shell that contrasts with the smooth, melt-in-your-mouth center. Chocolate truffles are perfect for gifting or serving as a luxurious treat during special occasions like holidays or celebrations.
Ingredients
- 8 ounces (225g) dark chocolate (70% cocoa): The base of your truffle ganache. Use high-quality chocolate for the best flavor.
- ½ cup heavy cream: Adds richness and creates the smooth, creamy texture of the ganache.
- 1 tablespoon unsalted butter: Enhances the smoothness and flavor of the truffle filling.
- 1 teaspoon vanilla extract: Adds depth to the flavor profile.
- Pinch of salt: Balances the sweetness and enhances the chocolate flavor.
- Coating options (choose one or more):
- Cocoa powder (for a classic finish)
- Chopped nuts (such as hazelnuts, almonds, or pistachios)
- Shredded coconut
- Melted chocolate (for a glossy coating)
- Sprinkles or edible glitter (for a festive touch)
- Sea salt (for a sweet-and-salty contrast)
Instructions
Step 1: Chop the Chocolate
Begin by chopping the dark chocolate into small, even pieces. This will help it melt more evenly when combined with the cream. You can use a serrated knife for a cleaner cut, or simply break it into pieces by hand if you prefer. Place the chopped chocolate into a heatproof bowl and set it aside.
Step 2: Heat the Cream and Butter
In a small saucepan over medium heat, bring the heavy cream and butter to a simmer. Stir occasionally, ensuring the butter is completely melted. You’ll want to heat the cream just until it begins to bubble at the edges—not to a full boil.
Step 3: Combine the Cream and Chocolate
Once the cream and butter are simmering, pour the mixture over the chopped chocolate. Let it sit for about 2-3 minutes to allow the heat from the cream to soften the chocolate. Afterward, gently stir the mixture with a spatula or wooden spoon until smooth and glossy. The result should be a thick, silky ganache. Add the vanilla extract and a pinch of salt, stirring to combine.
Step 4: Chill the Ganache
At this point, you will need to allow the ganache to cool and firm up before shaping it into truffles. Cover the bowl with plastic wrap and refrigerate the ganache for 1-2 hours, or until it has solidified enough to scoop and roll into balls.
Step 5: Shape the Truffles
Once the ganache has cooled and thickened, use a melon baller, small cookie scoop, or your hands to portion out the ganache into small rounds. Aim for about 1-inch-sized truffles, though you can make them larger or smaller depending on your preference. Roll each portion between your palms to form smooth, even balls.
Step 6: Coat the Truffles
Now comes the fun part—coating your truffles! You can roll them in cocoa powder for a classic truffle finish, or get creative with different coatings like chopped nuts, shredded coconut, or melted chocolate.
- For Cocoa Powder Coating: Place a few tablespoons of cocoa powder in a shallow dish. Gently roll each truffle in the cocoa powder, ensuring it is evenly coated.
- For Chopped Nuts: Place finely chopped nuts in a shallow bowl. Roll the truffles in the nuts, pressing lightly to make sure they stick.
- For Shredded Coconut: Roll the truffles in shredded coconut, ensuring they’re fully coated.
- For Melted Chocolate Coating: If you prefer a glossy chocolate finish, melt more chocolate (dark, milk, or white) in the microwave or double boiler. Dip each truffle into the melted chocolate using a fork or toothpick, then place it on parchment paper to set.
- For a Festive Touch: You can also roll the truffles in colorful sprinkles or edible glitter for an extra flair.
Step 7: Chill and Set
After coating the truffles, return them to the refrigerator for about 30 minutes to allow the coatings to set. If you’ve used melted chocolate for coating, this will also give it time to harden and create a glossy finish.
Step 8: Serve and Enjoy
Once the truffles have set and the coatings have hardened, your chocolate truffles are ready to serve! Arrange them on a platter, and if desired, garnish with a light dusting of cocoa powder or extra crushed nuts for added decoration. These truffles can be enjoyed immediately or stored for later.
- Prep Time: 20 minutes
- Cook Time: 2 hours
Nutrition
- Calories: 140 kcal
- Fat: 10g
- Carbohydrates: 14g
- Protein: 1g
Conclusion
Homemade chocolate truffles are a delicious and sophisticated treat that’s surprisingly easy to make. With their creamy centers, rich chocolate flavor, and endless customization options, these truffles will undoubtedly impress your guests or make a perfect gift for loved ones. Whether you’re making them for a special occasion or as a sweet treat just for yourself, chocolate truffles are sure to satisfy your sweet tooth and leave everyone asking for more. Enjoy every step of the process and, most importantly, enjoy the luxurious, indulgent results!

