Halloween is the perfect time to get creative in the kitchen, and these Cute Frankenstein Cookie Bars are an easy, fun, and spooky treat that everyone will love! Whether you’re making them for a Halloween party, an afternoon baking session with the kids, or just to satisfy your sweet tooth, these cookie bars are as adorable as they are delicious.
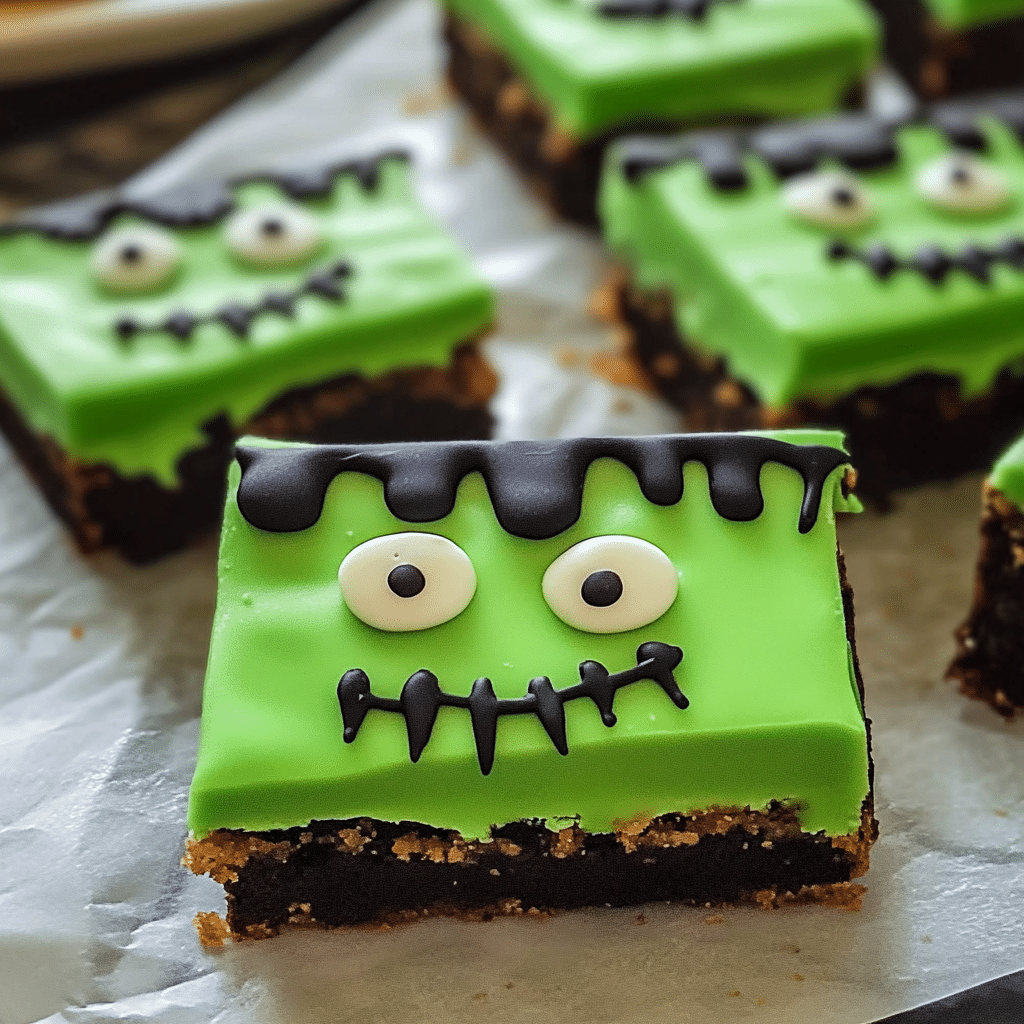
Soft, chewy, and full of flavor, these cookie bars feature a Frankenstein-inspired design with green frosting, candy eyes, and chocolate sprinkles for hair. The best part? They’re incredibly simple to make, with a basic sugar cookie base that’s topped with colorful frosting and decorations. You don’t need advanced baking skills to pull off this spooky-cute treat—just a few simple ingredients and a bit of creativity.
The combination of the soft cookie base and sweet frosting creates a deliciously indulgent treat, while the fun Frankenstein design makes these bars the perfect addition to your Halloween dessert table. Plus, they’re easy to customize with different colors and toppings, so you can make them your own. Ready to get started? Let’s dive into the recipe for these Cute Frankenstein Cookie Bars!
Why You’ll Love This Recipe
1. Easy to Make These cookie bars are incredibly simple to make. With a basic sugar cookie base and easy-to-mix frosting, you can whip up a batch in no time. They’re perfect for beginner bakers or anyone looking for a quick, fun dessert.
2. Fun and Festive Halloween is all about creativity, and these Frankenstein-inspired cookie bars are a fun way to get into the spooky spirit. The cute Frankenstein faces, complete with candy eyes and chocolate sprinkle hair, are sure to be a hit with both kids and adults.
3. Soft and Chewy Cookie Base The cookie base is soft, chewy, and perfectly sweet, making it the ideal canvas for the colorful frosting and decorations. The sugar cookie flavor pairs beautifully with the sweet frosting, creating a treat that’s as tasty as it is cute.
4. Customizable While this recipe focuses on Frankenstein-themed cookie bars, you can easily customize the design to suit your Halloween theme. Switch up the frosting color, add different candies, or create other spooky characters like ghosts, mummies, or pumpkins.
5. Perfect for Parties These cookie bars are perfect for Halloween parties, school events, or trick-or-treating. They’re easy to transport, can be made in advance, and are sure to impress with their festive design and delicious flavor.
Preparation Time and Servings
- Prep time: 20 minutes
- Cook time: 15-20 minutes
- Decoration time: 15 minutes
- Total time: 1 hour
- Servings: 16 cookie bars
- Calories per serving: 250
- Protein: 2g
- Carbs: 38g
- Fat: 10g
Ingredients
For the Cookie Base:
- 1 cup unsalted butter (softened)
- 1 1/4 cups granulated sugar
- 2 large eggs
- 1 teaspoon vanilla extract
- 2 1/2 cups all-purpose flour
- 1/2 teaspoon baking powder
- 1/2 teaspoon baking soda
- 1/4 teaspoon salt
For the Green Frosting:
- 1/2 cup unsalted butter (softened)
- 2 cups powdered sugar
- 1 tablespoon milk (add more as needed)
- 1 teaspoon vanilla extract
- Green food coloring (gel or liquid)
For Decoration:
- Candy eyes (store-bought or homemade)
- Chocolate sprinkles (for Frankenstein’s “hair”)
- Black decorating gel (or melted chocolate for drawing the mouth and stitches)
- Mini chocolate chips (for bolts, optional)
Why These Ingredients?
- Butter: Softened butter gives the cookie base a rich, buttery flavor and helps create a soft, chewy texture.
- Sugar: Granulated sugar sweetens the cookie base, while powdered sugar is used for the frosting to create a smooth, creamy texture.
- Eggs: Eggs add structure and moisture to the cookie dough, making it soft and tender.
- Vanilla Extract: Adds a warm, sweet flavor to both the cookie base and the frosting.
- Flour, Baking Powder, and Baking Soda: These ingredients provide structure and leavening, ensuring that the cookie base is soft and slightly fluffy.
- Food Coloring: Green food coloring gives the frosting its Frankenstein-inspired look. You can adjust the intensity of the green to suit your preference.
- Candy Eyes and Sprinkles: These decorations bring Frankenstein to life, creating the adorable face that makes these cookie bars so fun and festive.
Step-by-Step Instructions
Here’s how to make these Cute Frankenstein Cookie Bars step by step. It’s a fun and simple process that’s perfect for getting into the Halloween spirit!
1. Preheat the Oven and Prepare the Pan
Preheat your oven to 350°F (175°C). Line a 9×13-inch baking pan with parchment paper or lightly grease it with butter or non-stick spray. This will ensure the cookie bars come out easily after baking.
2. Make the Cookie Dough
Cream the butter and sugar:
In a large mixing bowl, cream together the softened butter and granulated sugar until light and fluffy, about 2-3 minutes. You can use a hand mixer or a stand mixer fitted with the paddle attachment.
Add the eggs and vanilla:
Beat in the eggs, one at a time, followed by the vanilla extract. Mix until fully combined and smooth.
Mix in the dry ingredients:
In a separate bowl, whisk together the flour, baking powder, baking soda, and salt. Gradually add the dry ingredients to the wet mixture, mixing until a smooth dough forms.
3. Bake the Cookie Base
Spread the cookie dough evenly into the prepared 9×13-inch pan, using a spatula to smooth the top. Bake in the preheated oven for 15-20 minutes, or until the edges are lightly golden and a toothpick inserted into the center comes out clean.
Pro Tip: Be careful not to overbake the cookie base. You want it to be soft and chewy, not dry or crumbly.
Once baked, remove the pan from the oven and let the cookie base cool completely in the pan before decorating.
4. Prepare the Green Frosting
Cream the butter:
In a mixing bowl, beat the softened butter until smooth and creamy.
Add the powdered sugar:
Gradually add the powdered sugar, 1/2 cup at a time, beating well after each addition.
Add the milk and vanilla:
Mix in the milk and vanilla extract, then continue to beat until the frosting is smooth and spreadable. If the frosting is too thick, add a little more milk, 1 teaspoon at a time, until you reach your desired consistency.
Color the frosting:
Add a few drops of green food coloring and mix until the frosting is evenly colored. You can adjust the amount of food coloring to achieve your desired shade of green.
5. Frost the Cookie Bars
Once the cookie base is completely cooled, spread the green frosting evenly over the top of the cookie layer. Use an offset spatula or the back of a spoon to smooth the frosting.
6. Decorate the Frankenstein Faces
Now for the fun part—decorating! Here’s how to bring your Frankenstein cookie bars to life:
Add the candy eyes:
Press two candy eyes into the frosting on each cookie bar to create Frankenstein’s eyes. You can space them close together or further apart, depending on the look you’re going for.
Create the hair:
Sprinkle chocolate sprinkles along the top edge of each cookie bar to form Frankenstein’s hair. Feel free to add as many sprinkles as you like to create a wild or more polished hairstyle.
Draw the mouth and stitches:
Using black decorating gel or melted chocolate, draw a small line for Frankenstein’s mouth and add some stitches across the forehead or cheek. You can also use black gel to outline the eyes for more detail.
Add the bolts (optional):
For an extra touch, press mini chocolate chips into the sides of the cookie bars to create the bolts on Frankenstein’s neck.
7. Cut and Serve
Once the cookie bars are fully decorated, use a sharp knife to cut them into squares or rectangles, depending on how large you want each Frankenstein face to be. Serve immediately, or store them in an airtight container until you’re ready to share them.
How to Serve
Here are a few fun ways to serve your Cute Frankenstein Cookie Bars:
- At a Halloween Party: Arrange the cookie bars on a platter or cake stand for a spooky centerpiece. Add a few Halloween-themed decorations around the platter for extra flair.
- As a Halloween Gift: Wrap individual cookie bars in cellophane bags and tie them with orange and black ribbons. They make a fun and festive treat to give to friends, neighbors, or coworkers.
- In a Dessert Spread: Include these cookie bars as part of a larger Halloween dessert table, alongside other spooky treats like ghost cupcakes, witch hat cookies, or pumpkin-shaped candy.
Additional Tips
To ensure your Cute Frankenstein Cookie Bars turn out perfect every time, here are a few extra tips:
1. Use Room Temperature Ingredients
Make sure the butter and eggs are at room temperature before starting. This helps the cookie dough come together smoothly and ensures the cookies have a soft, chewy texture.
*2. Don’t Overmix the
Dough*
When adding the dry ingredients to the wet mixture, mix just until combined. Overmixing can lead to dense, tough cookie bars instead of soft, tender ones.
3. Let the Cookie Base Cool Completely
It’s important to let the cookie base cool completely before frosting it. If the cookie is still warm, the frosting will melt and become runny.
4. Get Creative with Decorations
Feel free to get creative with your Frankenstein faces! You can switch up the color of the frosting, use different types of candy for the eyes, or even make other Halloween characters like mummies or pumpkins.
5. Store Properly
Store the cookie bars in an airtight container at room temperature for up to 3 days. If you want to keep them longer, you can store them in the fridge, but bring them to room temperature before serving for the best texture.
Recipe Variations
Here are a few ways to customize this recipe and make it your own:
1. Chocolate Frankenstein Bars
For a chocolate twist, add 1/4 cup of cocoa powder to the cookie dough. You can also use chocolate frosting instead of green frosting for a dark, spooky Frankenstein.
2. Gluten-Free Frankenstein Bars
Use a gluten-free flour blend in place of the all-purpose flour to make these cookie bars gluten-free. Be sure to use a 1:1 gluten-free flour substitute for the best results.
3. Vegan Frankenstein Bars
Make this recipe vegan by using plant-based butter and replacing the eggs with flax eggs (1 tablespoon ground flaxseed mixed with 3 tablespoons water per egg). Use dairy-free frosting and vegan candy eyes for decoration.
4. Mummy Cookie Bars
Turn these into mummy cookie bars by using white frosting instead of green and decorating with thin strips of frosting to create mummy “bandages.” Add candy eyes for the finishing touch.
5. Pumpkin Spice Cookie Bars
For a fall twist, add 1 teaspoon of pumpkin spice to the cookie dough. This will give the bars a warm, cozy flavor that pairs perfectly with the Halloween theme.
Freezing and Storage
Storage: Store the cookie bars in an airtight container at room temperature for up to 3 days. If you want to keep them longer, store them in the fridge for up to a week.
Freezing: You can freeze the unfrosted cookie bars for up to 3 months. Wrap them tightly in plastic wrap, then in aluminum foil before placing them in the freezer. When ready to serve, thaw at room temperature and frost as directed.
Special Equipment
- 9×13-inch Baking Pan: For baking the cookie base.
- Parchment Paper: To line the baking pan and prevent sticking.
- Offset Spatula: For spreading the frosting evenly.
- Mixing Bowls: For making the cookie dough and frosting.
- Decorating Gel or Piping Bag: For drawing the Frankenstein faces and details.
FAQ Section
Can I make these cookie bars ahead of time?
Yes! You can bake the cookie base and store it at room temperature for up to a day before frosting and decorating. This makes it easy to prep ahead for parties or events.
How do I prevent the frosting from melting?
Make sure the cookie base is completely cooled before frosting. If the frosting is too soft, you can chill it in the fridge for a few minutes before spreading it on the cookies.
Can I use store-bought cookie dough?
Yes, you can use store-bought sugar cookie dough to save time. Just press it into the baking pan and bake according to the package directions, then follow the rest of the recipe for frosting and decorating.
What can I use if I don’t have candy eyes?
You can make your own candy eyes using small dots of white frosting with a black dot of decorating gel in the center. You can also use mini chocolate chips for the eyes.
How do I make these bars extra chewy?
For extra chewy cookie bars, slightly underbake the cookie base by removing it from the oven when the edges are just golden and the center is still slightly soft. The cookie will continue to set as it cools.
Conclusion
There you have it—Cute Frankenstein Cookie Bars, the perfect spooky treat for Halloween! These bars are soft, chewy, and full of flavor, with a festive Frankenstein design that’s sure to impress. Whether you’re making them for a Halloween party, as a fun afternoon project with the kids, or just to enjoy the holiday spirit, these cookie bars are easy to make and even easier to eat.
Plus, with so many ways to customize and decorate them, the possibilities are endless. You can create different spooky characters, switch up the frosting colors, or add your favorite Halloween candy for a personal touch. I hope you have as much fun making these cookie bars as I do. Don’t forget to share your creations with me—I’d love to see your spooktacular cookie bars! Happy Halloween!
Print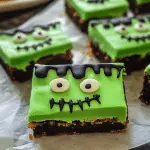
Cute Frankenstein Cookie Bars: A Spooktacular Treat
- Total Time: 45 minutes
Ingredients
-
- 1 cup unsalted butter, softened
-
- 1 cup granulated sugar
-
- 1 cup packed brown sugar
-
- 2 large eggs
-
- 2 teaspoons vanilla extract
-
- 3 cups all-purpose flour
-
- 1 teaspoon baking soda
-
- 1/2 teaspoon salt
-
- 1 cup semi-sweet chocolate chips
-
- 1/2 cup green frosting (store-bought or homemade)
-
- Candy eyes (available at craft stores or online)
-
- Chocolate sprinkles (for added texture)
Instructions
-
- Preheat your oven to 350°F (175°C). Grease a 9×13-inch baking pan or line it with parchment paper for easy removal.
-
- Cream the butter and sugars: In a large bowl, combine the softened butter, granulated sugar, and brown sugar. Beat them together until light and fluffy.
-
- Add the eggs and vanilla: Mix in the eggs one at a time, followed by the vanilla extract, ensuring everything is well incorporated.
-
- Combine the dry ingredients: In a separate bowl, whisk together the flour, baking soda, and salt. Gradually add this dry mixture to the wet ingredients, mixing until just combined.
-
- Fold in the chocolate chips: Gently stir in the chocolate chips, ensuring they’re evenly distributed throughout the batter.
-
- Spread in the pan: Pour the batter into the prepared baking pan, smoothing it out into an even layer.
-
- Bake: Place the pan in the oven and bake for 25-30 minutes, or until a toothpick inserted in the center comes out clean. Allow the bars to cool completely in the pan.
-
- Decorate: Once cooled, spread a generous layer of green frosting over the top. Use the candy eyes to create fun Frankenstein faces, and sprinkle with chocolate sprinkles to mimic hair.
-
- Cut and serve: Slice into squares, and you’re ready to enjoy these adorable treats!
- Prep Time: 15 minutes
- Cook Time: 30 minutes
Nutrition
- Serving Size: 24 servings
- Calories: 220
- Fat: 10
- Carbohydrates: 30g
- Protein: 2g

