Introduction
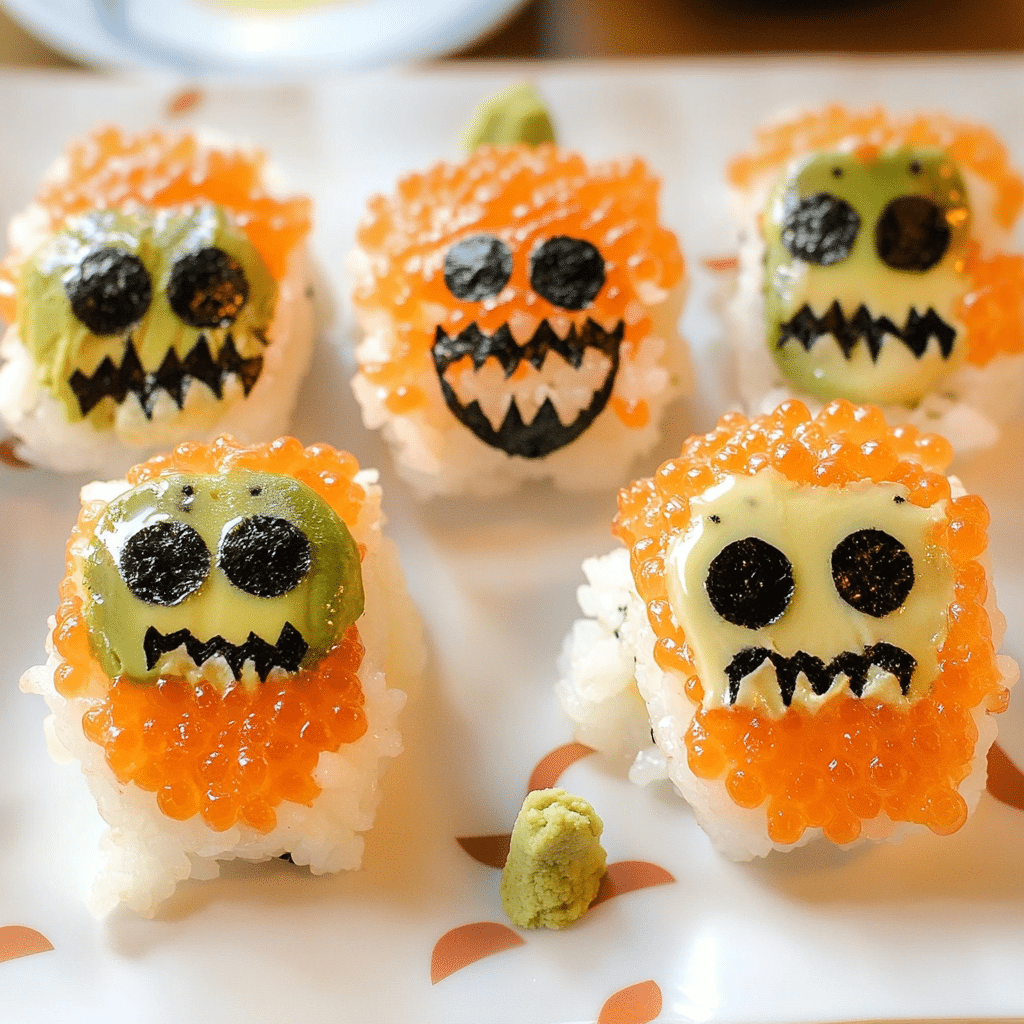
As Halloween creeps closer, it’s time to get creative in the kitchen, and what could be more fun than making Monster Sushi? This playful twist on traditional sushi is not only delicious but also a fantastic way to engage the whole family in some festive cooking. Picture vibrant sushi rolls transformed into adorable little monsters, complete with googly eyes and fun decorations. It’s a great opportunity to let your imagination run wild while preparing a meal that looks as good as it tastes.
I first discovered this idea while looking for Halloween-themed snacks to make with my kids. We love sushi, but I wanted to add a spooky touch to our dinner. The excitement on their faces when they saw the “monsters” we had created was priceless. Now, Monster Sushi has become a fun tradition in our house every Halloween, turning dinner into a creative celebration that everyone enjoys. It’s become a favorite bonding activity that sparks laughter and delicious memories, and I’m thrilled to share it with you.
Whether you’re hosting a Halloween party, looking for a unique dinner idea, or just wanting to have fun with food, this recipe is sure to impress. Let’s roll up our sleeves and dive into this monster mash-up of flavors and fun! You’ll be amazed at how simple it is to create these festive rolls, and your family and friends will appreciate the effort you put into making something truly special.
Why You’ll Love This Recipe
- Interactive Fun: Making Monster Sushi is a great way to get everyone involved in the kitchen. Kids love crafting their own little monsters, and it’s a perfect way to encourage creativity while cooking together.
- Customizable: You can fill the sushi rolls with your favorite ingredients, from classic crab and avocado to colorful veggies or even cooked chicken. This flexibility means you can cater to various tastes and dietary preferences, making it inclusive for everyone at the table.
- Visually Appealing: The vibrant colors and whimsical designs make this sushi a hit on any Halloween table. It’s the kind of dish that can start conversations and bring smiles, making it perfect for gatherings.
- Deliciously Healthy: Sushi is not only tasty but also packed with fresh ingredients, making it a nutritious option for the family. It’s a fun way to incorporate more veggies into your meals while still enjoying something everyone loves.
Preparation Time and Servings
- Total Time: 45 minutes (30 minutes prep, 15 minutes assembly)
- Servings: Makes about 4 monster sushi rolls, serving 4-6 people
- Calories per Serving: Approximately 250 calories per roll (depending on fillings and size)
Ingredients
Gather the following ingredients to create your Monster Sushi:
- 2 cups sushi rice: Essential for sushi, this short-grain rice is sticky and holds together beautifully, allowing you to create well-formed rolls.
- 2 ½ cups water: To cook the rice perfectly; the right water-to-rice ratio is crucial for achieving that signature sticky texture.
- ½ cup rice vinegar: Adds flavor and helps season the rice, giving it that authentic sushi taste that complements your fillings.
- 2 tablespoons sugar: For sweetness, balancing the tanginess of the vinegar; it creates a delightful flavor profile in the rice.
- ½ teaspoon salt: Enhances the overall flavor of the rice, ensuring each bite is seasoned perfectly.
- Nori sheets: These seaweed sheets are used to wrap the sushi and hold everything together, adding a lovely umami flavor to each roll.
- Fillings of your choice: Common options include crab sticks, cucumber, avocado, bell peppers, and carrots. Get creative! The more colorful the fillings, the more vibrant your monster sushi will be.
- Edible googly eyes: You can find these at craft stores or online for that fun monster effect. They’re the perfect finishing touch to bring your sushi to life.
- Soy sauce, for serving: A classic dip for sushi lovers; it adds an extra layer of flavor that enhances the overall experience.
- Sesame seeds: Optional, for an extra crunch on the outside of your monster sushi, adding both texture and visual appeal.
Step-by-Step Instructions
Step 1: Prepare the Sushi Rice
Rinse the sushi rice under cold water until the water runs clear to remove excess starch. This will help the rice cook evenly and become sticky. In a rice cooker or saucepan, combine the rinsed rice and water, then cook according to your rice cooker’s instructions or bring to a boil, then simmer covered for about 20 minutes until the water is absorbed.
Once the rice is cooked, it’s essential to let it sit for a few minutes. This resting period allows the moisture to redistribute, ensuring each grain remains fluffy and sticky without becoming mushy.
Step 2: Season the Rice
After letting the rice rest, transfer it to a large bowl and let it cool for a few minutes. In a small bowl, mix the rice vinegar, sugar, and salt until dissolved. Gently fold this mixture into the rice using a spatula, being careful not to crush the grains. The key is to mix it well enough that every grain gets coated in the vinegar mixture but not so much that the rice turns to mush. Allow the rice to cool completely before using it; this will help the rolls hold together better.
Step 3: Prepare Your Fillings
While the rice cools, slice your chosen fillings into thin strips. If you’re using vegetables like cucumber or bell pepper, aim for long, thin slices that will roll easily. For crab sticks or other protein options, cut them to a similar size. The presentation matters, so uniformity will not only make the sushi look better but will also enhance the eating experience.
Step 4: Assemble the Sushi Rolls
Lay a bamboo sushi mat on a flat surface and place a sheet of nori, shiny side down, on top. With wet hands to prevent sticking, take a handful of sushi rice and spread it evenly over the nori, leaving about an inch at the top edge. Press the rice down gently but firmly. It’s important to cover the nori fully, but don’t overdo it with the rice; too much can make rolling difficult.
Step 5: Add the Fillings
Place your prepared fillings in a line across the center of the rice. Feel free to get creative with the arrangement! You might want to alternate colors for a more visually appealing roll, or place your favorite ingredients front and center. This is where you can let your imagination shine, turning your sushi into a true work of art.
Step 6: Roll the Sushi
Using the sushi mat, carefully lift the edge closest to you and begin to roll it away from you, tucking the fillings as you go. Keep rolling until you reach the bare edge of the nori. Use a little water to seal the edge, which will help it stick and keep your roll intact. Don’t be afraid to use a bit of pressure; just be gentle enough not to squish your fillings.
Step 7: Shape the Monsters
With a sharp knife, slice the roll into bite-sized pieces. To create the monster effect, you can cut the rolls at an angle or into various shapes. Place each piece on a plate. For an added touch, consider giving some of the pieces different lengths for a playful look, making them appear like a family of quirky monsters.
Step 8: Decorate Your Monsters
Now for the fun part! Add edible googly eyes on top of each sushi piece using a small dot of rice or a bit of cream cheese to hold them in place. You can also sprinkle sesame seeds or add other decorative touches like thin slices of bell pepper for mouths or fins. This is where you can really personalize your creations, making them as silly or spooky as you like.
How to Serve
- As a Party Platter: Arrange the monster sushi on a large platter for an eye-catching centerpiece at your Halloween party. You might also consider adding some decorative elements around the platter, such as mini pumpkins or festive tablecloths, to enhance the overall presentation.
- With Dipping Sauces: Serve with soy sauce, wasabi, or spicy mayo for dipping. You can even create a little dipping station to allow guests to customize their flavors.
- Pair with Drinks: A refreshing lemonade or a fun, spooky punch can elevate your Halloween dinner. Think of bright colors or fun garnishes like floating fruit or creepy ice cubes to match the theme.
Additional Tips
- Keep Your Hands Wet: When handling sushi rice, keeping your hands damp will prevent the rice from sticking to you, making the rolling process smoother.
- Use Fresh Ingredients: The quality of your fillings matters. Fresh vegetables and good-quality seafood or substitutes will enhance the flavor and make your sushi more enjoyable.
- Make Ahead: You can prepare the sushi rice a few hours in advance. Just keep it covered with a damp cloth to prevent it from drying out, ensuring it stays moist and ready for rolling.
- Experiment with Shapes: Don’t hesitate to cut the sushi into different shapes or sizes to create various monster characters. This can be a fun way to engage kids and encourage them to create their own unique designs.
- Safe Storage: If you have leftovers, store them in an airtight container in the fridge and consume them within 24 hours for the best taste. Sushi is always best fresh, but proper storage can keep it enjoyable for a bit longer.
Recipe Variations
- Vegetarian Option: Swap out traditional fillings for avocado, cucumber, and carrot sticks for a veggie-packed roll. You can also add ingredients like pickled radish for a tangy twist.
- Fruity Twist: For a sweet version, consider using fruits like mango and strawberries for a unique sushi experience. This could be especially fun for dessert sushi that everyone will enjoy.
- Spicy Monsters: Add some sriracha or spicy tuna as a filling to give your sushi a little kick. For those who love heat, this can really take the sushi to the next level.
- Halloween Colors: Use black rice or colorful vegetable purees to dye the rice for an extra festive touch. The contrast can make your sushi even more eye-catching.
Serving Suggestions
To complement your Monster Sushi, consider these fun additions:
- Spooky Salad: A simple green salad with Halloween-themed toppings like candy corn or pumpkin seeds can add a festive touch. You could also create a colorful slaw to add crunch and brightness.
- Edible Monsters: Serve alongside some fun Halloween-themed snacks, like “witch fingers” (celery sticks with almond slivers) or “bat wings” (chicken wings). These can provide a variety of flavors and textures for your guests.
- Fun Beverages: Pair with themed drinks like green punch or fruity sodas to keep the spirit of the season alive. Creative drink names can add to the fun atmosphere of your gathering.
Freezing and Storage
Storage
If you have leftover sushi, store it in an airtight container in the fridge for up to 24 hours. The rice will lose some of its texture, but it’s still safe to eat. Try to separate any pieces with parchment paper to avoid sticking.
Freezing
While it’s best to enjoy sushi fresh, you can freeze unassembled ingredients. Just keep in mind that once the rice is cooked and rolled, it’s best consumed fresh. If you do freeze ingredients, ensure they’re tightly wrapped to prevent freezer burn.
Special Equipment
- Bamboo Sushi Mat: A must-have for rolling sushi. If you don’t have one, a clean dish towel can work in a pinch, though it might require a bit more effort.
- Sharp Knife: Essential for cleanly slicing your sushi rolls without squishing them. A serrated knife can also be effective for this task.
- Plastic Wrap: Useful for keeping your sushi rolls fresh or for wrapping up any leftovers. It can also help when rolling if you want to keep things extra tidy.
FAQ Section
Can I make this sushi ahead of time?
You can prepare the rice and fillings a few hours in advance, but it’s best to assemble the rolls just before serving to maintain freshness. This way, they’ll have the best texture and flavor.
What if I can’t find nori?
If nori isn’t available, you can use large lettuce leaves as a wrap for a fresh take on sushi. This option is also gluten-free and adds a nice crunch.
How can I make it less spicy?
Simply omit any spicy ingredients or use mild fillings like cucumber and avocado. You can also adjust the amount of sriracha or spicy mayo to suit your taste.
Can I use brown rice instead?
Yes! Brown rice can be a healthier alternative, though it will have a different texture and flavor than traditional sushi rice. Just be sure to cook it properly to achieve the right consistency.
Is this suitable for kids?
Absolutely! Kids love the fun shapes and can help make their own creations, making it a great family activity. It’s also an excellent way to encourage them to try new ingredients.
Conclusion
I can’t wait for you to dive into making your own Monster Sushi! This fun and festive dish is sure to be a hit at your Halloween gatherings, sparking joy and laughter as everyone creates their own edible monsters. I’d love to hear how your creations turn out, so please share your photos and stories. Don’t hesitate to tag me on social media—I’m always thrilled to see your spooky sushi masterpieces. Happy sushi rolling!
Print
Monster Sushi: A Spooktacular Treat for Halloween
- Total Time: 45 minutes
Ingredients
- 2 cups sushi rice: Essential for sushi, this short-grain rice is sticky and holds together beautifully, allowing you to create well-formed rolls.
- 2 ½ cups water: To cook the rice perfectly; the right water-to-rice ratio is crucial for achieving that signature sticky texture.
- ½ cup rice vinegar: Adds flavor and helps season the rice, giving it that authentic sushi taste that complements your fillings.
- 2 tablespoons sugar: For sweetness, balancing the tanginess of the vinegar; it creates a delightful flavor profile in the rice.
- ½ teaspoon salt: Enhances the overall flavor of the rice, ensuring each bite is seasoned perfectly.
- Nori sheets: These seaweed sheets are used to wrap the sushi and hold everything together, adding a lovely umami flavor to each roll.
- Fillings of your choice: Common options include crab sticks, cucumber, avocado, bell peppers, and carrots. Get creative! The more colorful the fillings, the more vibrant your monster sushi will be.
- Edible googly eyes: You can find these at craft stores or online for that fun monster effect. They’re the perfect finishing touch to bring your sushi to life.
- Soy sauce, for serving: A classic dip for sushi lovers; it adds an extra layer of flavor that enhances the overall experience.
- Sesame seeds: Optional, for an extra crunch on the outside of your monster sushi, adding both texture and visual appeal.
Instructions
Step 1: Prepare the Sushi Rice
Rinse the sushi rice under cold water until the water runs clear to remove excess starch. This will help the rice cook evenly and become sticky. In a rice cooker or saucepan, combine the rinsed rice and water, then cook according to your rice cooker’s instructions or bring to a boil, then simmer covered for about 20 minutes until the water is absorbed.
Once the rice is cooked, it’s essential to let it sit for a few minutes. This resting period allows the moisture to redistribute, ensuring each grain remains fluffy and sticky without becoming mushy.
Step 2: Season the Rice
After letting the rice rest, transfer it to a large bowl and let it cool for a few minutes. In a small bowl, mix the rice vinegar, sugar, and salt until dissolved. Gently fold this mixture into the rice using a spatula, being careful not to crush the grains. The key is to mix it well enough that every grain gets coated in the vinegar mixture but not so much that the rice turns to mush. Allow the rice to cool completely before using it; this will help the rolls hold together better.
Step 3: Prepare Your Fillings
While the rice cools, slice your chosen fillings into thin strips. If you’re using vegetables like cucumber or bell pepper, aim for long, thin slices that will roll easily. For crab sticks or other protein options, cut them to a similar size. The presentation matters, so uniformity will not only make the sushi look better but will also enhance the eating experience.
Step 4: Assemble the Sushi Rolls
Lay a bamboo sushi mat on a flat surface and place a sheet of nori, shiny side down, on top. With wet hands to prevent sticking, take a handful of sushi rice and spread it evenly over the nori, leaving about an inch at the top edge. Press the rice down gently but firmly. It’s important to cover the nori fully, but don’t overdo it with the rice; too much can make rolling difficult.
Step 5: Add the Fillings
Place your prepared fillings in a line across the center of the rice. Feel free to get creative with the arrangement! You might want to alternate colors for a more visually appealing roll, or place your favorite ingredients front and center. This is where you can let your imagination shine, turning your sushi into a true work of art.
Step 6: Roll the Sushi
Using the sushi mat, carefully lift the edge closest to you and begin to roll it away from you, tucking the fillings as you go. Keep rolling until you reach the bare edge of the nori. Use a little water to seal the edge, which will help it stick and keep your roll intact. Don’t be afraid to use a bit of pressure; just be gentle enough not to squish your fillings.
Step 7: Shape the Monsters
With a sharp knife, slice the roll into bite-sized pieces. To create the monster effect, you can cut the rolls at an angle or into various shapes. Place each piece on a plate. For an added touch, consider giving some of the pieces different lengths for a playful look, making them appear like a family of quirky monsters.
Step 8: Decorate Your Monsters
Now for the fun part! Add edible googly eyes on top of each sushi piece using a small dot of rice or a bit of cream cheese to hold them in place. You can also sprinkle sesame seeds or add other decorative touches like thin slices of bell pepper for mouths or fins. This is where you can really personalize your creations, making them as silly or spooky as you like.
- Prep Time: 30 minutes
- Assemble Time: 15 minutes
Nutrition
- Serving Size: Per Serving
- Calories: 250 kcal

