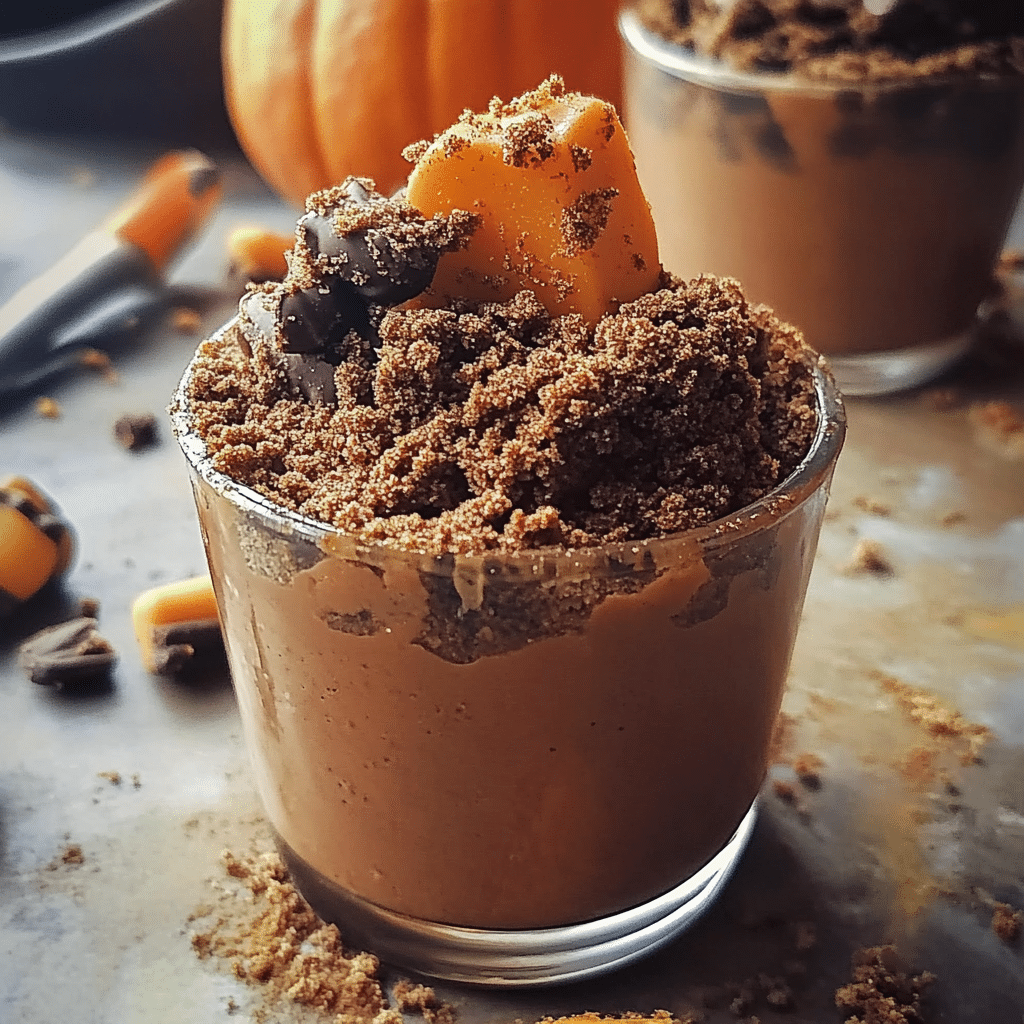
As the leaves begin to turn and the air gets a bit crisper, there’s something truly special about the arrival of fall—pumpkin-flavored everything! While pumpkin lattes and pies are delicious, there’s something uniquely fun about digging into a Pumpkin Patch Dirt Cup. This whimsical dessert combines rich, creamy pudding with crunchy cookie crumbs and sweet candy pumpkins, making it a treat that’s perfect for kids and adults alike.
I first discovered these delightful dirt cups at a Halloween party a few years ago. They were such a hit that I decided to make them a staple at all my autumn gatherings. Every time I serve them, I’m reminded of how fun it is to get a little messy while enjoying dessert! Plus, they’re so easy to put together that even my niece, who’s still learning her way around the kitchen, loves to help me make them. It’s a recipe that brings a bit of joy and creativity to the table.
Whether you’re hosting a fall celebration, a Halloween bash, or just want to indulge in some festive fun, these Pumpkin Patch Dirt Cups are sure to impress. Let’s dig in and create some delicious memories!
Why You’ll Love This Recipe
- Easy to Make: With minimal prep time and no baking involved, these cups are perfect for busy schedules. Just layer, decorate, and enjoy!
- Customizable: Feel free to mix and match ingredients based on your preferences or what you have on hand. This dessert allows for creativity and personalization.
- Kid-Friendly Fun: Kids will love getting involved in layering the ingredients and decorating their own cups. It’s a great way to spark their imagination!
- Deliciously Whimsical: The combination of creamy pudding, crunchy cookie crumbs, and candy pumpkins creates a delightful experience for your taste buds.
Imagine scooping through a cup to find layers of velvety pumpkin pudding topped with a crunchy chocolate layer and festive candy pumpkins. It’s a delicious and playful way to celebrate the season, and it’s sure to bring a smile to everyone’s face!
Preparation Time and Servings
- Total Time: 20-30 minutes (plus chilling time)
- Servings: This recipe makes about 6-8 cups, depending on the size of your containers.
- Nutrition Facts: Approximately 250 calories per serving (1 cup), with variations based on ingredient choices.
Ingredients
Here’s what you’ll need to whip up your Pumpkin Patch Dirt Cups:
- 1 box of instant vanilla pudding mix (3.4 oz): This will serve as the creamy base for our pudding layer.
- 2 cups of milk: To prepare the pudding mix and achieve a smooth consistency.
- 1 cup of pumpkin puree: Adds that rich pumpkin flavor and fall vibes. Be sure to use pure pumpkin puree, not pie filling!
- 1 teaspoon of pumpkin pie spice: For that cozy, spiced flavor that captures the essence of autumn.
- 1 cup of whipped topping: This adds lightness and creaminess to the pudding, making it extra delightful.
- 1 cup of chocolate sandwich cookies (crushed): These will create the “dirt” layer, giving texture and a chocolatey crunch.
- Candy pumpkins or gummy worms: For decorating and adding that Halloween flair. These will make your cups look festive and fun!
- Small cups or jars: To layer your ingredients and showcase the deliciousness. Clear containers work best to display the beautiful layers.
Feel free to swap out any ingredients according to your taste—this recipe is all about having fun and experimenting!
Step-by-Step Instructions
Creating your Pumpkin Patch Dirt Cups is a breeze! Here’s a simple step-by-step guide to help you assemble these delightful desserts:
- Prepare the Pudding: In a large bowl, whisk together the instant vanilla pudding mix and milk until it thickens. This usually takes about 2-3 minutes. You want it to be nice and smooth—no lumps allowed!
- Add Pumpkin: Gently fold in the pumpkin puree and pumpkin pie spice until well combined. This adds that wonderful autumn flavor to your pudding, making it rich and delicious.
- Incorporate Whipped Topping: Carefully fold in the whipped topping to give the pudding a light and fluffy texture. This step is crucial for creating a creamy layer that balances the crunch of the cookies.
- Crush the Cookies: In a resealable bag, crush the chocolate sandwich cookies into small pieces. You want them to resemble dirt, so don’t worry about making them perfectly uniform. Just make sure they’re small enough to sprinkle easily!
- Layer the Cups: Begin layering your cups:
- Start with a layer of the pumpkin pudding mixture at the bottom.
- Add a layer of crushed cookies for the “dirt.”
- Repeat the layers until you reach the top, finishing with a layer of cookie crumbs. You can get creative with how many layers you want!
- Decorate: Top each cup with candy pumpkins or gummy worms for a festive touch. You can even sprinkle a bit of extra cookie crumbs on top for added crunch and texture.
- Chill: Place the cups in the refrigerator for at least 30 minutes to allow the flavors to meld together. This also helps the pudding firm up a bit, making it easier to scoop.
- Serve and Enjoy: Once chilled, your Pumpkin Patch Dirt Cups are ready to delight! Serve them up and watch everyone dig in with excitement.
Cooking Tips:
- If you want to add a bit more texture, consider adding chopped nuts or crushed pretzels between the layers for an unexpected crunch.
- These cups can be made a day in advance, making them a great option for stress-free entertaining. Just make sure to cover them tightly!
How to Serve
These Pumpkin Patch Dirt Cups are perfect for a variety of occasions. Here are some fun ways to present them:
- Halloween Parties: Set them out on a dessert table as part of your Halloween spread. They’ll be a hit with both kids and adults!
- Fall Gatherings: Perfect for Thanksgiving or fall-themed events, these cups can add a playful touch to your dessert offerings.
- Kid-Friendly Snacks: Encourage kids to create their own dirt cups at home as a fun afternoon activity. It’s a great way to keep them engaged!
- Classroom Treats: These cups are easy to transport and make great treats for classroom celebrations. Just make sure to check for any food allergies!
Additional Tips
Here are five tips to ensure your Pumpkin Patch Dirt Cups turn out delicious and appealing:
- Use Pure Pumpkin: Make sure to use pure pumpkin puree and not pumpkin pie filling, which has added sugar and spices that can alter the flavor.
- Whisk Thoroughly: When mixing the pudding, make sure to whisk well to avoid lumps and ensure a smooth texture. A hand mixer can be handy for this!
- Layer Creatively: Don’t be afraid to get creative with your layers! Alternate between different textures for a more interesting cup, or use multiple colors of pudding if you want to get fancy.
- Personalize: Let each person decorate their own cup with their favorite candies—this adds a fun, interactive element that everyone will enjoy!
- Keep Refrigerated: Store any leftovers in the refrigerator for up to 3 days, but keep in mind that the cookie crumbs may soften over time. It’s best enjoyed fresh!
Recipe Variations
Looking to mix things up? Here are some fun variations to try with your Pumpkin Patch Dirt Cups:
- Chocolate Pudding Base: Swap out the vanilla pudding for chocolate pudding for a richer flavor that complements the pumpkin. You can even layer both flavors for a marbled effect!
- Alternative Toppings: Use crushed Oreos, crushed graham crackers, or even crushed caramel candies instead of chocolate sandwich cookies. Each will give a unique flavor and texture.
- Healthier Option: Use Greek yogurt instead of whipped topping for a healthier twist without sacrificing creaminess. You can also use lower-fat pudding mix for a lighter version.
- Spice It Up: Add a pinch of cayenne pepper or cinnamon to the pumpkin mixture for a surprising kick! This can elevate the flavor profile and give it an extra layer of complexity.
Serving Suggestions
To enhance your Pumpkin Patch Dirt Cups, consider these side dishes and beverage pairings:
- Side Dishes: Serve with fresh apple slices and caramel dip for a classic fall treat. The crunchiness of the apples complements the creaminess of the dirt cups beautifully.
- Beverages: Pair with warm apple cider, pumpkin spice lattes, or even a non-alcoholic spiced punch to keep the fall theme going.
- For Kids: Offer a selection of festive Halloween cookies, mini cupcakes, or fruit skewers to create a fun dessert spread that will delight young guests.
Freezing and Storage
Want to keep your Pumpkin Patch Dirt Cups fresh? Here’s how:
- Storage: Store any leftover cups in the refrigerator for up to 3 days. Make sure to cover them to keep them fresh. You can use plastic wrap or an airtight container.
- Freezing: While it’s best to enjoy these cups fresh, you can freeze the pudding mixture in an airtight container for up to a month. Just allow it to thaw in the fridge before serving. Keep in mind that the texture may change slightly after freezing.
Special Equipment
You don’t need much to create your Pumpkin Patch Dirt Cups, but here are a few tools that can help:
- Mixing Bowls: A large bowl for mixing the pudding and another for crushing cookies will make the process easier.
- **Rese
alable Bags**: Perfect for crushing the cookies without the mess! Just toss them in and use a rolling pin or your hands to crush.
- Small Cups or Jars: Clear containers let everyone see the beautiful layers. Mason jars or clear plastic cups work great and add a rustic touch.
FAQ Section
Can I use fresh pumpkin instead of canned?
Yes! Just make sure to cook and puree it thoroughly before using it in the recipe. Fresh pumpkin can have a slightly different flavor, so be sure to adjust your spices accordingly.
How can I make these ahead of time?
You can prepare the cups a day in advance and store them in the refrigerator until you’re ready to serve. Just keep them covered to maintain freshness.
What if I don’t have whipped topping?
You can substitute with homemade whipped cream or use Greek yogurt for a healthier option. Just be sure to adjust the sweetness if needed.
Can I use a different flavor of pudding?
Absolutely! Feel free to experiment with different pudding flavors, like chocolate or butterscotch, to create unique variations. You could even layer different flavors for a fun twist!
How long do they last in the fridge?
These cups are best enjoyed within 3 days, but they can last a little longer if stored properly. The cookie crumbs may soften over time, so enjoy them while they’re fresh!
Conclusion
I can’t wait for you to whip up these delightful Pumpkin Patch Dirt Cups! They’re not just a treat; they’re a fun, interactive way to celebrate the fall season with family and friends. With their creamy pumpkin flavor, crunchy layers, and festive toppings, they’re sure to be a hit at any gathering. So gather your ingredients, get creative, and enjoy the process of making this whimsical dessert. Don’t forget to share your spooky creations on social media—tag me on Instagram, as I love seeing how you put your own spin on these Pumpkin Patch Dirt Cups!
Print
Pumpkin Patch Dirt Cups: A Spooktacular Treat
- Total Time: 20-30 minutes
Ingredients
- 1 box of instant vanilla pudding mix (3.4 oz): This will serve as the creamy base for our pudding layer.
- 2 cups of milk: To prepare the pudding mix and achieve a smooth consistency.
- 1 cup of pumpkin puree: Adds that rich pumpkin flavor and fall vibes. Be sure to use pure pumpkin puree, not pie filling!
- 1 teaspoon of pumpkin pie spice: For that cozy, spiced flavor that captures the essence of autumn.
- 1 cup of whipped topping: This adds lightness and creaminess to the pudding, making it extra delightful.
- 1 cup of chocolate sandwich cookies (crushed): These will create the “dirt” layer, giving texture and a chocolatey crunch.
- Candy pumpkins or gummy worms: For decorating and adding that Halloween flair. These will make your cups look festive and fun!
- Small cups or jars: To layer your ingredients and showcase the deliciousness. Clear containers work best to display the beautiful layers.
Instructions
- Prepare the Pudding: In a large bowl, whisk together the instant vanilla pudding mix and milk until it thickens. This usually takes about 2-3 minutes. You want it to be nice and smooth—no lumps allowed!
- Add Pumpkin: Gently fold in the pumpkin puree and pumpkin pie spice until well combined. This adds that wonderful autumn flavor to your pudding, making it rich and delicious.
- Incorporate Whipped Topping: Carefully fold in the whipped topping to give the pudding a light and fluffy texture. This step is crucial for creating a creamy layer that balances the crunch of the cookies.
- Crush the Cookies: In a resealable bag, crush the chocolate sandwich cookies into small pieces. You want them to resemble dirt, so don’t worry about making them perfectly uniform. Just make sure they’re small enough to sprinkle easily!
- Layer the Cups: Begin layering your cups:
- Start with a layer of the pumpkin pudding mixture at the bottom.
- Add a layer of crushed cookies for the “dirt.”
- Repeat the layers until you reach the top, finishing with a layer of cookie crumbs. You can get creative with how many layers you want!
- Decorate: Top each cup with candy pumpkins or gummy worms for a festive touch. You can even sprinkle a bit of extra cookie crumbs on top for added crunch and texture.
- Chill: Place the cups in the refrigerator for at least 30 minutes to allow the flavors to meld together. This also helps the pudding firm up a bit, making it easier to scoop.
- Serve and Enjoy: Once chilled, your Pumpkin Patch Dirt Cups are ready to delight! Serve them up and watch everyone dig in with excitement.
- Prep Time: 15 minutes
- Cook Time: 15 minutes
Nutrition
- Calories: 250 kcal
- Fat: 10g
- Carbohydrates: 35g
- Protein: 4g

