Introduction
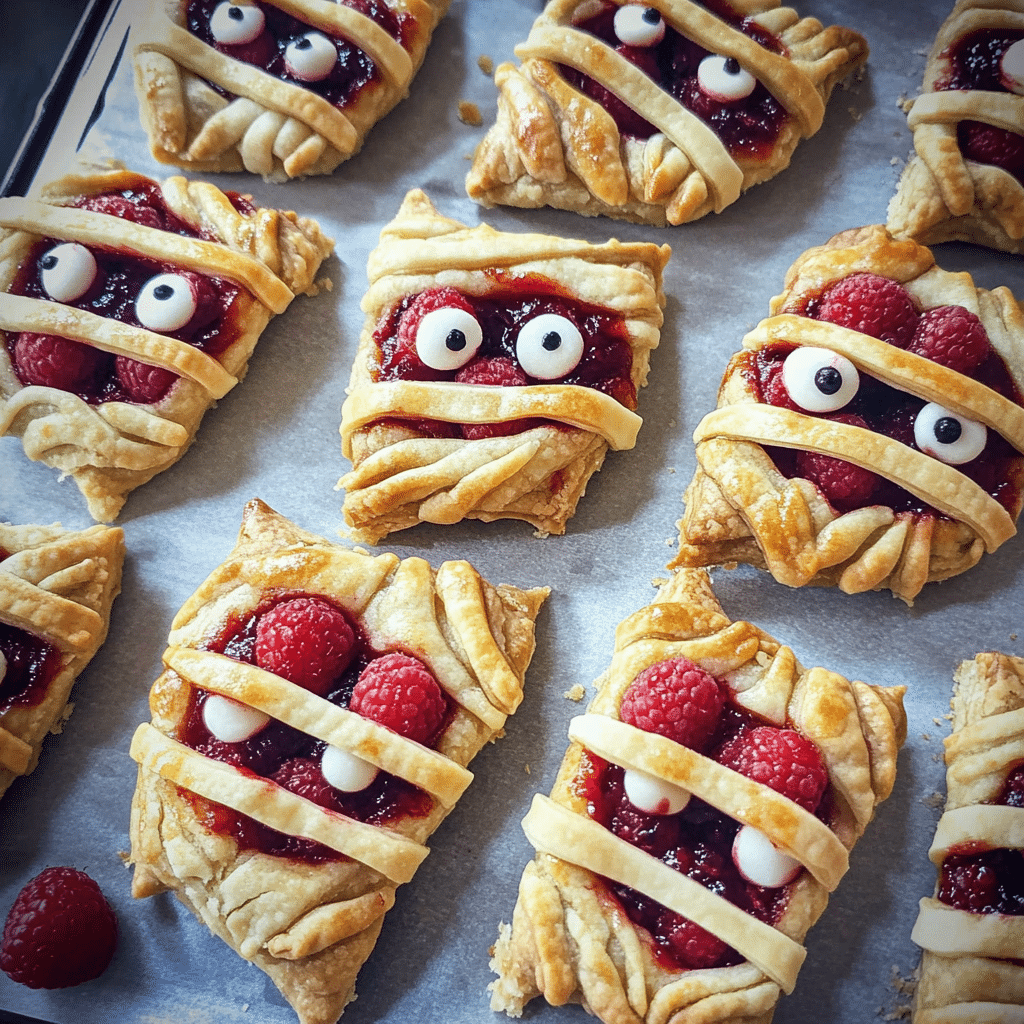
Halloween is all about fun, frights, and fabulous treats, and what better way to celebrate than with these adorable Raspberry Mummy Pies? Imagine flaky pastry wrapped around a sweet, tangy raspberry filling, all dressed up with a cute little mummy face. They’re the perfect blend of spooky and sweet, making them an irresistible addition to any Halloween gathering.
I first came across this recipe while searching for festive treats to make for my kids’ Halloween party. We wanted something that was easy to whip up but still packed with personality. As soon as we took our first bite, I knew these mummy pies were going to be a staple in our household every October. They quickly became a favorite, not just for their delicious flavor, but for the fun memories we created while making them together. The best part? They’re not just delicious; they also make a great conversation starter! Everyone loves the whimsical idea of mummies coming to life in the form of dessert.
So whether you’re hosting a Halloween bash, attending a potluck, or just want to indulge your sweet tooth, these Raspberry Mummy Pies are sure to impress. They’re simple enough for beginners yet festive enough to delight seasoned bakers. Plus, the joy of decorating them makes the process even more enjoyable.
Why You’ll Love This Recipe
- Easy to Make: With pre-made pastry and a simple filling, these pies come together in no time, making them perfect for busy bakers. The straightforward steps mean you can focus more on the fun parts, like decorating.
- Family-Friendly: Kids will love helping with the “bandage” wrapping, making it a fun activity for everyone. It’s a great way to spend time together and create lasting memories in the kitchen.
- Delicious Flavor: The tartness of the raspberries pairs beautifully with the buttery pastry, creating a delightful contrast that will have you coming back for more. Each bite offers a burst of flavor that’s both refreshing and satisfying.
- Customizable: Feel free to swap out the raspberry filling for your favorite jam or pie filling. Whether you prefer blueberry, cherry, or even a chocolate ganache, the possibilities are endless, and each variation can give a new twist to the recipe.
Preparation Time and Servings
- Total Time: 45 minutes (15 minutes prep, 30 minutes baking)
- Servings: About 8 mummy pies
- Calories per Serving: Approximately 210 calories per pie
Ingredients
To create these delightful Raspberry Mummy Pies, you’ll need the following ingredients:
- 1 package (14 oz) refrigerated pie crusts: For a flaky, buttery base; you can also use homemade crust if you prefer. Using store-bought crust saves time and still delivers on flavor.
- 1 cup raspberry preserves or jam: The star of the filling; it brings a sweet and tangy flavor that’s irresistible. It’s important to choose a quality preserve for the best taste.
- 1 egg (for egg wash): This will give the pies a beautiful golden color when baked, enhancing their visual appeal. It also helps to bind the dough together.
- 1 cup powdered sugar: For the mummy icing that adds the finishing touch, making these pies even more festive. It’s the sweet detail that ties everything together.
- 1-2 tablespoons milk: To thin out the icing for drizzling, ensuring it’s the right consistency for decorating.
- Candy eyes: For that adorable, spooky touch that brings your mummies to life. They’re the perfect finishing detail that adds character and charm.
Step-by-Step Instructions
Step 1: Preheat Your Oven
First, preheat your oven to 400°F (200°C). This will ensure your pies bake up perfectly golden and flaky. Preheating is a crucial step that helps achieve that desirable crust texture.
Step 2: Prepare the Pie Crusts
Roll out the pie crusts on a lightly floured surface. You want them to be about 1/8 inch thick. Using a round cutter or a glass, cut out circles about 4 inches in diameter. The thickness is key to achieving that perfect balance of crispy exterior and soft interior.
Step 3: Fill the Pies
Place half of the cut-out circles on a baking sheet lined with parchment paper. Spoon about a tablespoon of raspberry preserves onto the center of each circle, leaving some space around the edges to seal the pies. Be generous with the filling, but avoid overfilling to prevent leaks.
Step 4: Top and Seal
Place the remaining circles on top of the filled circles to create a top for each pie. Using a fork, press down the edges to seal them well. This will help keep the filling from leaking out while baking, ensuring a beautifully intact pie.
Step 5: Create the Mummy Look
To give your pies their signature mummy look, use a sharp knife or pizza cutter to cut thin strips from the leftover dough. Lay these strips across the tops of the pies in a crisscross pattern. It doesn’t have to be perfect—remember, mummies are supposed to look a bit spooky! The fun is in the creativity, so let your imagination run wild.
Step 6: Egg Wash
In a small bowl, beat the egg and brush it over the tops of the pies. This will give them a beautiful golden color when they bake. The egg wash also adds a nice sheen that makes your pies look extra appetizing.
Step 7: Bake the Pies
Place the baking sheet in the preheated oven and bake for 20-25 minutes or until the pies are golden brown and the filling is bubbly. Keep an eye on them as they bake; the aroma will be simply irresistible, and you’ll know they’re ready when they look golden and delicious.
Step 8: Cool and Decorate
Once baked, remove the pies from the oven and let them cool on a wire rack. While they cool, prepare the mummy icing by mixing the powdered sugar and milk until you reach a drizzle-able consistency. You can adjust the milk as needed to achieve your desired thickness. It’s a good idea to let them cool completely before icing to avoid melting.
Step 9: Add the Icing and Eyes
Once the pies are cool, drizzle the icing over the tops in a zigzag pattern to mimic mummy bandages. Finally, add candy eyes to give your mummies some character. The eyes are what make these pies come to life, so have fun placing them on each pie.
How to Serve
- As a Halloween Dessert: Present them on a spooky-themed platter at your Halloween party. They’ll be the star of the dessert table and will have guests raving.
- With Ice Cream: Serve warm with a scoop of vanilla ice cream for an extra indulgent treat. The contrast of warm pie and cold ice cream is simply heavenly.
- For School Events: Individually wrap them in clear cellophane for a fun surprise in lunchboxes or at school parties. They make great treats for kids and adults alike.
Additional Tips
- Use Store-Bought Crust: If you’re short on time, store-bought crust is a lifesaver and tastes great! It simplifies the process and allows you to focus on the fun parts.
- Chill the Dough: If your dough is warm, it can be tricky to work with. Pop it in the fridge for about 15 minutes before rolling out. This will make it easier to handle and less likely to stick.
- Adjust the Filling: Feel free to mix in other fruits or even chocolate chips for a unique twist! The versatility of this recipe allows for lots of experimentation.
- Make Ahead: You can prepare the pies in advance and freeze them unbaked. Just bake them straight from the freezer, adding a few extra minutes to the baking time. This is a great way to save time on party day.
- Play with Icing: Get creative with the icing! You can tint it with food coloring for a fun twist or use melted chocolate for a different flavor. Your creativity can turn these pies into a true centerpiece.
Recipe Variations
- Different Fillings: Swap out raspberry for blueberry, cherry, or even lemon curd for a different flavor profile. Each filling brings its own unique taste and seasonal flair.
- Nutty Addition: Add some finely chopped nuts to the filling for a bit of crunch. Nuts can enhance the texture and provide an extra layer of flavor.
- Vegan Option: Use plant-based butter for the crust and substitute the egg wash with almond milk for a vegan-friendly version. There are plenty of delicious alternatives that can cater to dietary preferences.
- Mini Mummy Pies: Use smaller cutters for bite-sized treats that are perfect for parties. They’re great for sharing and make for cute snacks.
Serving Suggestions
To complement your Raspberry Mummy Pies, consider these fun side ideas:
- Pumpkin Spice Latte: A warm drink that pairs perfectly with the sweet, tangy pies. The flavors of fall and Halloween blend beautifully together.
- Crispy Apple Slices: A refreshing side that balances the sweetness of the pies. The crispness of the apples contrasts well with the flaky pastry.
- Halloween-Themed Snack Platter: Include spooky treats like ghost-shaped cookies or bat-shaped cheese slices for a fun spread. This creates an inviting and festive atmosphere for your guests.
Freezing and Storage
Storage
Keep leftover mummy pies in an airtight container at room temperature for up to 3 days. They’re best enjoyed fresh but can be reheated in the oven if you like them warm. Just pop them back in at 350°F
for a few minutes to restore their crispiness.
Freezing
To freeze, place unbaked mummy pies on a baking sheet and freeze until solid. Then, transfer them to a freezer-safe container or bag. They’ll keep for up to 3 months. When you’re ready to bake, just pop them directly into the oven from the freezer, adding a few extra minutes to the baking time for perfect results.
Special Equipment
- Rolling Pin: For rolling out the pie crust to the right thickness. A good rolling pin makes the process much easier.
- Round Cutter: A cookie cutter or a glass works perfectly for cutting out the pie shapes. You can even use fun shapes if you want to switch it up.
- Parchment Paper: Essential for lining the baking sheet and preventing sticking. It also makes for easy cleanup.
- Wire Rack: For cooling the pies after baking, ensuring they maintain their texture and don’t become soggy.
FAQ Section
- Can I use homemade pie crust?
Absolutely! Homemade pie crust adds a personal touch and can be made in advance. Just make sure it’s well-chilled for easier handling. - What if I don’t have raspberry preserves?
You can substitute with any fruit jam or even chocolate spread for a different flavor. Each variation can bring a new dimension to your mummy pies. - How can I make the icing colorful?
Just add a few drops of food coloring to the icing mixture to create fun, spooky colors! You can even create a Halloween theme with orange and black. - Can I prepare these pies a day in advance?
Yes! You can make them the day before and store them in an airtight container until you’re ready to serve. This is a great time-saver for busy days. - How can I prevent the filling from leaking?
Make sure to seal the edges well and avoid overfilling the pies. Taking the time to press down firmly will keep everything intact. - What’s the best way to reheat leftovers?
Reheat them in the oven at 350°F for about 10 minutes to restore their flaky texture. This will also help bring back their original flavor. - Can I make these gluten-free?
Yes! Use a gluten-free pie crust to make them suitable for gluten-sensitive eaters. There are many great gluten-free options available now.
Conclusion
I can’t wait for you to try making these Raspberry Mummy Pies! They’re not only delicious but also a fantastic way to get into the Halloween spirit with family and friends. So gather your ingredients, roll up your sleeves, and have some fun in the kitchen! These pies are bound to be a hit, and I hope they become a beloved tradition in your home, just like they have in mine. Don’t forget to share your spooky creations with me; I love seeing what you come up with! Happy baking!
Print
Raspberry Mummy Pies: A Spooktacular Treat for Halloween
- Total Time: 45 minutes
Ingredients
- 1 package (14 oz) refrigerated pie crusts: For a flaky, buttery base; you can also use homemade crust if you prefer. Using store-bought crust saves time and still delivers on flavor.
- 1 cup raspberry preserves or jam: The star of the filling; it brings a sweet and tangy flavor that’s irresistible. It’s important to choose a quality preserve for the best taste.
- 1 egg (for egg wash): This will give the pies a beautiful golden color when baked, enhancing their visual appeal. It also helps to bind the dough together.
- 1 cup powdered sugar: For the mummy icing that adds the finishing touch, making these pies even more festive. It’s the sweet detail that ties everything together.
- 1–2 tablespoons milk: To thin out the icing for drizzling, ensuring it’s the right consistency for decorating.
- Candy eyes: For that adorable, spooky touch that brings your mummies to life. They’re the perfect finishing detail that adds character and charm.
Instructions
Step 1: Preheat Your Oven
First, preheat your oven to 400°F (200°C). This will ensure your pies bake up perfectly golden and flaky. Preheating is a crucial step that helps achieve that desirable crust texture.
Step 2: Prepare the Pie Crusts
Roll out the pie crusts on a lightly floured surface. You want them to be about 1/8 inch thick. Using a round cutter or a glass, cut out circles about 4 inches in diameter. The thickness is key to achieving that perfect balance of crispy exterior and soft interior.
Step 3: Fill the Pies
Place half of the cut-out circles on a baking sheet lined with parchment paper. Spoon about a tablespoon of raspberry preserves onto the center of each circle, leaving some space around the edges to seal the pies. Be generous with the filling, but avoid overfilling to prevent leaks.
Step 4: Top and Seal
Place the remaining circles on top of the filled circles to create a top for each pie. Using a fork, press down the edges to seal them well. This will help keep the filling from leaking out while baking, ensuring a beautifully intact pie.
Step 5: Create the Mummy Look
To give your pies their signature mummy look, use a sharp knife or pizza cutter to cut thin strips from the leftover dough. Lay these strips across the tops of the pies in a crisscross pattern. It doesn’t have to be perfect—remember, mummies are supposed to look a bit spooky! The fun is in the creativity, so let your imagination run wild.
Step 6: Egg Wash
In a small bowl, beat the egg and brush it over the tops of the pies. This will give them a beautiful golden color when they bake. The egg wash also adds a nice sheen that makes your pies look extra appetizing.
Step 7: Bake the Pies
Place the baking sheet in the preheated oven and bake for 20-25 minutes or until the pies are golden brown and the filling is bubbly. Keep an eye on them as they bake; the aroma will be simply irresistible, and you’ll know they’re ready when they look golden and delicious.
Step 8: Cool and Decorate
Once baked, remove the pies from the oven and let them cool on a wire rack. While they cool, prepare the mummy icing by mixing the powdered sugar and milk until you reach a drizzle-able consistency. You can adjust the milk as needed to achieve your desired thickness. It’s a good idea to let them cool completely before icing to avoid melting.
Step 9: Add the Icing and Eyes
Once the pies are cool, drizzle the icing over the tops in a zigzag pattern to mimic mummy bandages. Finally, add candy eyes to give your mummies some character. The eyes are what make these pies come to life, so have fun placing them on each pie.
- Prep Time: 15 minutes
- Baking Time: 30 minutes
Nutrition
- Serving Size: Per Pie
- Calories: 210 kcal

