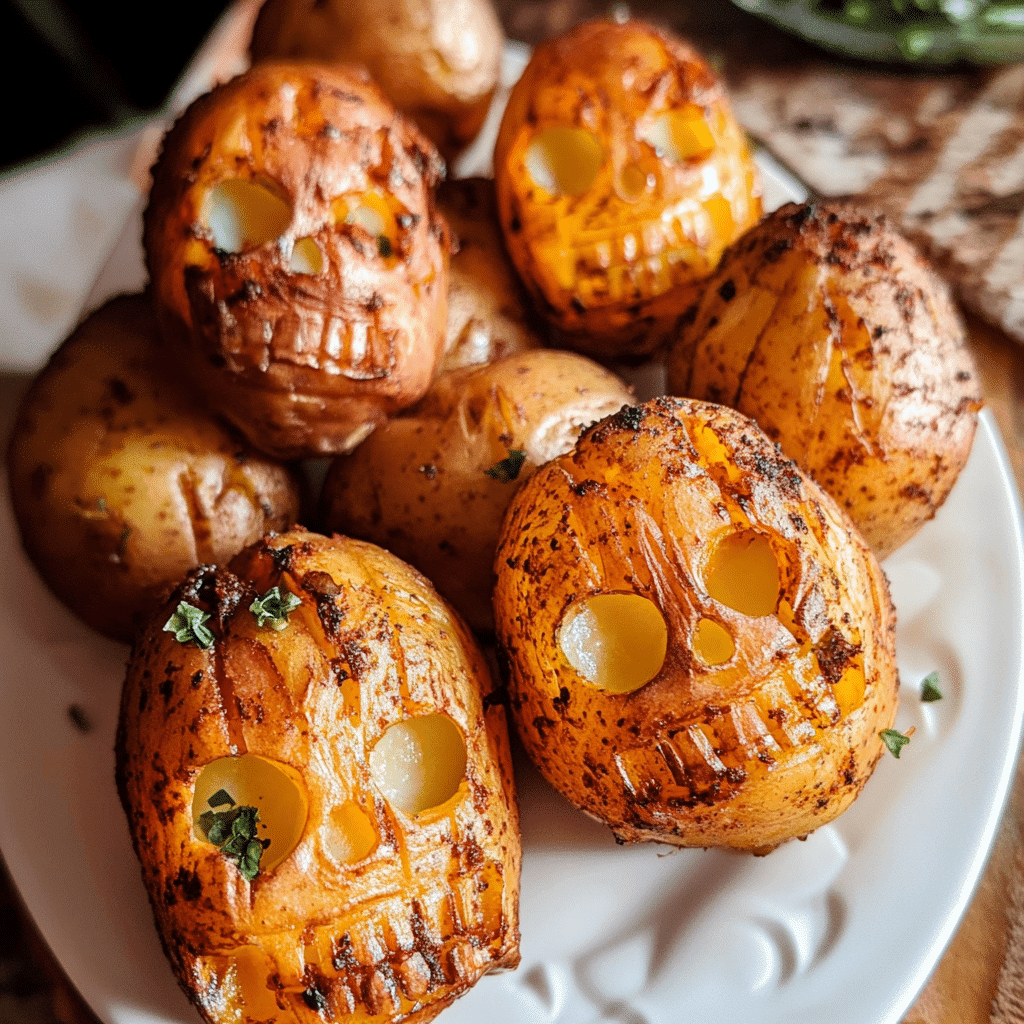
When Halloween rolls around, it’s time to have some fun with food. This year, why not add a spooky yet delicious dish to your lineup with Spooky Halloween Skull Potatoes? These skull-shaped mashed potato bites are not only a great way to bring a festive touch to your Halloween table but are also a comforting, savory treat that’s perfect for the whole family. Whether you’re hosting a Halloween party, making dinner for the kids, or simply wanting to serve up something creative, these skull-shaped potatoes are guaranteed to be a hit.
Mashed potatoes are already a family favorite, but when you mold them into spooky skull shapes, they become an instant Halloween classic. This recipe uses creamy, buttery mashed potatoes that are shaped and baked to crispy perfection in silicone skull molds. The outside gets beautifully golden and crispy while the inside stays soft and fluffy. You can customize the flavors by adding cheese, garlic, or herbs, making them as simple or as flavorful as you like.
The best part? These spooky potatoes are incredibly easy to make. If you already have mashed potatoes prepared, it’s just a matter of shaping and baking. If not, the mashed potatoes come together quickly, and with the help of a silicone mold, turning them into spooky skulls is a breeze. You can even make them ahead of time and reheat them when you’re ready to serve, making them ideal for parties and busy Halloween evenings.
Let’s dive into how to make these Spooky Halloween Skull Potatoes and add a little creepy fun to your Halloween celebration!
Why You’ll Love This Recipe
- Fun and Festive: These skull-shaped potatoes are a creative way to celebrate Halloween with your family. The kids will love the spooky shapes, and adults will appreciate the comforting, crispy potatoes.
- Customizable: You can flavor the mashed potatoes to your liking by adding cheese, herbs, bacon bits, or even a touch of spice for a more adult-friendly version.
- Easy to Make: Using silicone skull molds makes shaping the potatoes a breeze, and the recipe is simple enough that you can even get the kids involved in the kitchen.
- Make-Ahead Friendly: These can be prepared in advance and reheated before serving, making them perfect for Halloween parties or busy family dinners.
- Delicious: With a crispy exterior and a soft, fluffy interior, these potatoes are a satisfying side dish that pairs well with a variety of main courses.
Preparation Time and Servings
- Total Time: 1 hour (including cooking, shaping, and baking time)
- Active Prep Time: 20 minutes
- Servings: 6 skull potatoes (depending on the size of your mold)
- Calories per serving: Approximately 250-300 calories (depending on mix-ins)
Ingredients
- 4 large russet potatoes, peeled and cubed
- ½ cup unsalted butter
- ½ cup whole milk or cream (for creamier potatoes)
- 1 cup shredded cheddar cheese (optional, for a cheesy twist)
- 3 cloves garlic, minced (optional, for garlic mashed potatoes)
- Salt and pepper to taste
- ¼ cup chopped fresh parsley or chives (optional, for garnish)
- 2 tablespoons olive oil (for greasing the molds)
- ¼ cup grated Parmesan cheese (optional, for a crispy topping)
Step-by-Step Instructions
Step 1: Prepare the Mashed Potatoes
- Boil the Potatoes: Start by peeling and cubing the potatoes. Place them in a large pot and cover with cold water. Add a generous pinch of salt to the water and bring it to a boil over medium-high heat. Cook the potatoes for about 15-20 minutes, or until they are fork-tender. Be sure not to overcook the potatoes, as you want them to hold their shape while being mashed.
- Mash the Potatoes: Once the potatoes are fully cooked, drain them and return them to the pot. Add the butter and milk (or cream) to the potatoes and mash them until smooth. If you prefer a chunkier texture, mash the potatoes a little less to leave some small pieces. Stir in salt and pepper to taste. If you’re adding any optional ingredients, like garlic or cheddar cheese, fold them into the mashed potatoes at this point.
- Adjust Consistency: If the potatoes are too thick, add a little more milk or cream to reach your desired consistency. The potatoes should be thick enough to hold their shape but still creamy and smooth. Once your mashed potatoes are ready, let them cool slightly before moving on to the next step.
Step 2: Prepare the Skull Molds
- Grease the Molds: Preheat your oven to 400°F (200°C). Lightly grease the silicone skull molds with olive oil to ensure that the potatoes don’t stick. You can use a pastry brush or a paper towel to evenly coat the inside of each mold.
- Optional Parmesan Coating: For an extra crispy exterior, sprinkle a little grated Parmesan cheese into each mold before adding the potatoes. This adds a delicious crunch and extra flavor to the skull potatoes.
Step 3: Shape the Potatoes
- Fill the Molds: Spoon the mashed potatoes into the prepared skull molds, pressing down gently to make sure the potatoes take on the shape of the mold. Be sure to fill the molds completely and smooth the tops with a spatula.
- Create Air Pockets: To ensure the potatoes cook evenly and retain the skull shape, use the back of a spoon or your fingers to press the potatoes firmly into the molds, making sure there are no air pockets.
- Optional Toppings: If you want to add a little extra flavor, sprinkle more grated cheese or chopped herbs on top of the potatoes before baking.
Step 4: Bake the Skull Potatoes
- Bake the Potatoes: Place the filled molds on a baking sheet and bake in the preheated oven for 25-30 minutes, or until the tops of the potatoes are golden brown and crispy. If you want the potatoes to be extra crispy, you can turn on the broiler for the last 2-3 minutes of baking. Just be sure to watch them closely to avoid burning.
- Cool Slightly: Once the potatoes are done, remove the molds from the oven and allow them to cool for about 5 minutes. This cooling time will help the potatoes firm up, making them easier to remove from the molds.
Step 5: Serve the Skull Potatoes
- Unmold the Potatoes: Gently invert the skull molds onto a serving platter. If the potatoes are sticking to the molds, use a butter knife to loosen the edges before carefully removing them.
- Garnish and Serve: For a spooky finishing touch, garnish the skull potatoes with fresh herbs like parsley or chives. You can also serve them with a side of sour cream or a dipping sauce for added flavor. These potatoes make a fun and festive side dish for any Halloween meal.
How to Serve
Spooky Halloween Skull Potatoes are versatile and can be served alongside a variety of main dishes. Here are a few serving suggestions to make them even more festive:
- With a Spooky Main Dish: Serve the skull potatoes with a spooky-themed main dish, like “mummy” hot dogs, spider web pizzas, or bat-shaped chicken tenders. This will create a fun, themed meal for Halloween night.
- As a Side to Roasted Meat: These potatoes pair beautifully with roasted meats like chicken, beef, or pork. Serve them alongside a juicy roast or grilled steak for a more elegant Halloween dinner.
- With Dipping Sauces: Provide a selection of dipping sauces like sour cream, garlic aioli, or even a spicy chipotle mayo. The kids will love dipping their skull-shaped potatoes into the different sauces, and it adds another layer of flavor for the adults.
- On a Halloween Buffet: If you’re hosting a Halloween party, these skull potatoes are a great addition to a spooky buffet table. They can be served warm or at room temperature, making them easy to serve to a crowd.
Additional Tips for Success
- Use a Silicone Mold: Silicone molds are ideal for this recipe because they allow you to easily pop the potatoes out without sticking. If you don’t have skull molds, you can use any Halloween-themed silicone mold for a fun twist.
- Cool Before Unmolding: Let the potatoes cool slightly before trying to remove them from the molds. This will help them firm up and hold their shape better.
- Customize the Flavors: Don’t be afraid to play around with the flavors. Add different cheeses, herbs, or even spices like smoked paprika or cayenne for a little heat. You can also mix in cooked bacon or green onions for extra texture and flavor.
- Make Ahead: You can prepare the mashed potatoes a day in advance and store them in the refrigerator. When you’re ready to bake, fill the molds with the cold mashed potatoes and follow the baking instructions. This makes the recipe even easier, especially if you’re prepping for a Halloween party.
- Add a Crispy Topping: For extra texture, sprinkle breadcrumbs or panko on top of the potatoes before baking. This will give the potatoes a crunchy topping that contrasts nicely with the creamy interior.
Recipe Variations
- Cheesy Skull Potatoes: Mix shredded cheddar, Gruyère, or mozzarella into the mashed potatoes for an extra cheesy version of this dish. The cheese will melt and create a gooey center inside the crispy potatoes.
- Garlic Herb Potatoes: Add a few cloves of roasted garlic and fresh herbs like rosemary or thyme to the mashed potatoes for a more sophisticated flavor profile. This variation pairs wonderfully with roast chicken or beef.
- Loaded Skull Potatoes: Make these potatoes loaded by adding bacon bits, sour cream, and chives to the mashed potatoes. Top with extra cheese before baking for the ultimate indulgent Halloween side dish.
- Spicy Skull Potatoes: For a grown-up twist, add a pinch of cayenne pepper or smoked paprika to the mashed potatoes. The heat will contrast nicely with the buttery potatoes, and the spices give them an extra layer of flavor.
Freezing and Storage
To Store: These skull potatoes can be stored in an airtight container in the refrigerator for up to 3 days. To reheat, simply place them in a 350°F oven for about 10 minutes until they are warmed through and crispy again.
To Freeze: You can freeze the baked potatoes by placing them on a baking sheet and freezing until solid. Once frozen, transfer them to a freezer-safe bag or container. They will keep in the freezer for up to 3 months. To reheat, bake them from frozen in a 375°F oven for 15-20 minutes, or until heated through and crispy.
FAQ Section
Q: Can I use instant mashed potatoes for this recipe?
A: Yes, you can use instant mashed potatoes if you’re short on time. Just be sure to prepare them according to the package instructions, and make sure they’re thick enough to hold their shape in the molds.
Q: What other molds can I use if I don’t have skull molds?
A: You can use any silicone mold with a Halloween theme, like pumpkins, bats, or ghosts. If you don’t have themed molds, regular muffin tins can work as well, though they won’t have the spooky shapes.
Q: Can I make this recipe vegan or dairy-free?
A: Yes! To make this recipe vegan or dairy-free, simply substitute the butter with a plant-based alternative and use a non-dairy milk like almond or oat milk. You can also skip the cheese or use a dairy-free cheese substitute.
Q: What’s the best way to reheat the potatoes?
A: The best way to reheat these potatoes is in the oven, as it helps restore their crispy texture. Place them in a 350°F oven for 10-15 minutes until heated through and crispy on the outside.
Conclusion
Spooky Halloween Skull Potatoes are a fun and delicious way to celebrate the Halloween season with your family. These crispy, golden mashed potatoes are shaped into spooky skulls, making them a hit with kids and adults alike. Whether you’re serving them at a Halloween party or simply adding some festive flair to dinner, these potatoes are sure to delight everyone at the table.
With their customizable flavors, you can make them as simple or as indulgent as you like. Whether you go for classic mashed potatoes or add cheese, bacon, and herbs, these skull potatoes are guaranteed to be a family favorite. Plus, they’re easy to make ahead and store, so you can spend more time enjoying the Halloween fun and less time in the kitchen.
Print
Spooky Halloween Skull Potatoes: A Family Favorite
- Total Time: 45 minutes
Ingredients
- 4 large russet potatoes
- 2 tablespoons olive oil
- 1 teaspoon garlic powder
- 1 teaspoon onion powder
- 1 teaspoon paprika
- Salt and pepper to taste
- Optional: shredded cheese (for extra flavor)
- Optional: fresh herbs for garnish (like parsley or chives)
Instructions
- Preheat your oven to 425°F (220°C).
- Wash and peel the potatoes. Cut them into halves or quarters, depending on the size.
- Scoop out the center of each piece, forming a skull shape. If you have a skull mold, this is the perfect time to use it!
- In a mixing bowl, combine the olive oil, garlic powder, onion powder, paprika, salt, and pepper. Toss the potato skulls in this mixture until they’re evenly coated.
- Arrange the skull potatoes on a baking sheet lined with parchment paper. Make sure they’re not touching each other.
- Bake in the preheated oven for about 25-30 minutes, or until golden brown and crispy.
- Optional: In the last 5 minutes of baking, sprinkle shredded cheese on top of the skulls for a cheesy twist.
- Remove from the oven and let cool for a few minutes. Garnish with fresh herbs if desired.
- Prep Time: 15 minutes
- Cook Time: 30 minutes
Nutrition
- Calories: 150 kcal
- Fat: 7g
- Carbohydrates: 23g
- Protein: 2g

