Introduction
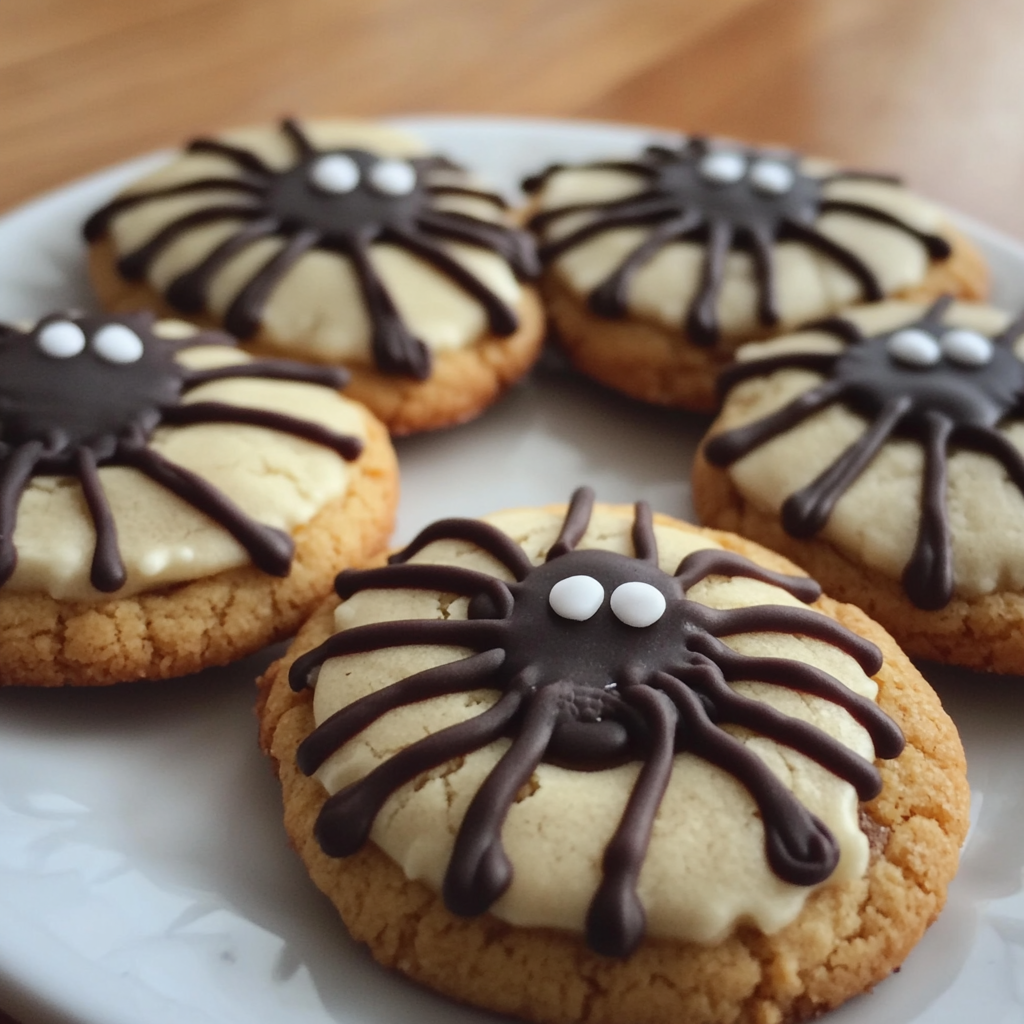
Halloween is all about fun, frights, and fantastic treats, and these Spooky Spider Cookies are the perfect way to celebrate! With their adorable spider decorations and deliciously soft texture, they’re sure to be a hit at any Halloween gathering. Imagine serving these charming cookies at your next party—everyone will be delighted to bite into a spooky surprise!
These cookies are not only delicious but also super fun to decorate. The combination of rich chocolate and vanilla flavors makes each cookie a treat, while the spider design adds a playful touch that kids and adults alike will love. Plus, they’re incredibly easy to make, so you can whip up a batch even if you’re new to baking.
I first came across this recipe during a Halloween-themed baking day with my kids. We wanted to create something that was both cute and creepy, and these spider cookies fit the bill perfectly! The laughter we shared while decorating them with chocolate and candy made it a memorable experience, and now it’s a tradition we look forward to every year. Each cookie holds a little piece of our family’s Halloween fun!
Why You’ll Love This Recipe
- Super Easy to Make: The cookie dough comes together quickly with just a few basic ingredients, making it a perfect recipe for beginner bakers.
- Fun Decoration: Let your creativity shine as you decorate these cookies. Kids will love making their spooky spider designs, and you can even turn it into a decorating contest!
- Deliciously Soft and Chewy: The combination of butter and brown sugar ensures a soft, chewy texture that melts in your mouth.
- Perfect for Sharing: These cookies are a fantastic treat for parties, school events, or just as a fun surprise for family and friends.
Picture yourself enjoying these delightful treats while sharing ghost stories or watching your favorite Halloween movie. They’re sure to add a touch of spooky sweetness to your celebrations!
Preparation Time and Servings
- Total Time: 45 minutes (15 minutes prep, 10 minutes bake, 20 minutes cooling and decorating)
- Servings: About 24 cookies
- Nutrition Facts: Calories per serving: 150, Protein: 2g, Carbs: 20g, Fat: 7g
Ingredients
Here’s what you’ll need to whip up these spooky spider cookies:
- 2 ½ cups all-purpose flour: The base of the cookies, providing structure and softness.
- 1 teaspoon baking soda: Helps the cookies rise and become fluffy.
- ½ teaspoon salt: Balances the sweetness and enhances the flavor.
- ¾ cup unsalted butter, softened: Adds richness and moisture for a chewy texture. Make sure it’s at room temperature for easy mixing!
- 1 cup brown sugar, packed: Gives the cookies a lovely caramel flavor and soft texture.
- ½ cup granulated sugar: Sweetens the cookies, complementing the brown sugar.
- 1 large egg: Acts as a binder, providing moisture and richness.
- 1 teaspoon vanilla extract: Adds classic flavor to the cookies.
- ½ cup chocolate chips: For a delicious chocolatey flavor throughout the cookie.
- Candy eyes: For decorating the spiders—these little details bring your cookies to life!
- Black licorice or chocolate strings: For making the spider legs.
Step-by-Step Instructions
Ready to bake some spooky spider cookies? Let’s get started!
- Preheat Your Oven: Preheat your oven to 350°F (175°C) to ensure even baking.
- Prepare Your Baking Sheets: Line two baking sheets with parchment paper. This will help prevent the cookies from sticking and make cleanup easy.
- Mix the Dry Ingredients:
- In a medium bowl, whisk together the flour, baking soda, and salt. Set aside.
- Cream the Butter and Sugars:
- In a large mixing bowl, cream together the softened butter, brown sugar, and granulated sugar using an electric mixer until light and fluffy, about 2-3 minutes. This step is essential for creating a soft, chewy cookie!
- Add the Egg and Vanilla:
- Beat in the egg and vanilla extract until well combined. The mixture should be smooth and creamy.
- Combine Wet and Dry Ingredients:
- Gradually add the dry mixture to the wet ingredients, mixing on low speed until just combined. Be careful not to overmix—this keeps the cookies tender.
- Stir in Chocolate Chips:
- Gently fold in the chocolate chips, distributing them evenly throughout the dough.
- Scoop the Dough:
- Using a cookie scoop or two tablespoons, drop rounded balls of dough onto the prepared baking sheets, spacing them about 2 inches apart.
- Bake:
- Bake in the preheated oven for 10-12 minutes, or until the edges are lightly golden but the centers still look soft. They’ll continue to set as they cool.
- Cool:
- Allow the cookies to cool on the baking sheets for about 5 minutes before transferring them to a wire rack to cool completely. This is essential for the best texture!
How to Serve
These spooky spider cookies are perfect for any Halloween celebration! Here are some fun serving suggestions:
- Decorate Together: Once cooled, gather your family and friends to decorate the cookies together. Use candy eyes and licorice to create fun spider designs!
- Halloween Treat Bags: Package these cookies in clear bags with Halloween-themed ties for fun treats to give away to friends and neighbors.
- Spooky Cookie Platter: Arrange the decorated cookies on a festive platter along with other Halloween treats for an eye-catching display.
- Creative Faces: Encourage everyone to come up with their own unique spider designs. You might discover some very creative ideas!
Additional Tips
Here are some helpful tips to ensure your spider cookies turn out perfectly:
- Room Temperature Ingredients: Make sure your butter and egg are at room temperature for easy blending and a smooth dough.
- Don’t Overbake: Keep an eye on the cookies while they bake. They should look slightly underbaked when you take them out—this will keep them soft!
- Storing Cookies: Store leftover cookies in an airtight container at room temperature for up to a week. They’ll stay fresh and delicious!
- Make Ahead: Prepare the dough in advance and refrigerate it for up to 2 days before baking. Just let it sit at room temperature for a few minutes before scooping.
- Use Piping Bags: For decorating, use piping bags to make precise designs with the licorice or chocolate strings. This will help you create neat spider legs!
Recipe Variations
Feel like experimenting? Here are some fun variations you can try:
- Chocolate Spider Cookies: Substitute half of the flour with cocoa powder for rich chocolate cookies. Decorate with white chocolate spider legs for a fun contrast!
- Nutty Addition: Mix in some chopped nuts like walnuts or pecans for added texture and flavor.
- Gluten-Free Option: Use a gluten-free flour blend to make these cookies suitable for gluten-sensitive friends and family.
- Different Sprinkles: Instead of licorice legs, try using colored candy melts to create unique spider legs for a vibrant twist!
Serving Suggestions
Pair these spooky spider cookies with these delightful options:
- Milk or Hot Cocoa: These classic beverages are perfect for balancing the sweetness of the cookies.
- Halloween Punch: Serve with a festive punch for an added touch of Halloween fun!
- Fruit Platter: Fresh fruit adds a refreshing contrast and vibrant colors to your dessert table.
- Ice Cream: Create ice cream sandwiches with the cookies for a deliciously fun treat!
Freezing and Storage
Here’s how to properly store and freeze your spider cookies:
- Storing Cookies: Keep baked cookies in an airtight container at room temperature for up to a week. They’ll remain soft and enjoyable!
- Freezing Baked Cookies: Freeze cookies in a single layer on a baking sheet until solid. Then transfer to a freezer-safe container for up to 3 months. Thaw at room temperature before enjoying.
- Freezing Cookie Dough: Roll the dough into balls and freeze them on a baking sheet. Once solid, transfer to a freezer-safe bag for up to 3 months. Bake from frozen, adding a couple of extra minutes to the baking time.
Special Equipment
Here are a few tools that can make your baking easier:
- Electric Mixer: A stand mixer or hand mixer is great for creaming the butter and sugars effortlessly.
- Cookie Scoop: This ensures your cookies are evenly sized, which helps them bake uniformly.
- Piping Bags: Perfect for decorating with precision, especially for the spider legs!
- Parchment Paper: This keeps cookies from sticking and makes cleanup easy. It’s a baker’s best friend!
FAQ Section
Can I use margarine instead of butter?
Yes, but butter will give the best flavor and texture. If using margarine, stick to the solid form for best results.
How can I make these cookies ahead of time?
You can prepare the dough a day in advance and refrigerate it. Bake fresh when you’re ready to enjoy them!
What if my cookies spread too much?
Make sure your butter is softened but not melted. Chill the dough before baking to help maintain their shape.
Can I decorate the cookies with royal icing?
Absolutely! Royal icing creates a firm finish for your designs. Just allow the cookies to dry completely before stacking or packaging.
Conclusion
I can’t wait
for you to try making these Spooky Spider Cookies! They’re not just a treat; they’re a fun activity that brings family and friends together. Whether you’re hosting a Halloween party or just enjoying a cozy evening at home, these cookies will add a delightful touch to your festivities. Don’t forget to snap a picture of your creepy creations and share them with me on social media—I love seeing your baking adventures! Happy Halloween and happy baking!
Print
Spooky Spider Cookies: A Halloween Delight
- Total Time: 45 minutes
Ingredients
- 2 ½ cups all-purpose flour: The base of the cookies, providing structure and softness.
- 1 teaspoon baking soda: Helps the cookies rise and become fluffy.
- ½ teaspoon salt: Balances the sweetness and enhances the flavor.
- ¾ cup unsalted butter, softened: Adds richness and moisture for a chewy texture. Make sure it’s at room temperature for easy mixing!
- 1 cup brown sugar, packed: Gives the cookies a lovely caramel flavor and soft texture.
- ½ cup granulated sugar: Sweetens the cookies, complementing the brown sugar.
- 1 large egg: Acts as a binder, providing moisture and richness.
- 1 teaspoon vanilla extract: Adds classic flavor to the cookies.
- ½ cup chocolate chips: For a delicious chocolatey flavor throughout the cookie.
- Candy eyes: For decorating the spiders—these little details bring your cookies to life!
- Black licorice or chocolate strings: For making the spider legs.
Instructions
- Preheat Your Oven: Preheat your oven to 350°F (175°C) to ensure even baking.
- Prepare Your Baking Sheets: Line two baking sheets with parchment paper. This will help prevent the cookies from sticking and make cleanup easy.
- Mix the Dry Ingredients:
- In a medium bowl, whisk together the flour, baking soda, and salt. Set aside.
- Cream the Butter and Sugars:
- In a large mixing bowl, cream together the softened butter, brown sugar, and granulated sugar using an electric mixer until light and fluffy, about 2-3 minutes. This step is essential for creating a soft, chewy cookie!
- Add the Egg and Vanilla:
- Beat in the egg and vanilla extract until well combined. The mixture should be smooth and creamy.
- Combine Wet and Dry Ingredients:
- Gradually add the dry mixture to the wet ingredients, mixing on low speed until just combined. Be careful not to overmix—this keeps the cookies tender.
- Stir in Chocolate Chips:
- Gently fold in the chocolate chips, distributing them evenly throughout the dough.
- Scoop the Dough:
- Using a cookie scoop or two tablespoons, drop rounded balls of dough onto the prepared baking sheets, spacing them about 2 inches apart.
- Bake:
- Bake in the preheated oven for 10-12 minutes, or until the edges are lightly golden but the centers still look soft. They’ll continue to set as they cool.
- Cool:
- Allow the cookies to cool on the baking sheets for about 5 minutes before transferring them to a wire rack to cool completely. This is essential for the best texture!
- Prep Time: 15 minutes
- Baking Time: 10 minutes
Nutrition
- Calories: 150 kcal
- Fat: 7g
- Carbohydrates: 20g
- Protein: 2g

