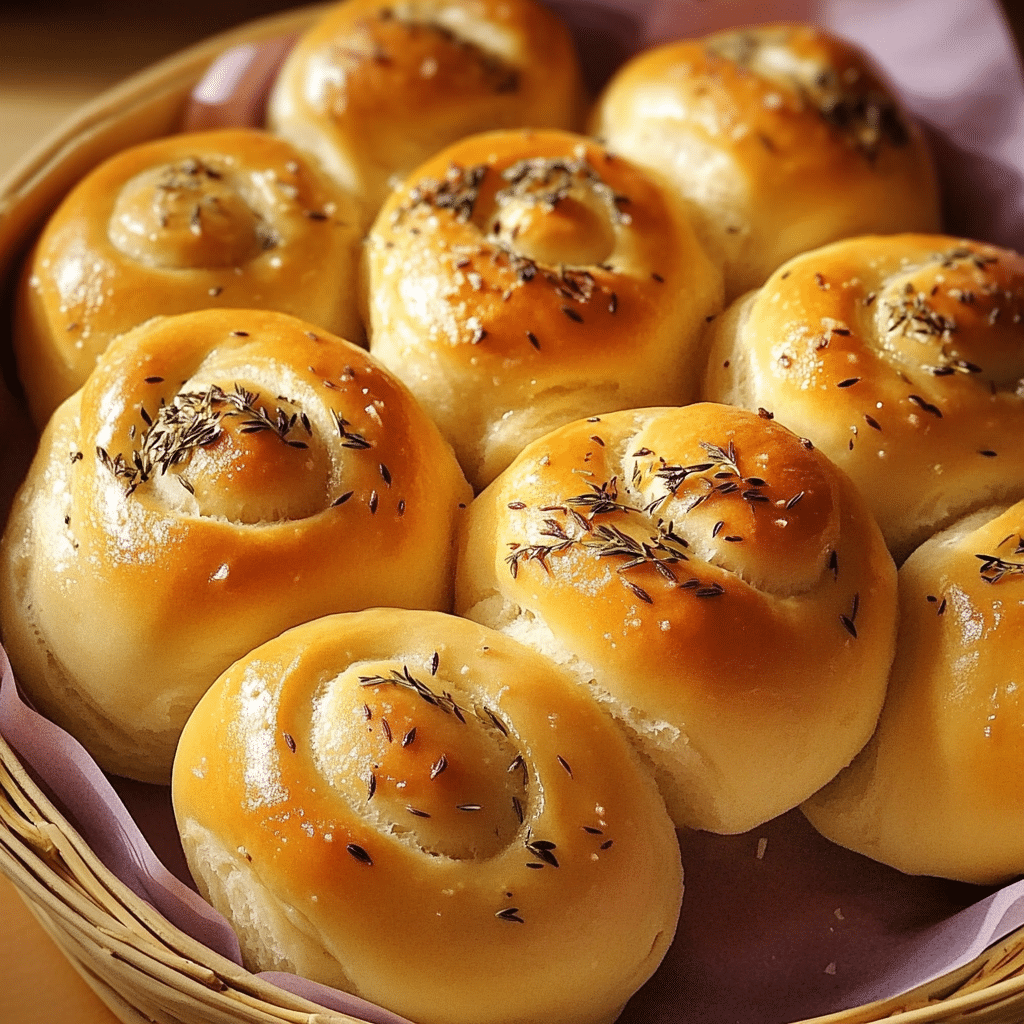
There’s something so nostalgic and comforting about homemade dinner rolls, especially when they come from a cherished family recipe. These Grandma’s Rosemary Dinner Rolls are no exception. Soft, warm, and fragrant with fresh rosemary, these rolls are perfect for any occasion—whether you’re hosting a holiday dinner, enjoying a cozy weeknight meal, or simply craving the comfort of freshly baked bread.
This recipe has been passed down through generations, and every time you make these rolls, it’s like bringing a piece of family history to life. They’re simple to make, and yet there’s something almost magical about the way they come together: a tender, buttery dough infused with fresh rosemary and baked until golden brown.
The smell alone will transport you back to your grandma’s kitchen—filled with the aroma of fresh herbs and warm bread, with the anticipation of a family meal that’s as much about sharing love as it is about the food. Let’s dive into the step-by-step guide to making these delicious rosemary dinner rolls.
Why You’ll Love This Recipe
Before we get started, here’s why these Rosemary Dinner Rolls will quickly become your go-to recipe for bread:
- Soft and Fluffy: These rolls are incredibly tender and soft, with a light and fluffy texture that’s perfect for soaking up sauces or slathering with butter.
- Fragrant with Rosemary: Fresh rosemary adds a subtle earthiness and an aromatic quality to the rolls, making them extra special.
- Perfect for Any Occasion: While they’re ideal for Thanksgiving, Christmas, or any holiday gathering, these rolls are versatile enough to accompany weeknight dinners as well.
- Freezer-Friendly: You can make these rolls ahead of time, freeze them, and warm them up when you’re ready to serve. They’re great for meal prep or when you want fresh bread without the work.
- Kid-Approved: These rolls have a mild, savory flavor that even picky eaters will love, and kids can help with the rolling and shaping of the dough.
Ingredients for Grandma’s Rosemary Dinner Rolls
This recipe uses simple, pantry-staple ingredients, but the addition of fresh rosemary elevates it to something truly special.
For the Dough:
- 3 ½ to 4 cups all-purpose flour: Start with 3 ½ cups, and add more as needed while kneading the dough.
- 1 packet (2 ¼ teaspoons) active dry yeast: This will help the rolls rise and become nice and fluffy.
- 1 cup warm milk (110°F): Warm milk helps activate the yeast and creates a softer crumb.
- ¼ cup sugar: A touch of sweetness balances out the savory flavors.
- 1 teaspoon salt: Essential for enhancing the flavor of the bread.
- 2 tablespoons fresh rosemary, finely chopped: The star of the recipe—rosemary adds a fragrant and earthy flavor.
- ¼ cup unsalted butter, melted: Butter adds richness to the dough, keeping the rolls soft and tender.
- 1 large egg: For structure and extra richness.
For the Topping:
- 2 tablespoons unsalted butter, melted: To brush on top of the rolls for a golden finish.
- 1 tablespoon fresh rosemary, finely chopped: A sprinkle of rosemary on top gives the rolls a beautiful, aromatic touch.
Step-by-Step Instructions for Making Rosemary Dinner Rolls
Ready to bake these fluffy, fragrant dinner rolls? Here’s a simple guide to follow.
Step 1: Activate the Yeast
- In a small bowl, combine the warm milk, sugar, and yeast. Stir gently and let it sit for 5-10 minutes until the mixture becomes frothy. This means the yeast is activated and ready to go.
Tip: Make sure the milk is not too hot—110°F is ideal. If it’s too hot, it can kill the yeast, and your rolls won’t rise.
Step 2: Mix the Dough
- In a large mixing bowl (or the bowl of a stand mixer), combine 3 ½ cups of flour and salt. Create a well in the center, then pour in the yeast mixture, melted butter, egg, and chopped rosemary.
- Stir until the mixture starts to come together into a shaggy dough. If you’re using a stand mixer, use the dough hook attachment to knead the dough on low speed.
Step 3: Knead the Dough
- If kneading by hand, transfer the dough to a lightly floured surface and knead for 8-10 minutes, adding more flour as needed until the dough is soft, smooth, and slightly tacky but not sticky.
- If using a stand mixer, knead on low to medium speed for 5-6 minutes, adding extra flour as necessary.
Tip: The dough should be soft and springy. It’s better to add flour gradually—too much flour can make the rolls dense, so stop adding it once the dough is smooth but still moist.
Step 4: First Rise
- Place the dough in a lightly oiled bowl, cover it with a clean kitchen towel, and let it rise in a warm place for about 1-1 ½ hours, or until it has doubled in size.
Tip: To create a warm environment, you can preheat your oven to 200°F for a few minutes, then turn it off and place the bowl inside with the oven door slightly ajar.
Step 5: Shape the Rolls
- Once the dough has risen, punch it down to release the air. Divide the dough into 12 equal pieces (or more for smaller rolls). Roll each piece into a ball by tucking the edges underneath and rolling it between your palms.
- Place the dough balls in a greased 9×13-inch baking dish or a large baking sheet, spaced slightly apart so they have room to expand.
Step 6: Second Rise
- Cover the shaped rolls with the kitchen towel again and let them rise for another 30-45 minutes, or until they have puffed up.
Step 7: Preheat the Oven
- While the rolls are on their second rise, preheat your oven to 375°F (190°C). This ensures the oven is nice and hot by the time the rolls are ready to bake.
Step 8: Bake the Rolls
- Brush the tops of the risen rolls with melted butter and sprinkle the extra chopped rosemary on top for a flavorful finish.
- Bake for 15-18 minutes, or until the rolls are golden brown and sound hollow when tapped on the bottom.
Tip: Keep an eye on them in the last few minutes. Every oven is different, and you don’t want to overbake them.
Step 9: Serve and Enjoy!
- Once the rolls are out of the oven, brush them with a little more melted butter to give them a soft, shiny top. Let them cool for a few minutes before serving, but they’re best enjoyed warm with a little extra butter on the side.
How to Serve Rosemary Dinner Rolls
These soft, herby rolls are incredibly versatile and can be served in so many ways! Here are a few ideas to get you started:
1. Thanksgiving Dinner Rolls
These rolls are perfect for Thanksgiving or Christmas dinners. They pair wonderfully with turkey, ham, mashed potatoes, and gravy. The hint of rosemary adds a festive flavor that complements holiday dishes perfectly.
2. Soup or Stew Companion
Nothing is better than dipping soft, warm dinner rolls into a bowl of hearty soup or stew. Serve these rolls alongside chicken noodle soup, beef stew, or creamy tomato soup for a comforting meal.
3. Sandwich Rolls
Use these rolls to make delicious mini sandwiches! Slice them in half and fill them with your favorite meats, cheeses, and condiments. Rosemary dinner rolls make amazing sliders for any occasion.
4. Breakfast Treat
Who says dinner rolls are only for dinner? These rosemary rolls are equally delicious at breakfast. Split them open, toast them lightly, and slather with butter or jam for a simple yet satisfying start to your day.
Tips for Perfect Rosemary Dinner Rolls
To make sure your rolls turn out soft, fluffy, and fragrant every time, here are a few helpful tips:
1. Measure Flour Correctly
Use the spoon-and-level method to measure your flour. Spoon the flour into your measuring cup, then level it off with the back of a knife. Packing flour into the cup can lead to too much flour in the dough, making the rolls dense.
2. Fresh vs. Dried Rosemary
For the best flavor, use fresh rosemary in this recipe. Dried rosemary can work in a pinch, but fresh herbs bring a more vibrant, aromatic quality to the rolls. If you’re using dried rosemary, reduce the amount to 1 tablespoon since it’s more concentrated.
3. Don’t Skip the Second Rise
The second rise is crucial for creating light, fluffy rolls. Let the rolls rise until they are nice and puffy before baking to ensure they bake up soft and airy.
4. Room Temperature Ingredients
Make sure your milk, butter, and egg are at room temperature before you start. This helps the ingredients blend together more smoothly and results in a softer dough.
5. Freezing and Storing
These rolls freeze beautifully. To freeze, bake the rolls as directed, let them cool completely, then store them in an airtight container or freezer bag for up to 3 months. To reheat, wrap them in foil and warm them in a 350°F oven for 10-15 minutes.
Recipe Variations
Looking to change things up
a bit? Here are a few fun ways to customize Grandma’s Rosemary Dinner Rolls:
1. Cheesy Rosemary Rolls
Add 1 cup of shredded Parmesan or cheddar cheese to the dough for a cheesy twist. The cheese will melt into the rolls as they bake, adding extra flavor and a gooey, cheesy texture.
2. Garlic and Rosemary Rolls
For an extra savory roll, mix 2 cloves of minced garlic into the melted butter before brushing it on top of the rolls. The combination of garlic and rosemary is irresistible!
3. Sweet Rosemary Rolls
If you prefer a slightly sweeter roll, increase the sugar in the dough to ⅓ cup. The sweet and savory combination of rosemary and sugar creates a unique and delicious flavor.
4. Rosemary Olive Rolls
For a Mediterranean-inspired variation, fold in ½ cup of chopped black or green olives into the dough. The briny olives pair beautifully with the earthy rosemary for a flavor-packed roll.
FAQ About Rosemary Dinner Rolls
Q: Can I use bread flour instead of all-purpose flour?
A: Yes, you can substitute bread flour for all-purpose flour. Bread flour will give the rolls a slightly chewier texture, but they’ll still be soft and delicious.
Q: Can I make the dough ahead of time?
A: Yes! You can prepare the dough the day before and let it rise in the fridge overnight. The cold fermentation process can actually enhance the flavor of the rolls.
Q: How long do these rolls stay fresh?
A: These rolls are best enjoyed fresh out of the oven, but they’ll stay soft for up to 3 days if stored in an airtight container. You can reheat them in the oven or microwave for that fresh-baked taste.
Q: Can I double this recipe for a larger crowd?
A: Absolutely! This recipe can easily be doubled or even tripled if you’re feeding a large group. Just make sure to use a larger baking dish or multiple pans to ensure even baking.
Conclusion
Grandma’s Rosemary Dinner Rolls are more than just bread—they’re a reminder of family traditions, home-cooked meals, and the joy of sharing food with loved ones. With their soft, fluffy texture and fragrant rosemary flavor, these rolls are the perfect accompaniment to any meal, from holiday feasts to casual dinners. Best of all, they’re easy to make and guaranteed to impress!
Whether you’re a seasoned baker or a beginner, this recipe is sure to become a family favorite that you’ll want to pass down for generations. So next time you’re in the mood for some homemade comfort, whip up a batch of these rosemary dinner rolls and enjoy the warm, cozy flavors of home.
Print
Grandma’s Rosemary Dinner Rolls
- Total Time: 0 hours
Ingredients
- 4 cups all-purpose flour (plus extra for dusting)
- 2 tablespoons granulated sugar
- 2 1/4 teaspoons active dry yeast (1 packet)
- 1 1/2 cups warm water (110°F to 115°F)
- 1/4 cup unsalted butter (melted, plus extra for brushing)
- 1 tablespoon fresh rosemary (chopped, or 1 tsp dried rosemary)
- 1 teaspoon salt
- 1 egg (for egg wash, optional)
- Olive oil (for greasing the bowl and baking dish)
- Coarse sea salt (for topping, optional)
Instructions
1. Activate the Yeast:
- In a small bowl, combine the warm water and sugar. Stir to dissolve the sugar, then sprinkle the yeast over the water. Let it sit for 5-10 minutes, or until the mixture becomes frothy. If the mixture doesn’t foam, your yeast may be expired, so it’s best to start over with fresh yeast.
2. Prepare the Dough:
- In a large mixing bowl, combine the flour and salt. Make a well in the center and add the yeast mixture, melted butter, and chopped rosemary. Stir with a wooden spoon or dough hook until the dough starts to come together.
- Once the dough is mostly combined, knead it on a floured surface for about 8-10 minutes, or until the dough is smooth and elastic. If you’re using a stand mixer, you can knead the dough with the dough hook for about 5-7 minutes.
3. Let the Dough Rise:
- Lightly grease a large bowl with olive oil and place the dough inside, turning it once to coat it in the oil. Cover the bowl with a clean kitchen towel or plastic wrap and place it in a warm spot to rise. Let the dough rise for 1-1.5 hours, or until it has doubled in size.
4. Shape the Rolls:
- Once the dough has doubled in size, punch it down to release any air bubbles. Turn the dough out onto a floured surface and divide it into 12 equal portions. Shape each portion into a smooth ball and arrange them in a greased 9×13-inch baking dish or on a large baking sheet lined with parchment paper. The rolls can be touching slightly, which will help them rise up rather than spread out.
5. Second Rise:
- Cover the rolls with a clean towel and let them rise for another 30-45 minutes, or until they have puffed up and are touching each other.
6. Bake the Rolls:
- Preheat the oven to 375°F (190°C).
- For a golden, glossy finish, you can brush the tops of the rolls with a beaten egg (optional). Melted butter works great too if you prefer a slightly softer finish.
- Bake the rolls in the preheated oven for 20-25 minutes, or until they are golden brown on top. If you want a little extra flavor, sprinkle coarse sea salt over the tops of the rolls about 5 minutes before they’re done baking.
7. Finish and Serve:
- Once the rolls are out of the oven, brush them with a little more melted butter for added flavor and a shiny finish. Let them cool for about 10 minutes before serving.
- Prep Time: 15 minutes
- Baking Time:: 20 – 25 minutes
- Cook Time: 3 hours
Nutrition
- Calories: 190 kcal
- Fat: 7g
- Carbohydrates: 28g
- Protein: 4g

