Introduction
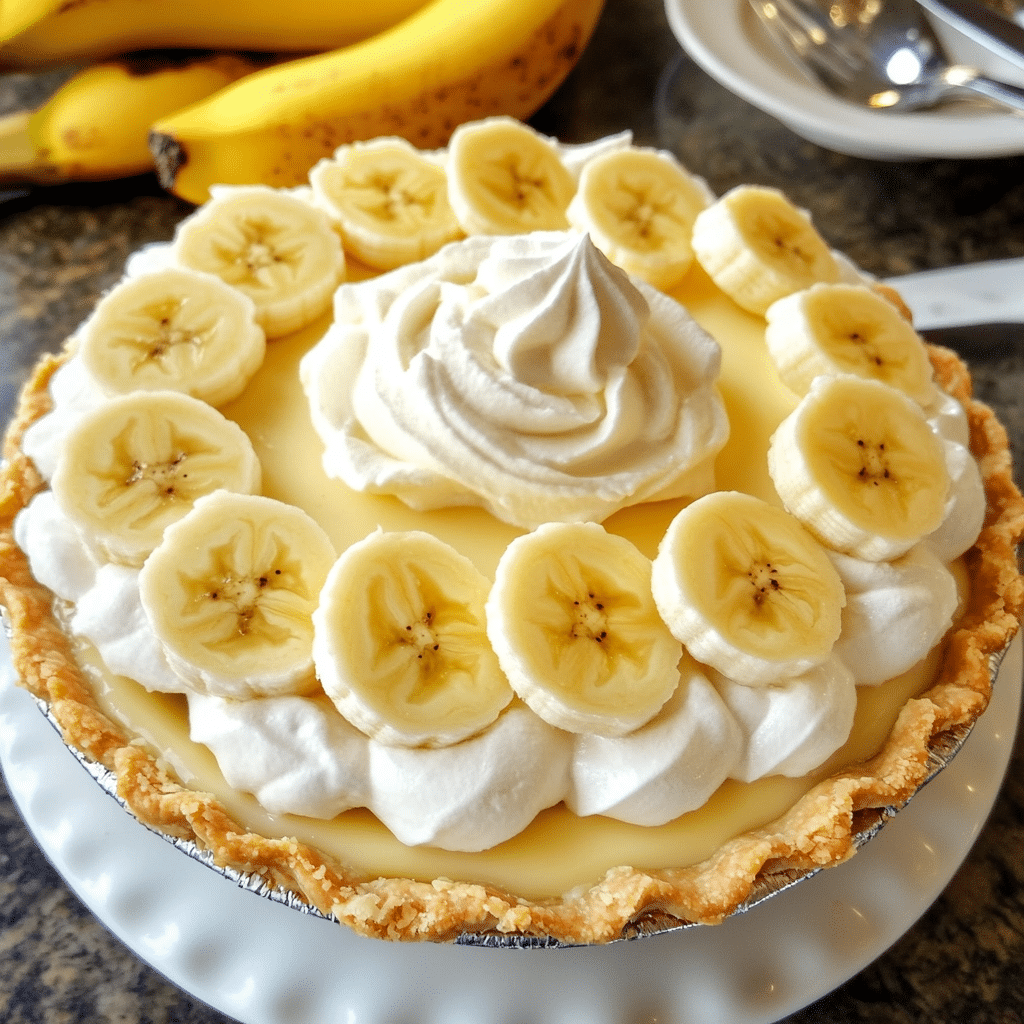
When it comes to classic desserts, few can match the nostalgic charm of Old-Fashioned Banana Cream Pie. This delightful treat features a luscious vanilla custard filling, layers of ripe bananas, and a light, fluffy whipped cream topping, all encased in a flaky pie crust. Each bite offers a perfect balance of sweetness and creaminess, evoking memories of family gatherings and sunny afternoons.
I first encountered Banana Cream Pie at a neighborhood potluck, where its creamy texture and inviting aroma instantly captured my heart. The combination of fresh bananas and velvety custard is simply irresistible. Whether for a holiday celebration or a casual weeknight dessert, this pie is sure to bring joy to your table. Join me as we explore the reasons why this recipe has stood the test of time and how to create this classic dessert from scratch!
Why You’ll Love This Recipe
- Nostalgic Flavor: The creamy custard, fresh bananas, and whipped cream evoke feelings of comfort and nostalgia, making it a beloved favorite.
- Simple Ingredients: With just a handful of everyday ingredients, this pie is easy to prepare and perfect for home bakers of all skill levels.
- Versatile Dessert: This pie is perfect for any occasion—birthdays, holidays, or simply a sweet treat after dinner.
- Beautiful Presentation: Layers of banana and whipped cream create an eye-catching dessert that’s sure to impress your guests.
- Make-Ahead Friendly: The pie can be prepared in advance, allowing for stress-free entertaining.
Preparation Time and Servings
- Total Time: 4 hours (30 minutes prep, 30 minutes cooking, 3 hours chilling)
- Servings: This recipe serves about 8 people.
- Nutrition Facts: Calories per serving: 350, Protein: 5g, Carbs: 40g, Fat: 18g.
Ingredients
For the Pie Crust:
- 1 ½ cups all-purpose flour: The base for a flaky crust.
- ½ teaspoon salt: Balances the flavors in the crust.
- ½ cup unsalted butter, chilled and diced: Creates a rich flavor and flaky texture.
- 4 to 5 tablespoons ice water: Helps bring the dough together.
For the Banana Custard Filling:
- ¾ cup granulated sugar: Sweetens the custard.
- ⅓ cup cornstarch: Thickens the custard for a creamy texture.
- ¼ teaspoon salt: Enhances the flavor.
- 2 ¾ cups whole milk: The base for a rich, creamy filling.
- 3 large egg yolks: Adds richness and depth of flavor.
- 2 tablespoons unsalted butter: Enhances creaminess.
- 1 teaspoon vanilla extract: Adds warmth and flavor.
- 2 ripe bananas: The star of the pie!
For the Whipped Cream Topping:
- 1 cup heavy whipping cream: Forms the base for the fluffy topping.
- 2 tablespoons powdered sugar: Sweetens the cream.
- 1 teaspoon vanilla extract: Enhances flavor.
Step-by-Step Instructions
STEP 1: PREHEAT THE OVEN
Start by preheating your oven to 425°F (220°C). This will ensure your pie crust bakes to a golden perfection.
STEP 2: MAKE THE PIE CRUST
In a mixing bowl, combine the flour and salt. Add the chilled, diced butter and use a pastry cutter or your fingers to work the butter into the flour until the mixture resembles coarse crumbs.
STEP 3: ADD ICE WATER
Gradually add the ice water, one tablespoon at a time, mixing gently until the dough comes together. Avoid overworking the dough to keep it tender.
STEP 4: CHILL THE DOUGH
Shape the dough into a disk, wrap it in plastic wrap, and refrigerate for at least 30 minutes. This resting time helps relax the gluten and makes the dough easier to roll out.
STEP 5: ROLL OUT THE DOUGH
Once chilled, remove the dough from the refrigerator. On a floured surface, roll it out to about 1/8-inch thick, ensuring it’s large enough to fit your pie pan.
STEP 6: PLACE IN PIE PAN
Transfer the rolled dough to a 9-inch pie pan, pressing it gently into the bottom and sides. Trim any excess dough hanging over the edges.
STEP 7: PRE-BAKE THE CRUST
To prevent the crust from puffing up during baking, line it with parchment paper and fill it with pie weights or dried beans. Bake in the preheated oven for 15 minutes. Remove the weights and parchment, then bake for an additional 5-7 minutes, or until golden brown. Let it cool completely.
STEP 8: MAKE THE CUSTARD FILLING
In a medium saucepan, whisk together the granulated sugar, cornstarch, and salt. Gradually add the milk while whisking to prevent lumps from forming.
STEP 9: COOK THE CUSTARD
Place the saucepan over medium heat and continue to whisk constantly until the mixture thickens and starts to bubble. This usually takes about 5-7 minutes.
STEP 10: TEMPER THE EGG YOLKS
In a separate bowl, lightly beat the egg yolks. Once the custard has thickened, gradually add a small amount of the hot mixture to the egg yolks while whisking continuously. This prevents the eggs from scrambling.
STEP 11: COMBINE AND COOK
Pour the tempered egg yolks back into the saucepan with the remaining custard mixture. Continue to cook for an additional 2-3 minutes, whisking constantly until the mixture is thick and smooth.
STEP 12: ADD BUTTER AND VANILLA
Remove the saucepan from the heat and stir in the butter and vanilla extract until completely melted and well combined.
STEP 13: LAYER THE BANANAS
Slice the ripe bananas and arrange them evenly at the bottom of the cooled pie crust. Pour the warm custard filling over the bananas, ensuring they are fully covered.
STEP 14: CHILL THE PIE
Cover the pie with plastic wrap and chill in the refrigerator for at least 3 hours or until the custard is set. This step is crucial for achieving the right texture.
STEP 15: MAKE THE WHIPPED CREAM
Just before serving, whip the heavy cream in a large mixing bowl until soft peaks form. Gradually add the powdered sugar and vanilla extract, continuing to whip until stiff peaks form.
STEP 16: TOP THE PIE
Once the custard is set, remove the pie from the refrigerator. Spread the whipped cream evenly over the top, creating swirls and peaks for a beautiful presentation.
STEP 17: GARNISH AND SERVE
For an extra touch, consider garnishing the whipped cream with a few banana slices or a sprinkle of crushed graham crackers. Slice the pie into wedges and serve chilled.
How to Serve
- Garnish Options: Add banana slices or chocolate shavings for a decorative touch on top of the whipped cream.
- Pairing Suggestions: This pie pairs beautifully with a cup of coffee or a scoop of vanilla ice cream.
- Serving Style: For a casual gathering, consider serving individual slices on colorful plates or in small bowls for easy serving.
Additional Tips
- Use Ripe Bananas: Choose bananas that are ripe but not overly brown for the best flavor and texture.
- Make Your Own Whipped Cream: For the freshest taste, always whip your cream from scratch. Store-bought whipped topping can work in a pinch but lacks the same flavor.
- Chill Your Mixing Bowl: For perfectly whipped cream, chill your mixing bowl and beaters in the refrigerator before whipping.
- Don’t Rush the Chilling: Allowing the pie to chill thoroughly is essential for achieving the right texture. Don’t skip this step!
- Store Properly: Leftover pie can be stored in the refrigerator for up to 3 days. Cover it well to maintain freshness.
Recipe Variations
- Add Chocolate: Drizzle chocolate syrup over the whipped cream or fold in mini chocolate chips for an extra layer of flavor.
- Nutty Flavor: Incorporate finely chopped nuts, such as walnuts or pecans, into the crust for added texture and flavor.
- Coconut Cream Version: Substitute part of the milk in the custard with coconut milk for a tropical twist.
- Bourbon Banana Cream Pie: Add a tablespoon of bourbon to the custard for a rich, adult version of this classic dessert.
- Vegan Option: Use a plant-based milk and a vegan butter substitute, and replace the egg yolks with a thickener like arrowroot or cornstarch.
Serving Suggestions
- Side Dishes: Serve alongside a light salad or fresh fruit to balance the sweetness of the pie.
- Beverage Pairing: Pair with iced tea or lemonade for a refreshing contrast to the creamy dessert.
- Kid-Friendly Option: Let kids help with decorating their slices with colorful sprinkles or fresh fruit.
Freezing and Storage
Storage
- Leftover Old-Fashioned Banana Cream Pie can be stored in an airtight container in the refrigerator for up to 3 days. Make sure to cover the pie well to prevent it from absorbing odors.
Freezing
- While it’s best to enjoy Banana Cream Pie fresh, you can freeze the custard filling separately if needed. Wrap it tightly in plastic wrap and aluminum foil. It can be frozen for up to 1 month.
Reheating
- If you have frozen custard, thaw it in the refrigerator overnight before using it in future desserts or repurposing it into smoothies.
Special Equipment
- 9-inch Pie Pan: Essential for baking the pie crust and presenting the dessert.
- Mixing Bowls: Various sizes for mixing the crust, custard, and whipped cream.
- Whisk: For combining ingredients and ensuring a smooth custard.
- Pastry Cutter or Fork: For cutting butter into flour while making the crust.
- Plastic Wrap: To cover the pie while it chills.
FAQ Section
Can I use a store-bought pie crust?
Yes, a store-bought pie crust can save time. Just follow the package instructions for baking if required.
Can I make this pie gluten-free?
Absolutely! Substitute the all-purpose flour with a gluten-free blend and use a gluten-free pie crust.
How can I tell when the custard is thick enough?
The custard should coat the back of a spoon and hold a ribbon when drizzled from the whisk.
What can I use instead of whole milk?
You can substitute with almond milk or other non-dairy milk, but this may slightly change the texture and richness.
Can I prepare this ahead of time?
Yes! You can make the crust and custard the day before, allowing the flavors to meld.
Conclusion
I hope you’re as excited to make this Old-Fashioned Banana Cream Pie as I am! This dessert is a delightful combination of flavors and textures, sure to evoke warm memories and create new ones around your table. Whether for a special occasion or just a sweet treat after dinner, this classic pie will surely impress.
Don’t forget to share your results! I can’t wait to see how your Banana Cream Pie turns out—be sure to leave a comment or tag me on social media with your delicious creations. Enjoy the baking and, most importantly, the eating!
Print
Old-Fashioned Banana Cream Pie: A Timeless Classic
- Total Time: 4 HOURS
Description
Experience the comforting nostalgia of Old-Fashioned Banana Cream Pie, a delightful dessert that layers fresh bananas with a creamy vanilla custard filling. Nestled in a perfectly flaky crust, this pie is topped with a generous swirl of whipped cream, creating a harmonious blend of flavors and textures. The sweetness of the ripe bananas, combined with the richness of the custard and the lightness of the whipped cream, makes every slice a taste of home. Ideal for holidays, potlucks, or simply as a special treat, this pie brings warmth and joy to any gathering.
Ingredients
For the Pie Crust:
- 1 ½ cups all-purpose flour: The base for a flaky crust.
- ½ teaspoon salt: Balances the flavors in the crust.
- ½ cup unsalted butter, chilled and diced: Creates a rich flavor and flaky texture.
- 4 to 5 tablespoons ice water: Helps bring the dough together.
For the Banana Custard Filling:
- ¾ cup granulated sugar: Sweetens the custard.
- ⅓ cup cornstarch: Thickens the custard for a creamy texture.
- ¼ teaspoon salt: Enhances the flavor.
- 2 ¾ cups whole milk: The base for a rich, creamy filling.
- 3 large egg yolks: Adds richness and depth of flavor.
- 2 tablespoons unsalted butter: Enhances creaminess.
- 1 teaspoon vanilla extract: Adds warmth and flavor.
- 2 ripe bananas: The star of the pie!
For the Whipped Cream Topping:
- 1 cup heavy whipping cream: Forms the base for the fluffy topping.
- 2 tablespoons powdered sugar: Sweetens the cream.
- 1 teaspoon vanilla extract: Enhances flavor.
Instructions
STEP 1: PREHEAT THE OVEN
Start by preheating your oven to 425°F (220°C). This will ensure your pie crust bakes to a golden perfection.
STEP 2: MAKE THE PIE CRUST
In a mixing bowl, combine the flour and salt. Add the chilled, diced butter and use a pastry cutter or your fingers to work the butter into the flour until the mixture resembles coarse crumbs.
STEP 3: ADD ICE WATER
Gradually add the ice water, one tablespoon at a time, mixing gently until the dough comes together. Avoid overworking the dough to keep it tender.
STEP 4: CHILL THE DOUGH
Shape the dough into a disk, wrap it in plastic wrap, and refrigerate for at least 30 minutes. This resting time helps relax the gluten and makes the dough easier to roll out.
STEP 5: ROLL OUT THE DOUGH
Once chilled, remove the dough from the refrigerator. On a floured surface, roll it out to about 1/8-inch thick, ensuring it’s large enough to fit your pie pan.
STEP 6: PLACE IN PIE PAN
Transfer the rolled dough to a 9-inch pie pan, pressing it gently into the bottom and sides. Trim any excess dough hanging over the edges.
STEP 7: PRE-BAKE THE CRUST
To prevent the crust from puffing up during baking, line it with parchment paper and fill it with pie weights or dried beans. Bake in the preheated oven for 15 minutes. Remove the weights and parchment, then bake for an additional 5-7 minutes, or until golden brown. Let it cool completely.
STEP 8: MAKE THE CUSTARD FILLING
In a medium saucepan, whisk together the granulated sugar, cornstarch, and salt. Gradually add the milk while whisking to prevent lumps from forming.
STEP 9: COOK THE CUSTARD
Place the saucepan over medium heat and continue to whisk constantly until the mixture thickens and starts to bubble. This usually takes about 5-7 minutes.
STEP 10: TEMPER THE EGG YOLKS
In a separate bowl, lightly beat the egg yolks. Once the custard has thickened, gradually add a small amount of the hot mixture to the egg yolks while whisking continuously. This prevents the eggs from scrambling.
STEP 11: COMBINE AND COOK
Pour the tempered egg yolks back into the saucepan with the remaining custard mixture. Continue to cook for an additional 2-3 minutes, whisking constantly until the mixture is thick and smooth.
STEP 12: ADD BUTTER AND VANILLA
Remove the saucepan from the heat and stir in the butter and vanilla extract until completely melted and well combined.
STEP 13: LAYER THE BANANAS
Slice the ripe bananas and arrange them evenly at the bottom of the cooled pie crust. Pour the warm custard filling over the bananas, ensuring they are fully covered.
STEP 14: CHILL THE PIE
Cover the pie with plastic wrap and chill in the refrigerator for at least 3 hours or until the custard is set. This step is crucial for achieving the right texture.
STEP 15: MAKE THE WHIPPED CREAM
Just before serving, whip the heavy cream in a large mixing bowl until soft peaks form. Gradually add the powdered sugar and vanilla extract, continuing to whip until stiff peaks form.
STEP 16: TOP THE PIE
Once the custard is set, remove the pie from the refrigerator. Spread the whipped cream evenly over the top, creating swirls and peaks for a beautiful presentation.
STEP 17: GARNISH AND SERVE
For an extra touch, consider garnishing the whipped cream with a few banana slices or a sprinkle of crushed graham crackers. Slice the pie into wedges and serve chilled.
- Prep Time: 30 minutes
- Chilling Time: 3 hours
- Cook Time: 30 minutes
Nutrition
- Calories: 350 kcal
- Fat: 18g
- Carbohydrates: 40g
- Protein: 5g

